Work Procedure
After the front camera unit or distance sensor are replaced or a problem with ProPILOT Assist is corrected, perform a test of ProPILOT Assist 1.1 operation and check that ProPILOT Assist 1.1 operates correctly.
CAUTION:
Always drive safely when performing the action test.
CHECK FOR ProPILOT ASSIST SWITCH
-
Start the engine.
-
Press the ProPILOT Assist switch
 (less than 1.5 seconds).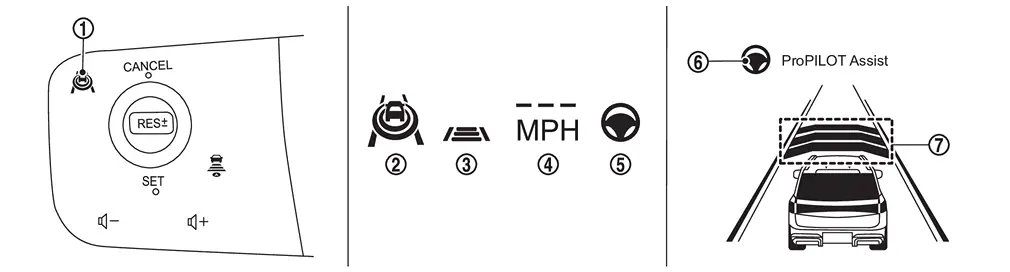
Information display status ProPILOT Assist 1.1 status indicator 
: ON (Gray) Speed control status indicator/warning 
: ON (Gray) Set vehicle speed indicator 
: “———” Steering assist status indicator 
: ON (Gray) Steering assist status indicator/warning 
: ON (Gray) Set distance indicator 
: Long mode -
Check that the vehicle information display on the combination meter indicates the set standby mode.
-
Press the ProPILOT Assist switch and check that the ProPILOT Assist 1.1 indicator turns off when ProPILOT Assist 1.1 is set to OFF.
-
Check that the ProPILOT Assist 1.1 indicator is OFF after the engine starts again.
>>
GO TO 2.
CHECK FOR DISTANCE SWITCH
-
Start the engine.
-
Press the ProPILOT Assist switch (less than 1.5 seconds).
-
Press the DISTANCE switch.
-
Check that the set distance indicator changes display in order of: (Long)→(Middle)→(Short).
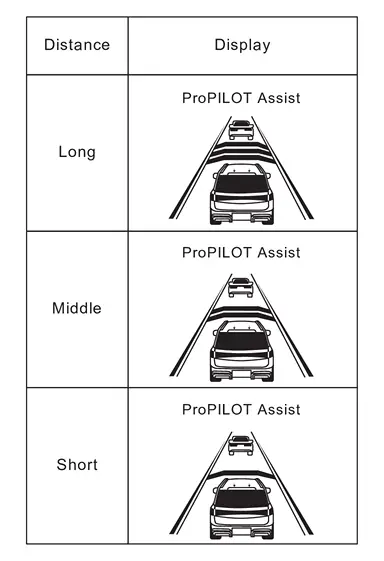
 NOTE:
NOTE:
When the ProPILOT Assist switch is turned ON, initial setting set to (Long).
>>
GO TO 3.
CHECK FOR RES+, SET-, AND CANCEL SWITCHES
-
Check that RES+, SET-, CANCEL switches are operated smoothly.
-
Check that switches come up as hand is released from the switches.
>>
GO TO 4.
SET CHECKING (1)
-
Start the engine.
-
Press the ProPILOT Assist switch (less than 1.5 seconds) and turn the ProPILOT Assist 1.1 system ON.
-
Drive the vehicle at 30 km/h (19 MPH) or more.
-
Push down the SET- switch.
-
Check that the desired speed is set and ProPILOT Assist 1.1 control starts when releasing SET- switch.
NOTE:
The set vehicle speed is indicated on the set vehicle speed indicator in the ProPILOT Assist 1.1 system display on the information display.
>>
GO TO 5.
CHECK FOR INCREASE OF CRUISING SPEED (1)
-
Set the ProPILOT Assist 1.1 at desired speed.
-
Check that the set speed increases by 1 km/h (0.6 MPH) as RES+ switch is pushed up.
NOTE:
The maximum set speed of the ProPILOT Assist 1.1 is 144 km/h (89 MPH).
CAUTION:
Never set the cruise speed exceeding the posted speed limit.
>>
GO TO 6.
CHECK FOR DECREASE OF CRUISING SPEED (1)
-
Set the ProPILOT Assist 1.1 at desired speed.
-
Check that the set speed decreases by 1 km/h (0.6 MPH) as SET- switch is pushed down.
NOTE:
The minimum set speed is approximately 30 km/h (19 MPH).
>>
GO TO 7.
SET CHECKING (2)
-
Stop the vehicle.
-
Drive the vehicle at less than approximately 30 km/h (19 MPH).
-
Push down the SET- switch when the system detects a vehicle ahead.
-
Check that the ProPILOT Assist 1.1 is performed so that the vehicle maintains a proper distance according to the vehicle speed [maximum: approximately 30 km/h (19 MPH)] when releasing SET- switch.
NOTE:
-
The ProPILOT Assist 1.1 cannot be set when the vehicle speed is less than 30 km/h (19 MPH) and when a vehicle ahead is not detected.
-
Cancel the control automatically when the system does not detect any vehicle ahead.
-
The set vehicle speed indicator in the ProPILOT Assist 1.1 system display on the information display is set to 30 km/h (19 MPH).
>>
GO TO 8.
CHECK FOR INCREASE OF CRUISING SPEED (2)
-
Set the ProPILOT Assist 1.1 when the vehicle speed is less than approximately 30 km/h (19 MPH) and when a vehicle ahead is detected.
-
Check that the set speed increases by 1 km/h (0.6 MPH) as RES+ switch is pushed up.
NOTE:
The maximum set speed of the ProPILOT Assist 1.1 is 144 km/h (89 MPH).
CAUTION:
Never set the cruise speed exceeding the posted speed limit.
>>
GO TO 9.
CHECK FOR DECREASE OF CRUISING SPEED (2)
-
Set the ProPILOT Assist 1.1 when the vehicle speed is less than approximately 30 km/h (19 MPH) and when a vehicle ahead is detected.
-
Set the set vehicle speed to the desired vehicle speed according to “check for increase of cruising speed”.
-
Check that the set speed decreases by 1 km/h (0.6 MPH) as SET- switch is pushed down.
NOTE:
The minimum the set speed is approximately 30 km/h (19 MPH).
>>
GO TO 10.
CHECK FOR CANCELLATION OF ProPILOT ASSIST 1.1
Check that the ProPILOT Assist 1.1 is canceled when performing the following operations.
-
When the brake pedal is depressed after ProPILOT Assist 1.1 is set and the vehicle is driven.
-
When the shift position is in the “N” position after ProPILOT Assist 1.1 is set and the vehicle is driven.
-
When the ProPILOT Assist switch is turned OFF after ProPILOT Assist 1.1 is set and the vehicle is driven.
-
When the CANCEL switch is pressed after ProPILOT Assist 1.1 is set and the vehicle is driven.
>>
GO TO 11.
CHECK FOR RESTORING SPEED THAT IS SET BY ProPILOT ASSIST 1.1 BEFORE CANCELLATION
Check that the vehicle restores the previous speed kept before the system deactivation when performing the following operations.
-
Drive the vehicle when the ProPILOT Assist 1.1 is set and depress the brake pedal to cancel the control. Check that the vehicle restores the previous vehicle speed kept before the system deactivation when pushing up the RES+ switch.
-
Drive the vehicle when the ProPILOT Assist 1.1 is set and shift the shift position to the “N” position to cancel the control. Check that the vehicle restores the previous vehicle speed kept before the system deactivation when shifting the shift position to the “D” position and pushing up the RES+ switch.
-
Drive the vehicle when the ProPILOT Assist 1.1 is set and press the CANCEL switch to cancel the control. Check that the vehicle restores the previous vehicle speed kept before the system deactivation when pushing up the RES+ switch.
>>
INSPECTION END
Other materials
Basic information
WARNING
Ensure that the Nissan Armada liftgate is fully closed and securely latched
before driving to prevent it from opening unexpectedly.
Never drive the Nissan Armada with the liftgate open, as harmful exhaust
gases may enter the cabin.
To reduce the risk of injury or fatal incident ...
Transfer Control Unit
Exploded View
Transfer control unit
: N·m (kg-m, in-lb)
Removal and Installation
WARNING:
Jacking up or lift up the vehicle may the vehicle height to go down which cause a personal injury and/or damage to the air suspension component parts. Refer to Precaution for when Jacking an ...
Back Door Striker
Removal and Installation
REMOVALRemove luggage rear plate. Refer to Removal and Installation.
Remove mounting TORX bolts, and then remove back door striker.INSTALLATIONNote the following items, and then install in the reverse order of removal.CAUTION:
Never reuse TORX bolt. Always replace it with ...