
Nissan Armada 2025-2026 Service and Repair Manual: Adjustment
FITTING ADJUSTMENT
Fitting Adjustment Standard Dimension
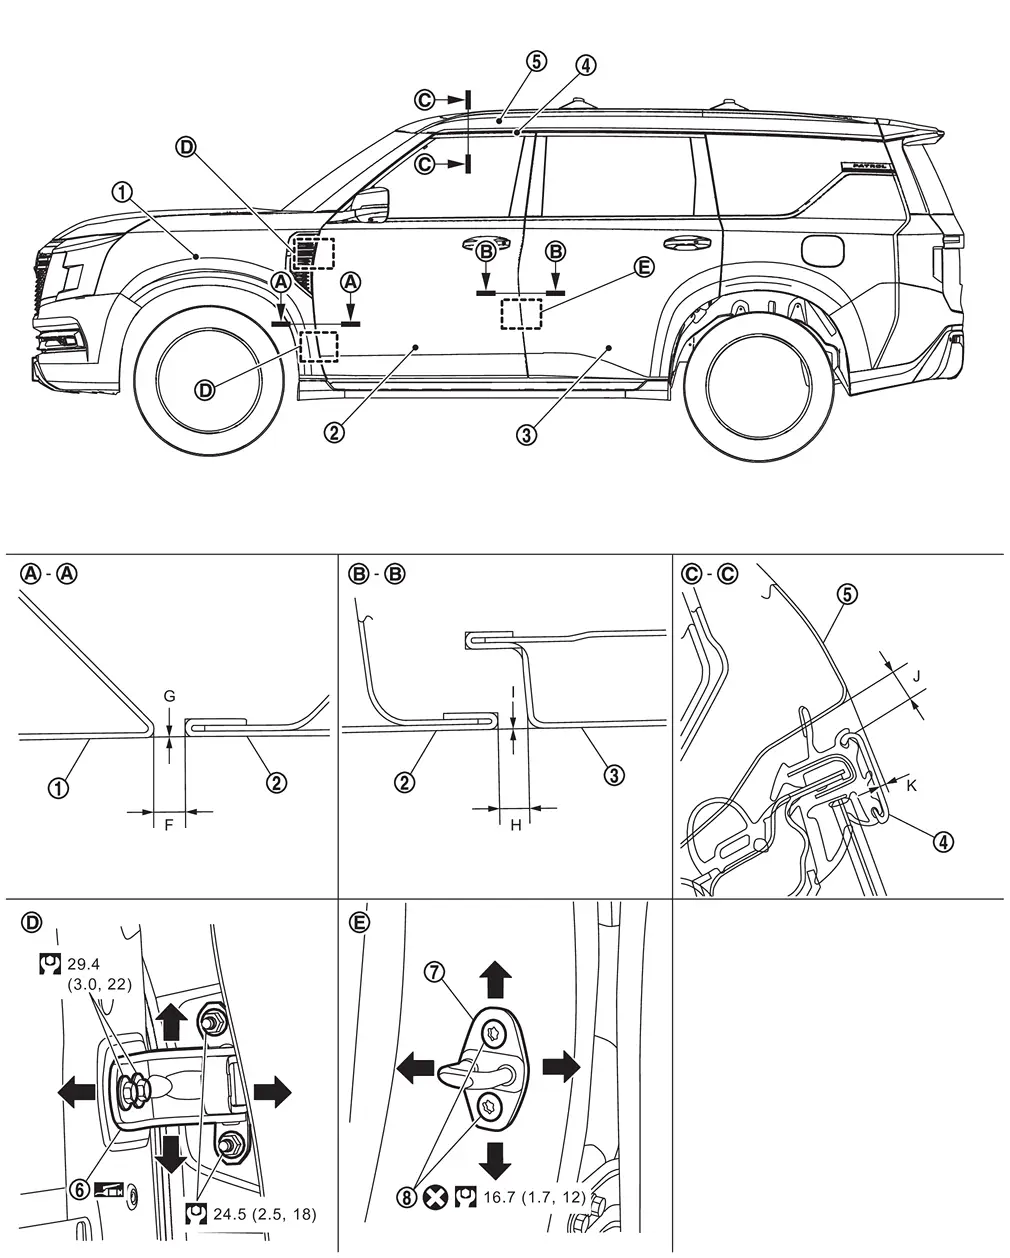
 | Front fender assembly |  | Front door panel |  | Rear door panel |
 | Front door sash molding |  | Body side outer |  | Front door hinge |
 | Front door striker |  | TORX bolt | ||
 | : Always replace after every disassembly. | ||||
 | : N·m (kg-m, ft-lb) | ||||
 | : Body grease | ||||
Unit: mm [in]
| Portion | Standard | |||
|---|---|---|---|---|
| Front door panel – Front fender assembly |  – – | F | Clearance | 4.5 ± 1.0 [0.177 ± 0.039] |
| G | Surface height | 0.0 ± 1.0 [0.000 ± 0.039] | ||
| Front door panel – Rear door panel |  – – | H | Clearance | 4.5 ± 1.0 [0.177 ± 0.039] |
| I | Surface height | 0.0 ± 1.0 [0.000 ± 0.039] | ||
| Front door sash molding – Body side outer |  – – | J | Clearance | 7.3 ± 1.8 [0.287 ± 0.071] |
| K | Surface height | 0.6 ± 1.9 [0.024 ± 0.075] | ||
Check the clearance and surface height between front door and each part by visually and touching.
Fitting Adjustment Procedure
Remove front door assembly. Refer to Removal and Installation.
Loosen front door hinge mounting bolts.
Temporary install front door panel, and then adjust the clearance of front door according to the fitting adjustment standard dimension by moving front door panel.
Remove temporary install parts, and then tighten front door hinge mounting bolts to the specified torque.
CAUTION:
When remove front door panel, never move front door hinge.
After tightening, apply touch-up paint (the body color) onto the head of hinge mounting bolts.
Install front door assembly, and then temporary tighten front door hinge mounting nuts. Refer to Removal and Installation.
Adjust the surface height of front door according to the fitting adjustment standard dimension by moving front door panel.
Tighten front door hinge mounting nuts to the specified torque.
CAUTION:
After tightening, apply touch-up paint (the body color) onto the head of hinge mounting nuts.
After installation, apply anticorrosive around the bolts and nuts to prevent rust.
After adjusting, perform the camera calibration (with around view monitor models). Refer to Work Procedure.
FRONT DOOR STRIKER ADJUSTMENT
Adjust front door striker so that it becomes parallel with door lock insertion direction.
 Inspection
Open and close front door. Check that front door hinge and front door check link rotation portion moves smoothly.
Check front door hinge rotating part for lubrication condition. Apply body grease if n ...

Other materials:
Exploded View
Front fillet molding Rear fillet molding front Rear fillet molding rear Grommet Double-sided tape
[t: 1.2 mm (0.047 in)] : Clip : Pawl : Vehicle front : Always replace after every disassembly. ...
General Specifications
BRAKE SYSTEM
Unit: mm (in)
Front brake Cylinder bore diameter 50.8 × 2 (2.000 × 2) Pad length × width × thickness 151.6 × 53.2 × 12.0 (5.97 × 2.094 × 0.47) Rotor outer diameter × thickness 350.0 × 30.0 (13.78 × 1.18) Rear brake Cylinder bore diameter 48.1 (1.894) Pad length × ...
Emission control system warranty
Your Nissan Armada is protected by comprehensive emission-related warranties
designed to ensure compliance with environmental regulations and maintain optimal
engine performance.
For USA:
Emission Defects Warranty – Covers defects in materials or workmanship that
may affect emissions s ...

0.005