
Nissan Armada 2025-2026 Service and Repair Manual: Adjustment
FITTING ADJUSTMENT
Fitting Adjustment Standard Dimension
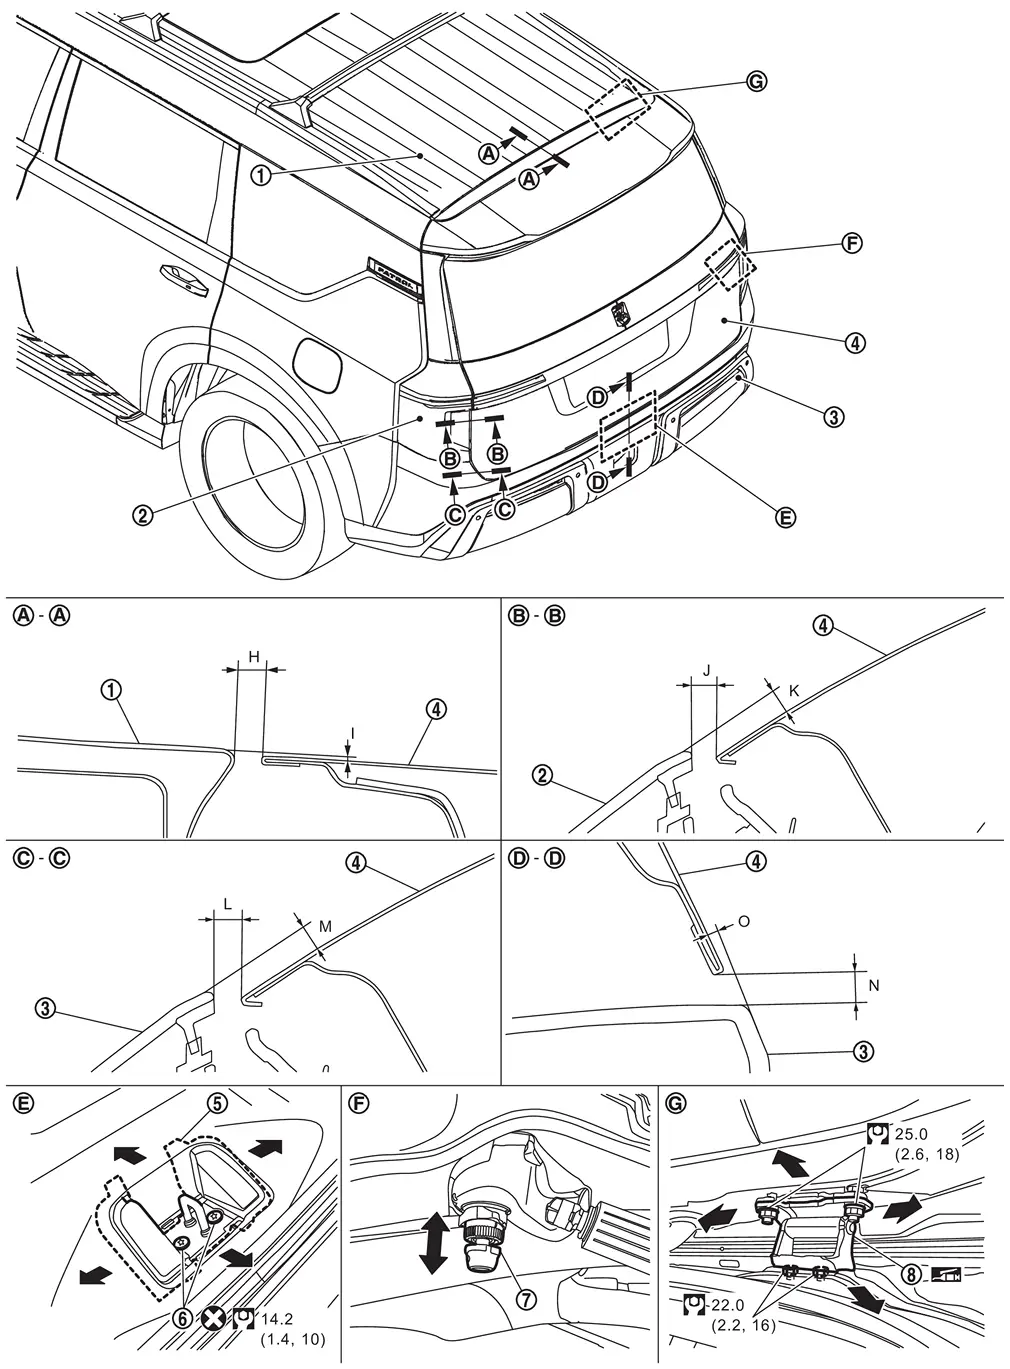
 | Roof panel |  | Rear combination lamp |  | Rear bumper fascia |
 | Back door panel |  | Back door striker |  | TORX bolt |
 | Back door bumper rubber upper |  | Back door hinge | ||
 | : Always replace after every disassembly. | ||||
 | : N·m (kg-m, ft-lb) | ||||
 | : Body grease | ||||
Unit: mm [in]
| Portion | Standard | Tolerance | Difference (LH/RH, MAX) | Parallel | ||||
|---|---|---|---|---|---|---|---|---|
| Roof panel – Back door panel |  – – | H | Clearance | 6.5 [0.256] | + 1.5 [+ 0.059] - 1.0 [- 0.039] | < 3.0 [0.118] | < 2.0 [0.079] | |
| I | Surface height | 1.0 [0.039] | ± 1.0 [± 0.039] | — | < 1.5 [0.059] | |||
| Back door panel – Rear combination lamp |  – – | J | Clearance | 5.0 [0.197] | ± 2.1 [± 0.083] | < 2.9 [0.114] | < 2.0 [0.079] | |
| K | Surface height | 1.0 - 4.4 [0.039 - 0.173] | ± 2.0 [± 0.079] | < 2.0 [0.079] | < 2.0 [0.079] | |||
| Back door panel – Rear bumper fascia |  – – | L | Clearance | 5.0 - 5.3 [0.197 - 0.209] | ± 2.0 [± 0.079] | < 3.0 [0.118] | < 2.0 [0.079] | |
| M | Surface height | 0.5 - 0.7 [0.020 - 0.028] | ± 2.0 [± 0.079] | < 2.0 [0.079] | < 2.0 [0.079] | |||
 – – | N | Clearance | 6.0 [0.236] | ± 2.0 [± 0.079] | — | < 2.1 [0.083] | ||
| O | Surface height | 0.5 - 1.0 [0.020 - 0.039] | ± 2.0 [± 0.079] | — | < 2.0 [0.079] | |||
Check the clearance and the surface height between back door and each part by seeing and touching.
Fitting Adjustment Procedure
Remove back door striker. Refer to Removal and Installation.
Loosen back door hinge mounting bolts of back door side.
Temporarily install back door striker.
CAUTION:
Never reuse TORX bolt. Always replace it with a new one when it is removed.
Adjust the clearance and surface height of back door according to the fitting standard dimension by moving back door assembly and adjusting back door bumper rubber upper.
 NOTE:
NOTE:
Adjust the back door bumper rubber upper according to the following procedure.
Turn the stopper part
counterclockwise to unlock.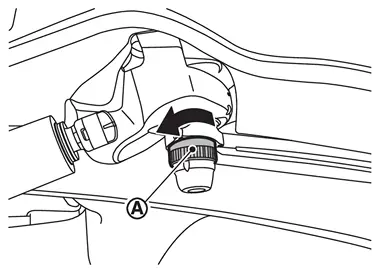
Adjust by moving the bumper rubber part
up and down.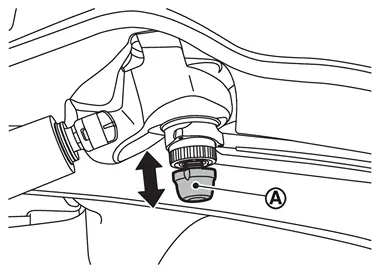
Turn the stopper part
clockwise to lock.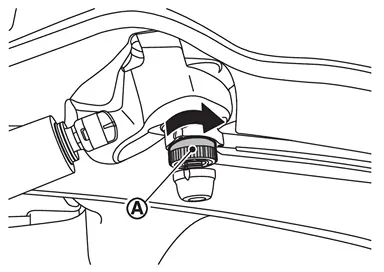
Back door bumper rubber upper height extends 1.6 mm [0.063 in] automatically when it is locked.
Tighten rear door hinge mounting nuts to the specified torque.
CAUTION:
After tightening, apply touch-up paint (the body color) if the paint around hinge and mounting nuts are peeled off during adjustment.
Before installation, apply anticorrosive agent onto mounting surface.
Position back door lock assembly and engage back door striker. Check back door lock assembly and back door striker for looseness.
Tighten back door striker mounting TORX bolts to the specified torque.
Install luggage rear plate. Refer to Removal and Installation.
CAUTION:
After adjusting, check that bumper rubber is in contact with vehicle body surely.
After adjusting, check the open/close operation. Refer to Inspection.
After adjusting, perform calibration of automatic back door position information. Refer to Work Procedure.
After adjusting, perform the camera calibration. Refer to Work Flow.
BACK DOOR STRIKER ADJUSTMENT
Adjust back door striker so that it becomes parallel with back door lock insertion direction.
 Inspection
Open and close the back door. Check that back door hinge rotation portion moves smoothly.
Check back door hinge rotating part for lubrication condition. Apply body grease if necessary.
: Body grea ...

Other materials:
Precautions for Removing Battery Terminal
NOTE:
NOTE:
NOTE:
The removal of 12V battery may cause a DTC detection error.
HOW TO DISCONNECT 12V BATTERY TERMINAL
Disconnect 12V battery terminal according to instruction described below.
Open the hood.
Turn ignition switch to the ON position.
Turn ignition switch to the OFF position with the d ...
Diagnosis Procedure
CHECK AUTO OPEN/CLOSE FUNCTION
Check auto open/close function using automatic back door switch.
Is the inspection result normal?
YES>>
GO TO 2.
NO>>
Refer to Diagnosis Procedure.
CHECK AUTOMATIC BACK DOOR CLOSE SWITCH
Check automatic back door close switch.
Refer to Component Function ...
Inside mirror
Basic information
In the Nissan Armada, adjust the inside mirror by carefully setting both its
height and angle to achieve optimal rearward visibility and driving comfort.
Manual anti-glare type (if so equipped)
The Nissan Armada manual anti-glare inside mirror can be adjusted to reduce ...

0.0053