Exploded View
REMOVAL
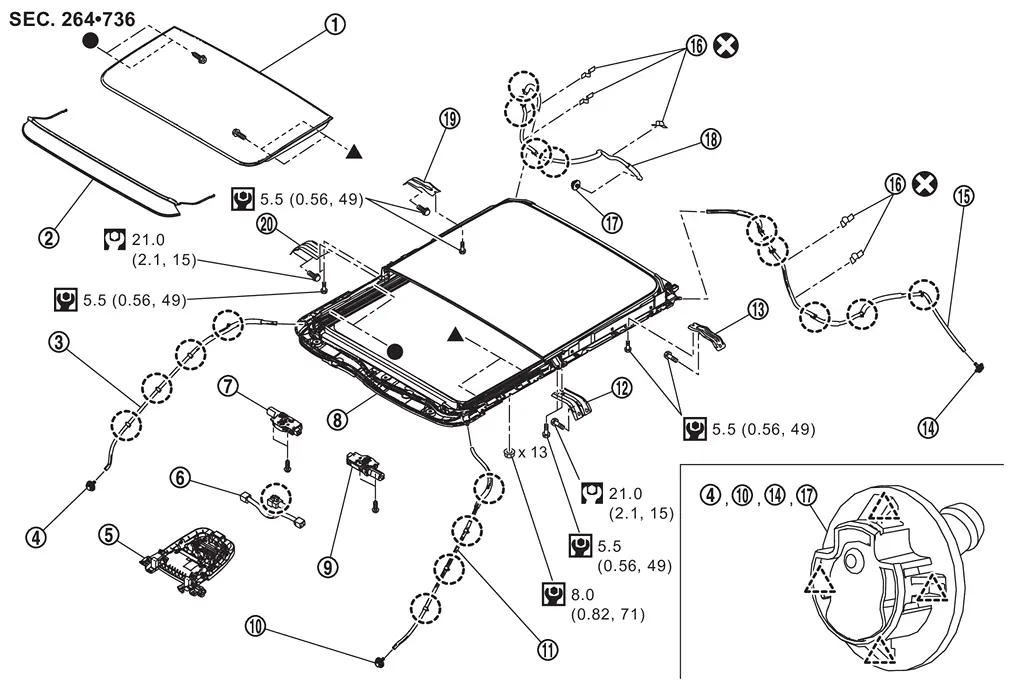
 |
Glass lid |  |
Wind deflector |  |
Front drain hose RH |
 |
Front drain connector RH |  |
Map lamp assembly |  |
Harness connector assembly |
 |
Moonroof motor assembly |  |
Moonroof unit assembly |  |
Sunshade motor assembly |
 |
Front drain connector LH |  |
Front drain hose LH |  |
Front moonroof bracket LH |
 |
Rear moonroof bracket LH |  |
Rear drain connector LH |  |
Rear drain hose LH |
 |
Protector tape |  |
Rear drain connector RH |  |
Rear drain hose RH |
 |
Rear moonroof bracket RH |  |
Front moonroof bracket RH | ||
 |
: Clip | ||||
 |
: Pawl | ||||
 |
: Always replace after every disassembly. | ||||
 |
: N·m (kg-m, in-lb) | ||||
 |
: N·m (kg-m, ft-lb) | ||||
 , : Indicates that the part is connected at points with same symbol in actual vehicle. , : Indicates that the part is connected at points with same symbol in actual vehicle. |
|||||
DISASSEMBLY
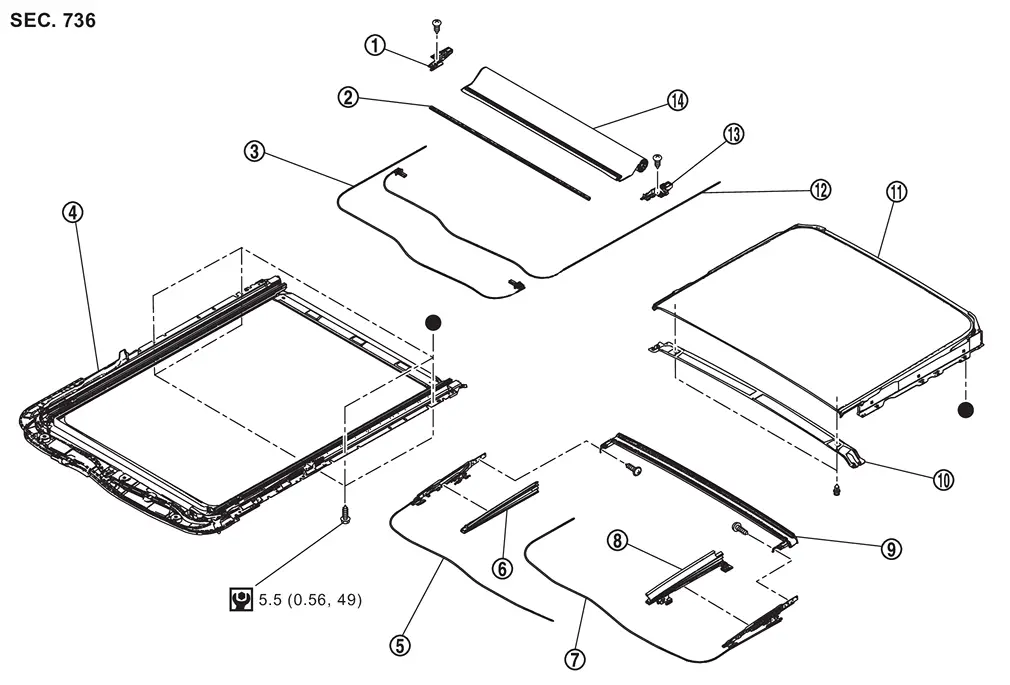
|
Sunshade base RH | |
Rollshade stay | |
Sunshade slider LH |
|
Moonroof frame assembly | |
Glass lid guide RH | |
Side trim RH |
|
Glass lid guide LH | |
Side trim LH | |
Drain assembly |
|
Center reinforce frame | |
Rear moonroof glass | |
Sunshade slider RH |
|
Sunshade base LH | |
Sunshade | ||
|
: N·m (kg-m, in-lb) | ||||
| : Indicates that the part is connected at points with same symbol in actual vehicle. |
|||||
Removal and Installation
CAUTION:
-
Always work with a helper.
-
When removing/installing moonroof unit assembly, use cloths to protect the seats and trim from damage.
REMOVAL
Remove wind deflector. Refer to Removal and Installation.
Remove glass lid. Refer to Removal and Installation.
Remove headlining. Refer to Removal and Installation.
Disconnect front and rear drain hoses from moonroof unit assembly.
Remove moonroof motor assembly. Refer to Removal and Installation.
Remove sunshade motor assembly. Refer to Removal and Installation.
Remove curtain air bag module. Refer to Removal & Installation.
Remove front moonroof bracket mounting bolts  , and then remove front moonroof bracket.
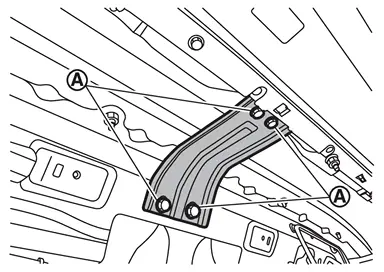
Remove rear moonroof bracket mounting bolts , and then remove rear moonroof bracket.
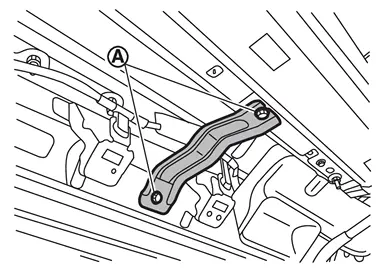
Remove moonroof unit assembly mounting nuts, and then remove moonroof unit assembly from back door opening.
INSTALLATION
Temporarily tighten the mounting nuts to the front end and side rail of moonroof unit assembly.
Temporarily tighten the mounting bolts to the front moonroof brackets and rear moonroof brackets.
Tighten the front end and side rail mounting nuts diagonally in order. For the specified torque, refer to Exploded View.
CAUTION:
Install moonroof unit assembly evenly without any distortion on moonroof unit assembly.
Tighten the mounting bolts to the rear moonroof brackets. For the specified torque, refer to Exploded View.
Tighten the mounting bolts to the front moonroof brackets. For the specified torque, refer to Exploded View.
Install curtain air bag module. Refer to Removal & Installation.
Install sunshade motor assembly. Refer to Removal and Installation.
Install moonroof motor assembly. Refer to Removal and Installation.
Connect front drain hoses and rear drain hoses.
Install headlining. Refer to Removal and Installation.
Install glass lid. Refer to Removal and Installation.
Install wind deflector. Refer to Removal and Installation.
CAUTION:
-
After installing moonroof unit assembly, perform the leak test and check that there is no malfunction.
-
After installation, perform fitting adjustment. Refer to Adjustment.
-
After installation of moonroof unit assembly, perform additional service. Refer to Description.
Disassembly and Assembly
DISASSEMBLY
Remove rear moonroof glass. Refer to Removal and Installation.
Remove sunshade. Refer to Removal and Installation.
Remove sunshade slider. Refer to Removal and Installation.
Remove drain assembly. Refer to Removal and Installation.
Remove glass lid guide. Refer to Removal and Installation.
ASSEMBLY
Assemble in the reverse order of disassembly.
Other materials
Heated seats
Basic information
WARNING
In the Nissan Armada, avoid using seat heaters if occupants are unable to
sense temperature changes or pain. Improper use may result in overheating and serious
injury.
CAUTION
Do not operate the heated seats in the Nissan Armada for extended periods
when not i ...
Hill descent control system
Basic information
WARNING
Do not rely solely on the Hill Descent Control system in the Nissan Armada
to regulate speed on steep downhill slopes. Always maintain full control of
the vehicle and use the brake pedal when necessary. Extra caution is required
on slippery, muddy, icy, or ext ...
Hood
Exploded View
Hood assembly
Hood hinge RH
Stud ball
Hood stay RH
Hood seal
Hood bumper rubber 1
Hood bumper rubber 2
Radiator core seal
Hood insulator
Hood stay LH
Hood hinge LH
: Clip
: Pawl
: Body grease
, : Indicates that the part is connected at poi ...