
Nissan Armada 2025-2026 Service and Repair Manual: Removal and Installation
CAUTION:
Perform work with 2 workers, because it is heavy weight.
Support back door with a proper material and use protective tape or shop cloth to protect back door and body from falling and damage when removing and installing back door assembly.
REMOVAL
Remove roof rear garnish. Refer toRemoval and Installation .
Disconnect LH side harness connectors  , and then disengage harness fixing clips.
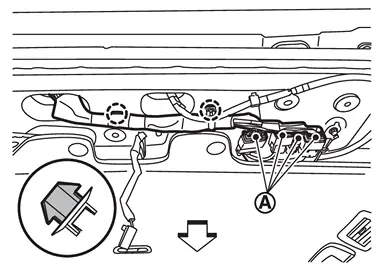
 | : Clip |
 | : Vehicle front |
Remove harness grommet from body panel, and then pull out back door harness from vehicle body.
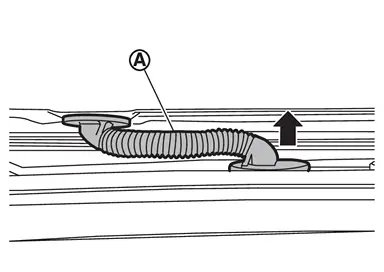
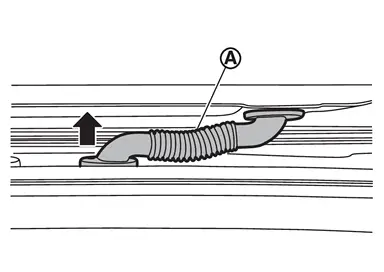
Disconnect rear washer tube B. Refer to Removal and Installation.
Remove washer tube grommet from body panel, and then pull out back door harness from vehicle body.
Support back door assembly with the proper material to prevent it from falling.
WARNING:
Injury may occur if door assembly is not supported with a proper material when removing back door assembly.
Remove spindle unit from spindle unit bracket lower (with automatic back door models). Refer to Removal and Installation.
Remove back door stay from back door stay lower bracket (without automatic back door models). Refer to Removal and Installation.
Remove back door hinge mounting nuts, and then remove back door assembly.
INSTALLATION
Note the following items, and then install in the reverse order of removal.
CAUTION:
Before installation, apply anticorrosive agent onto mounting surface.
When installation, perform the fitting adjustment. Refer to Adjustment.
After installation, check whether harness is not pinched. If harness is pinched, pull harness downward lightly.
After installation, apply touch-up paint (the body color) onto the head of back door hinge mounting nuts.
After installation, check the open/close operation. Refer to Inspection.
After installation, apply anticorrosive around the nuts to prevent rust.

 Inspection
Open and close the back door. Check that back door hinge rotation portion moves smoothly.
Check back door hinge rotating part for lubrication condition. Apply body grease if necessary.
: Body grea ...
Other materials:
Diagnosis Procedure
COMBINATION SWITCH INSPECTION
Check combination switch. Refer to Symptom Table.
Is the inspection result normal?
YES>>
GO TO 2.
NO>>
Repair or replace the malfunctioning part.
CHECK LOW BEAM REQUEST SIGNAL
With CONSULT
Select “Low beam request� in “Data Monitor� mode of “ ...
Precautions for Removing Battery Terminal
NOTE:
NOTE:
NOTE:
The removal of 12V battery may cause a DTC detection error.
HOW TO DISCONNECT 12V BATTERY TERMINAL
Disconnect 12V battery terminal according to instruction described below.
Open the hood.
Turn ignition switch to the ON position.
Turn ignition switch to the OFF position with the d ...
Driver Monitor (ProPILOT Assist 2.1)
Basic information
In the Nissan Armada equipped with ProPILOT Assist 2.1, the Driver Monitor system
plays a critical role in ensuring driver awareness and safety. Using a driver-facing
camera mounted on the steering column, the system continuously evaluates the driver’s
attentiveness by ana ...

0.0055