Exploded View
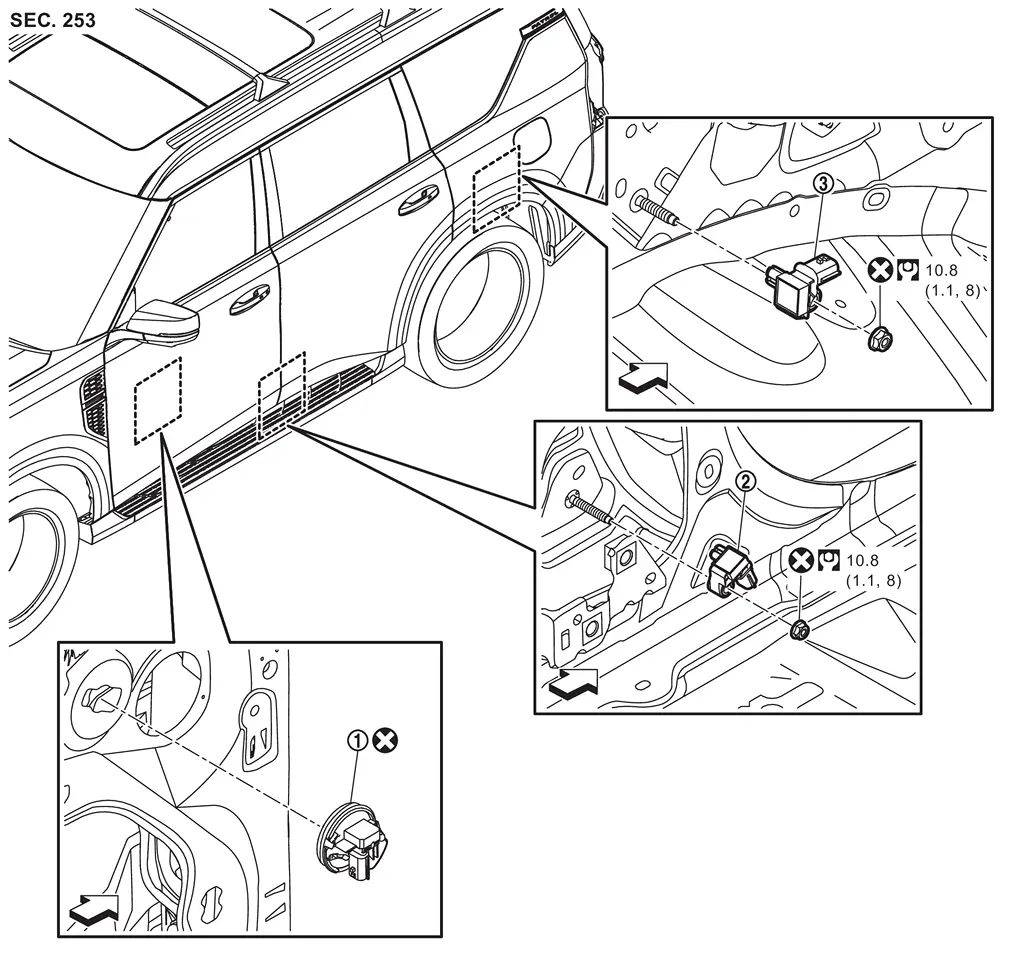
 |
Front door satellite sensor |  |
B-pillar satellite sensor |  |
C-pillar satellite sensor |
| : vehicle front | |||||
 |
: Always replace after every disassembly. | ||||
 |
: N·m (kg-m, ft-lb) | ||||
Removal and Installation
WARNING:
Always observe the following items for preventing accidental activation.
-
Before servicing, ignition switch OFF, disconnect 12V battery negative terminal and wait for 3 minutes or more (discharges electricity held in the additional power supply circuit of the air bag diagnosis sensor unit). Refer to Precautions for Removing Battery Terminal.
-
Never use air tools or electric tools for servicing.
REMOVAL
Front Door Satellite Sensor
Remove front door finisher. Refer to Removal & Installation.
Disconnect front door satellite sensor harness connector.
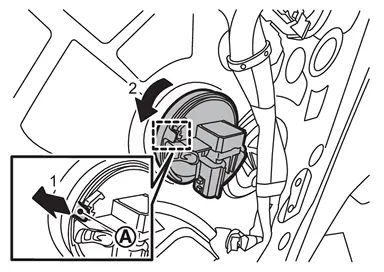
Disengage front door satellite sensor lock pin  according numerical order 1→2 indicated by arrows as shown in figure, and then remove front door satellite sensor.
B-pillar Satellite Sensor
Remove front seat belt retractor mounting anchor bolt, and then move front seat belt retractor to secure work space. Refer to Removal & Installation.
Remove B-pillar satellite sensor mounting nut, and then pull out B-pillar satellite sensor.
Disconnect B-pillar satellite sensor harness connector, and then remove B-pillar satellite sensor.
CAUTION:
-
To prevent damage to the parts, never impact the satellite sensor.

-
Replace satellite sensor if it is dropped or sustains an impact.
-
Replace satellite sensor of deployed front side air bag module, deployed front center air bag module (with front center air bag module models) and deployed curtain air bag module.
C-pillar Satellite Sensor
Remove luggage side lower finisher. Refer to Removal and Installation.
Remove rear foot duct (RH side). Refer to Removal and Installation.
Disconnect C-pillar satellite sensor harness connector.
Remove C-pillar satellite sensor mounting nut, and then remove C-pillar satellite sensor.
CAUTION:
-
To prevent damage to the parts, never impact the satellite sensor.
-
Replace satellite sensor if it is dropped or sustains an impact.
-
Replace satellite sensor of deployed front side air bag module, deployed front center air bag module (with front center air bag module models) and deployed curtain air bag module.
INSTALLATION
Note the following items, and then install in the reverse order of removal.
CAUTION:
-
Never reuse front door satellite sensor after removal, replace with new one.
-
Never reuse B-pillar and C-pillar satellite sensor mounting nut after removal, replace with the new one.
-
Never damage the harness while installing.
-
Always install normally aligning to the cutout hole, because performance of the satellite sensor excessively fluctuates according to the installation position.
-
After installation is completed, perform self-diagnosis using CONSULT and confirm if the system is normal. Refer to Work Flow.
-
After the work is completed, check that no system malfunction is detected by air bag warning lamp.
Other materials
Oil Pump
Exploded View
Oil pump drive chain
Oil pump sprocket
Oil pump drive sprocket
Oil pump drive chain tensioner
Oil pump assembly
O-ring
Oil pump seal
O-ring
Oil strainer
Comply with the installation procedure when tightening. Refer to Removal and Installation
&nb ...
Steering Wheel Turning Force Is Heavy or Light
Description
Steering wheel turning force is heavy or light.
Diagnosis Procedure
PERFORM SELF-DIAGNOSIS
With CONSULT
Pull the parking brake switch.
NOTE:
Check to make sure that the parking brake switch indicator is turned ON.
Ignition switch OFF.
Get out of the vehicle and close all doors.
W ...
Door Mirror Cover
Removal and Installation
REMOVALRemove glass mirror. Refer to Removal and Installation.
Apply protective tapes (A) on the part to protect it from damage.
Disengage door mirror cover fixing pawls from door mirror housing assembly .
: Pawl
Remove door mirror cover.INSTALLATIONNote the follow ...