Inspecton
WARNING:
-
Jacking up or lift up the vehicle may the vehicle height to go down which cause a personal injury and/or damage to the air suspension component parts. Refer to Precaution for when Jacking and Lifting Up the vehicle with Electronic Air Suspension System.
-
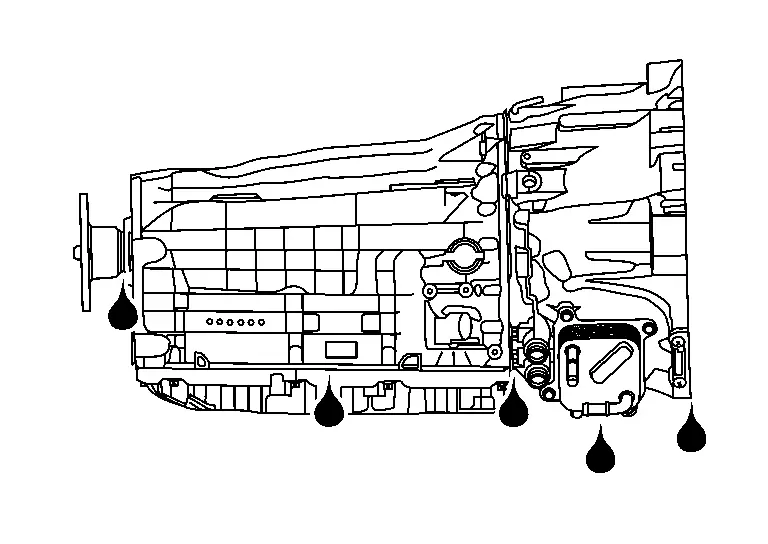
Check transmission surrounding area (oil seal and plug etc.) for fluid leakage.
-
If anything is found, repair or replace damaged parts and adjust A/T fluid level. Refer to Adjustment.
Draining
WARNING:
-
Jacking up or lift up the vehicle may the vehicle height to go down which cause a personal injury and/or damage to the air suspension component parts. Refer to Precaution for when Jacking and Lifting Up the vehicle with Electronic Air Suspension System.
Start the engine and let it run to warm up transmission.
Stop the engine.
Lift up the vehicle.
When the oil pan positioning mark  is difficult to find, mark it with paint or like beforehand.
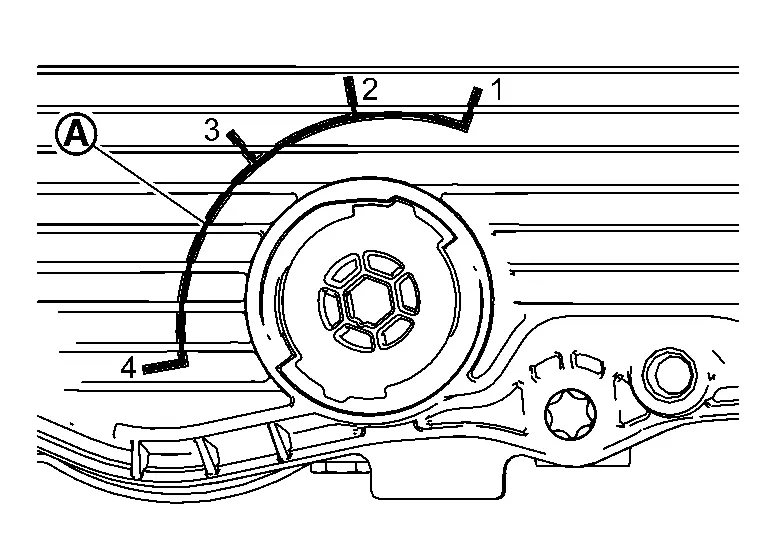
Remove the drain plug to allow fluid to drain using OFT position change wrench (SST: NI-52972–2).
Insert OFT position change wrench (SST: NI-52972–2) into the overflow tube, rotate to position (4) (Drain), then remove OFT position change wrench (SST: NI-52972–2) and let A/T fluid drain.
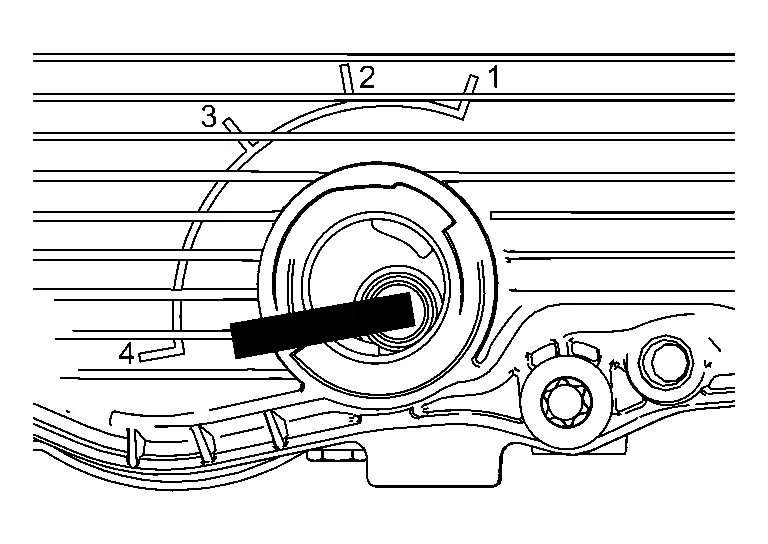
| (1) | : Closed |
| (2) | : Slow drain |
| (3) | : Overflow |
| (4) | : Drain |
 NOTE:
NOTE:
The overflow tube has a deformed hexagonal shape, the current overflow tube position determines the position for the Tool alignment.
When the flow of the A/T fluid slows to a drip, re-insert the OFT position change wrench (SST: NI-52972–2) into the overflow tube and rotate to position (1) (Closed).
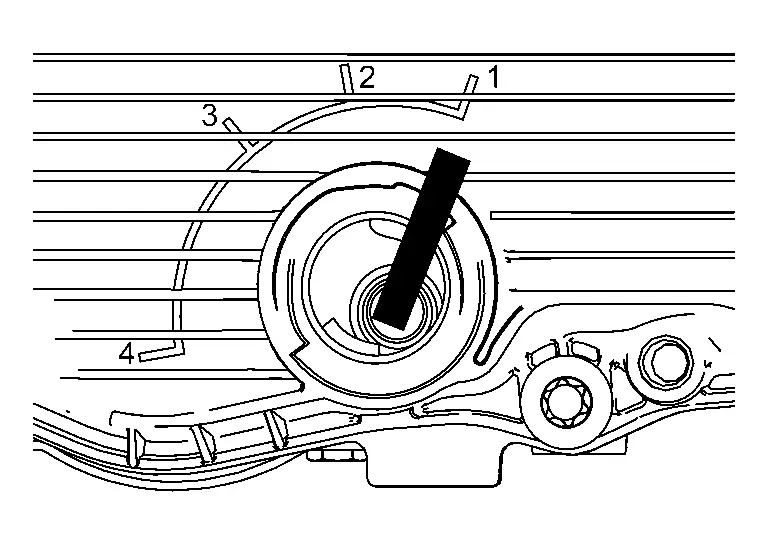
| (1) | : Closed |
| (2) | : Slow drain |
| (3) | : Overflow |
| (4) | : Drain |
Refilling
WARNING:
-
Jacking up or lift up the vehicle may the vehicle height to go down which cause a personal injury and/or damage to the air suspension component parts. Refer to Precaution for when Jacking and Lifting Up the vehicle with Electronic Air Suspension System.
| Recommended fluid and fluid capacity | Refer to Fluids and Lubricants. |
CAUTION:
-
Use only recommended A/T fluid. Never mix with other A/T fluid.
-
Using A/T fluid other than recommended A/T fluid will cause deterioration in driveability and A/T durability, and may damage the A/T, which is not covered by the NISSAN new vehicle limited warranty.
-
When filling A/T fluid, be careful not to spill fluid on heat generating parts such as exhaust.
Lift up the vehicle.
When the oil pan positioning mark is difficult to find, mark it with paint or like beforehand.
When the drain plug is installed to the oil pan, remove it with OFT position change wrench (SST: NI-52972–2).
Insert OFT position change wrench (SST: NI-52972–2) into the overflow tube, and check that the overflow tube is in position (1) (close).
| (1) | : Closed |
| (2) | : Slow drain |
| (3) | : Overflow |
| (4) | : Drain |
NOTE:
The overflow tube has a deformed hexagonal shape, the current overflow tube position determines the position for the Tool alignment.
Install the A/T fluid injection plug (SST: NI-52972–1) and charge pipe adapter set (SST: NI-52584) to the oil pan.
Continue filling A/T fluid into the oil pan until A/T fluid comes out from the charging pipe.
Remove the A/T fluid injection plug (SST: NI-52972–1) and charge pipe adapter set (SST: NI-52584) from the oil pan.
Install the drain plug and tighten it to the specified torque.
| Drain plug | : 6 N·m (0.61 kg-m, 53 in-lb) |
CAUTION:
-
Replace with new O-ring of drain plug after adjusting A/T fluid level.
-
Never overtighten the drain plug.
Check ATF degradation level. (When the control valve & TCM are not replaced.)
-
Select "Data Monitor" in "TRANSMISSION" using CONSULT.
-
Select “ATF degradation level”.
-
When ATF degradation level is 77,000 or less, adjust A/T fluid level. Refer to Adjustment.
-
When ATF degradation level is 77,001 or more, change A/T fluid into fresh one. Refer to Changing. (Start the procedure from step 13 of "Changing.")
-
Changing
WARNING:
-
Jacking up or lift up the vehicle may the vehicle height to go down which cause a personal injury and/or damage to the air suspension component parts. Refer to Precaution for when Jacking and Lifting Up the vehicle with Electronic Air Suspension System.
| Recommended fluid and fluid capacity | Refer to Fluids and Lubricants. |
CAUTION:
-
Use only recommended A/T fluid. Never mix with other A/T fluid.
-
Using A/T fluid other than recommended A/T fluid will cause deterioration in driveability and A/T durability, and may damage the A/T, which is not covered by the NISSAN new vehicle limited warranty.
-
When filling A/T fluid, be careful not to spill fluid on heat generating parts such as exhaust.
Start the engine.
Adjust the A/T fluid temperature to be approximately 50°C (122°F).
NOTE:
Check with “Fluid temperature” in “TRANSMISSION” using CONSULT.
Stop the engine.
Lift up the vehicle.
When the oil pan positioning mark is difficult to find, mark it with paint or like beforehand.
Remove the drain plug to allow fluid to drain using OFT position change wrench (SST: NI-52972–2).
Insert OFT position change wrench (SST: NI-52972–2) into the overflow tube, rotate to position (4) (Drain), then remove OFT position change wrench (SST: NI-52972–2) and let A/T fluid drain.
| (1) | : Closed |
| (2) | : Slow drain |
| (3) | : Overflow |
| (4) | : Drain |
NOTE:
The overflow tube has a deformed hexagonal shape, the current overflow tube position determines the position for the Tool alignment.
When the flow of the A/T fluid slows to a drip, re-insert the OFT position change wrench (SST: NI-52972–2) into the overflow tube and rotate to position (1) (Closed).
Install the A/T fluid injection plug (SST: NI-52972–1) and charge pipe adapter set (SST: NI-52584) to the overflow tube.
Continue filling A/T fluid into the oil pan until A/T fluid comes out from the charging pipe.
Remove the A/T fluid injection plug (SST: NI-52972–1) and charge pipe adapter set (SST: NI-52584) from the oil pan.
Install the drain plug and tighten it to the specified torque.
| Drain plug | : 6 N·m (0.61 kg-m, 53 in-lb) |
CAUTION:
Never overtighten the drain plug.
Lower the vehicle.
Check that the shift position is in the "P" position, then completely engage the parking brake.
Start the engine and let it idle for 3 minutes.
Stop the engine.
Repeat steps 4 – 13 (one time).
Start the engine.
Adjust the A/T fluid temperature to be approximately 50°C (122°F).
NOTE:
Check that the “Fluid temperature” in “Data Monitor” is between 45°C (113°F) and 55°C (131°F) using CONSULT.
Lift up the vehicle.
Remove the drain plug to access the overflow tube using OFT position change wrench (SST: NI-52972–2).
Insert OFT position change wrench (SST: NI-52972–2) into the overflow tube, rotate to position (3)(overflow), remove OFT position change wrench (SST: NI-52972–2), and continue draining A/T fluid until it becomes drops.
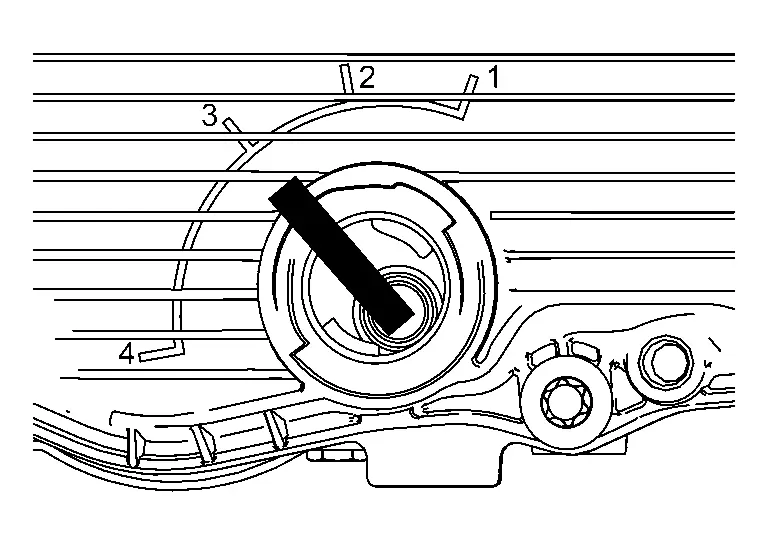
| (1) | : Closed |
| (2) | : Slow drain |
| (3) | : Overflow |
| (4) | : Drain |
Insert OFT position change wrench (SST: NI-52972–2) into overflow tube and rotate to position (1) (Closed).
Install the drain plug and tighten it to the specified torque.
| Drain plug | : 6 N·m (0.61 kg-m, 53 in-lb) |
CAUTION:
-
Never over tighten the drain plug.
-
Never reuse O-ring.
Clear the deterioration level data of A/T fluid. (When the control valve & TCM has not been replaced.)
-
Select "Work Support" in "TRANSMISSION" using CONSULT.
-
Select "CONFIRM ATF DETERIORATION".
-
Touch "Start".
-
Touch "Clear".
Work end.
Adjustment
WARNING:
-
Jacking up or lift up the vehicle may the vehicle height to go down which cause a personal injury and/or damage to the air suspension component parts. Refer to Precaution for when Jacking and Lifting Up the vehicle with Electronic Air Suspension System.
| Recommended fluid and fluid capacity | : Refer to Fluids and Lubricants. |
CAUTION:
-
Use only recommended A/T fluid. Never mix with other A/T fluid.
-
Using A/T fluid other than recommended A/T fluid will cause deterioration in driveability and A/T durability, and may damage the A/T, which is not covered by the NISSAN new vehicle limited warranty.
-
When filling A/T fluid, be careful not to spill fluid on heat generating parts such as exhaust.
-
Always maintain the A/T fluid temperature within between 45°C (113°F) and 55°C (131°F) while checking with CONSULT when the A/T fluid level adjustment is performed.
Check that the shift position is in the "P" position, then completely engage the parking brake.
Start the engine.
Adjust the A/T fluid temperature to be approximately 50°C (122°F).
NOTE:
Check that the "Fluid temperature" in "Data Monitor" is between 45°C (113°F) and 55°C (131°F) using CONSULT.
Lift up the vehicle.
When the oil pan positioning mark is difficult to find, mark it with paint or like beforehand.
Remove the drain plug to access the overflow tube using OFT position change wrench (SST: NI-52972–2).
Install the A/T fluid injection plug (SST: NI-52972–1) and charge pipe adapter set (SST: NI-52584) into the oil pan.
Continue filling A/T fluid into the oil pan until A/T fluid comes out from the charging pipe.
Remove the A/T fluid injection plug (SST: NI-52972–1) and charge pipe adapter set (SST: NI-52584) from the oil pan.
Insert OFT position change wrench (SST: NI-52972–2) into the overflow tube, rotate to position (3)(overflow), remove OFT position change wrench (SST: NI-52972–2), and continue draining A/T fluid until it becomes drops.
| (1) | : Closed |
| (2) | : Slow drain |
| (3) | : Overflow |
| (4) | : Drain |
NOTE:
The overflow tube has a deformed hexagonal shape, the current overflow tube position determines the position for the OFT position change wrench (SST: NI-52972–2) alignment.
Insert OFT position change wrench (SST: NI-52972–2) into the overflow tube and rotate to position (1) (Closed).
| (1) | : Closed |
| (2) | : Slow drain |
| (3) | : Overflow |
| (4) | : Drain |
Install the drain plug and tighten it to the specified torque.
| Drain plug | : 6 N·m (0.61 kg-m, 53 in-lb) |
CAUTION:
-
Never over tighten the drain plug.
-
Never reuse O-ring
Work end.
Other materials
Fuel-filler door
Basic information
CAUTION
Avoid directing high-pressure water, such as from a pressure washer,
onto or around the Nissan Armada fuel-filler door area.
Always ensure the fuel-filler door is securely closed before using an
automatic or high-pressure car wash.
Opening the fuel-filler do ...
Rear Door Parting Seal
Removal and Installation
REMOVALRear Door Parting Seal FrontFully open rear door.
Remove rear door parting seal front clip.Apply protective tape (A) to rear door panel around rear door parting seal front clip for preventing damage.
Disengage fixing pawls using a remover tool (A), and then remove re ...
Door Mirror Assembly
Removal and Installation
REMOVALCAUTION:
Never damage the front door panel and any parts.Remove front door sash inner cover. Refer to Removal & Installation.
Disconnect door mirror assembly harness connectors and .
NOTE:
Harness connector : Side camera harness connector (with side camera)
Remo ...