Removal and Installation
CAUTION:
Never damage the back door panel.
REMOVAL
CAUTION:
When removing, always use a remover tool that is made of plastic to prevent damage to the parts.
Remove back door pull handle. Refer to Removal and Installation.
Remove back door finisher cap (without automatic back door system models) or automatic back door switch finisher (with automatic back door system models).
- Back door finisher cap: Refer to Removal and Installation.
- Automatic back door switch finisher: Refer to Removal and Installation.
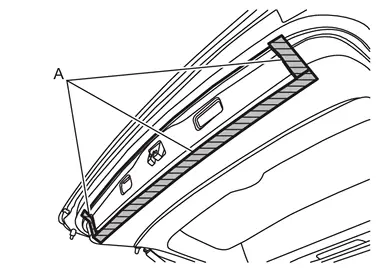
Apply protective tapes (A) on back door inner finisher to protect it from damage.
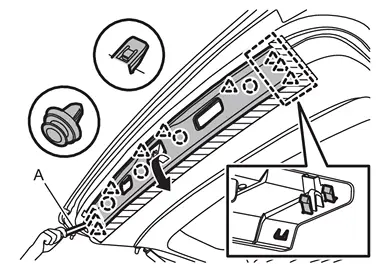
Disengage back door lower finisher fixing clips and pawls using a remover tool (A), and then back door lower finisher.
 |
: Clip |
 |
: Pawl |
INSTALLATION
Note the following items, and then install in the reverse order of removal.
CAUTION:
-
Visually check clips for deformation and damage during installation. Replace with new ones if necessary.
-
Check in advance that clips and pawls are accurately aligned with the portions on back door panel, and then install by pressing in.
Other materials
Vr35ddtt
Starter Motor
Engine
VR35DDTT
Type
M001TF1771
MITSUBISHI make
Reduction gear type
System voltage
(V)
12
No-load
Terminal voltage
(V)
11
Current
(A)
Less than 110
Revolution
(rpm)
More than 2,890
Clearance "L" between pinion front edge and pinion stopper
...
Body Side Trim
Exploded View
Rear body side welt
Assist grip
Center pillar upper garnish
Front body side welt
Front pillar garnish
Assist grip
Front kicking plate
Dash trim clip
Dash side finisher
Harness protector
Front side bracket
Center pillar lower garnish
Center pill ...
Diagnosis and Repair Work Flow
Work Flow
OVERALL SEQUENCEDETAILED FLOWINTERVIEW FOR MALFUNCTION
It is also important to clarify the customer concerns before starting the inspection. Interview the customer about the concerns carefully and understand the symptoms fully.
NOTE:
The customers are not professionals. Never assume that â ...