Removal and Installation
WARNING:
-
Before servicing, disconnect ground line of battery. Refer to Precautions for Removing Battery Terminal.
-
Prevent accidental activation. Refer to Precaution for Supplemental Restraint System (SRS) "AIR BAG" and "SEAT BELT PRE-TENSIONER".
REMOVAL
Remove lap anchor.Insert appropriate tool (A) from the top hole to the internal stopper position.
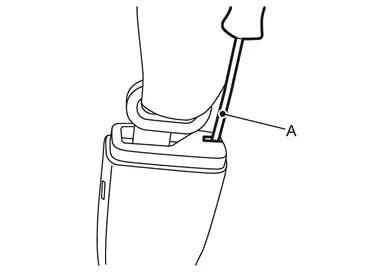
 NOTE:
NOTE:
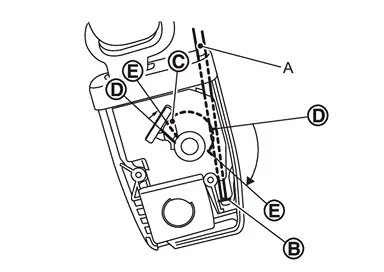
When insert appropriate tool (A) to stopper position  , the cam
  rotates from
  position to
  position.
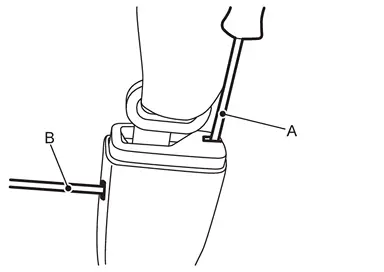
NOTE:
The lock is unlocked when the lock pin is moved to the position using an appropriate tool (B).
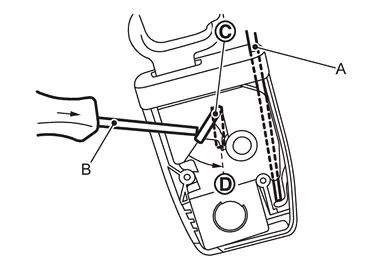
| A | : Appropriate tool |
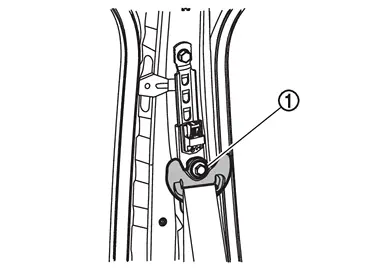
Remove shoulder anchor.Remove center pillar upper garnish. Refer to Removal and Installation. Remove shoulder anchor mounting anchor bolt  , and then remove shoulder anchor.
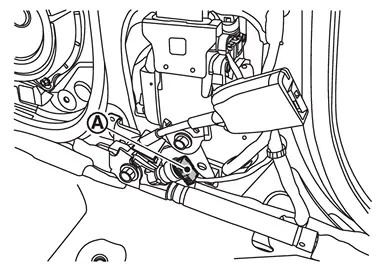
Remove lap pre-tensioner.Disconnect lap pre-tensioner harness connector  .
.
CAUTION:
Never damage harness connector.
NOTE:
Insert remover tool (A) wrapped in tape between connector and lever , and then disconnect harness connector while moving the lever.
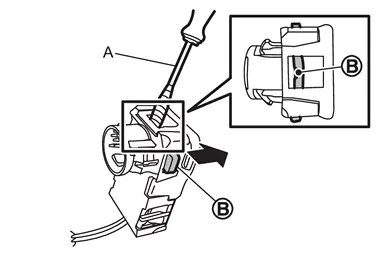
, and then remove lap pre-tensioner.
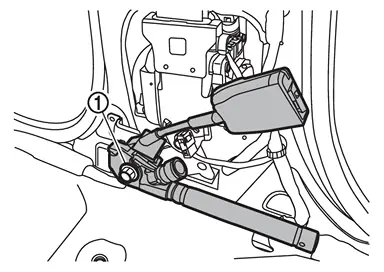
Remove seat belt pre-tensioner retractor.Disconnect seat belt pre-tensioner retractor harness connector .
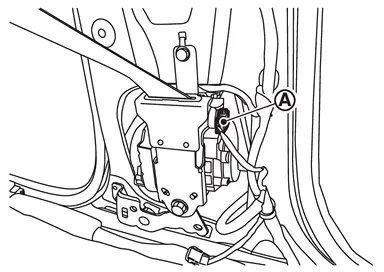
CAUTION:
Never damage harness connector.
NOTE:
Insert remover tool (A) wrapped in tape between connector and lever , and then disconnect harness connector while moving the lever.
and bolt , and then remove seat belt pre-tensioner retractor.
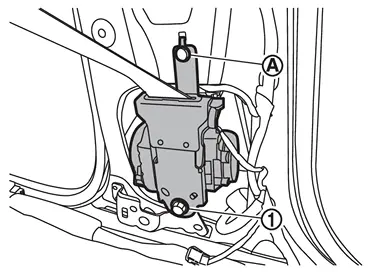
CAUTION:
Never place seat belt pre-tensioner retractor in an area where the temperature reaches 80°C (176°F) or more.
Remove seat belt adjuster mounting anchor bolts , and then remove seat belt adjuster.
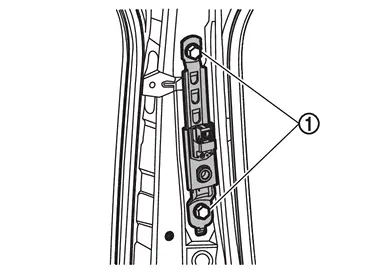
INSTALLATION
Note the following item, and then install in the reverse order of removal.
CAUTION:
When connect harness connector, press harness connector until the clicking sound.
Inspection
AFTER A COLLISION
WARNING:
To avoid the risk of death or severe injury:
-
Inspect all seat belt system components including the seat belt webbing, retractors, pretensioners, buckles, anchors, and attaching hardware after any collision.
-
Inspect all seat belt assemblies and components including webbing, retractors, buckles, anchors and attaching hardware not in use during a collision. Replace if either damage or improper operation is noted.
-
Failure to follow any of the above steps could result in serious personal injury in an accident.
Replace any seat belt assembly (including anchor bolts) if:
-
The seat belt is in use at the time of a collision (except for minor collisions and the belts, retractors and buckles show no damage and continue to operate properly).
-
The seat belt is damaged in an accident (i.e. torn webbing, bent retractor or guide, etc.).
-
The seat belt attaching point is damaged in an accident. Inspect the seat belt attaching area for damage or distortion and repair if necessary before installing a new seat belt assembly.
-
Anchor bolts are deformed or worn out.
-
The seat belt assembly must be replaced even if the seat belts were not in use during the collision in which the air bags were deployed.
PRELIMINARY CHECKS
Check the seat belt warning lamp for proper operation. Refer to Seat Belt Warning Lamp.
If the air bag warning lamp turns ON, perform self-diagnosis using CONSULT. Refer to CONSULT Function.
Check that the seat belt retractor, seat belt anchor and buckle bolts are tightened firmly.
Check the shoulder seat belt guide and shoulder belt height adjuster for front seats. Check that guide swivels freely and that webbing lays flat and does not bind in guide. Check that height adjuster operates properly and holds securely.
Check retractor operation:Fully extend the seat belt webbing and check for twists, tears or other damage. Allow the seat belt to retract. Check that webbing returns smoothly and completely into the retractor. If the webbing does not return smoothly, the cause may be an accumulation of dust or dirt. Use the “SEAT BELT TAPE SET” and perform the following steps.
Inspect The Front Seat Belt Shoulder Anchor
-
Pull the seat belt out to a length of 500 mm (19.69 in) or more.
-
Fix the seat belt at the center pillar webbing opening with a clip or other device.
-
Pass a thin wire through the shoulder anchor webbing opening. Hold both ends of the wire and pull it tightly while moving it up and down several times along the webbing opening surface to remove dirt stuck there.
-
Any dirt that cannot be removed with the wire can be removed by cleaning the opening with a clean cloth.
-
Apply tape at the point where the webbing contacts the shoulder anchor webbing opening.
NOTE:
Apply the tape so that there is no slack or wrinkling.
-
Remove the clip fixing the seat belt and check that the webbing returns smoothly.
Repeat steps above if necessary to check the other seat belts.
SEAT BELT RETRACTOR ON-VEHICLE CHECK
Emergency Locking Retractors (ELR)
NOTE:
All seat belt retractors are Emergency Locking Retractors (ELR) type. In an emergency (sudden stop) the retractor will lock and prevent the webbing from extending any further.
Check the seat belt retractors with the following test(s) to determine if a retractor assembly is operating properly.
ELR Function Stationary Check
Grasp the shoulder webbing and pull forward quickly. The retractor should lock and prevent the belt from extending further.
ELR Function Moving Check
WARNING:
Perform the following test in a safe, open area clear of other vehicles and obstructions (for example, a large, empty parking lot). Road surface must be paved and dry. Never perform the following test on wet or gravel roads or on public streets and highways. This could result in an accident and serious personal injury. The driver and passenger must be prepared to brace themselves in the event that the retractor does not lock.
Fasten the seat belt. Buckle a passenger into the seat for the belt that is to be tested.
Proceed to the designated safe area.
Drive the vehicle at approximately 16 km/h (10 MPH). Notify any passengers of a pending sudden stop and the driver and passenger must be prepared to brace themselves in the event that the retractor does not lock. Apply brakes firmly and make a very hard stop.
During stopping, seat belts should lock and not be extended. If the seat belt retractor assembly does not lock, perform the retractor off-vehicle check.
SEAT BELT RETRACTOR OFF-VEHICLE CHECK
Remove front seat belt retractor assembly. Refer to Removal and Installation.
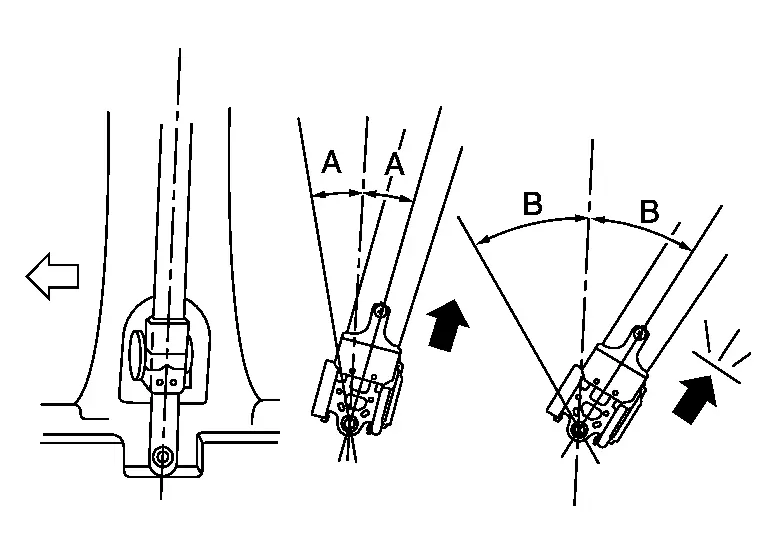
Slowly pull out webbing while tilting the retractor assembly forward from the mounted position without twisting the retractor assembly as shown in the figure.
-
The webbing can be pulled out when the angle (A) is 12 degrees or less.
-
The webbing cannot be pulled out when the angle (B) is 27 degrees or more.
| A and B | : Tilting angles |
| : vehicle front |
Replace the seat belt assembly if it does not operate normally.
Other materials
Basic information
WARNING
Improper use or failure to follow the safety instructions for the Nissan Armada
Blind Spot Warning (BSW) system may result in serious injury or even fatal accidents.
The Nissan Armada BSW system is a supplemental driving aid and must not
be relied upon as a substitute for safe driv ...
Hood Hinge
Removal and Installation
REMOVALRemove hood assembly. Refer to Removal and Installation.
Remove front fender assembly. Refer to Removal and Installation.
Remove hood hinge mounting bolts, and then remove hood hinge.INSTALLATIONNote the following items, and then install in the reverse order of remova ...
Console Box Lamp
Exploded View
Console box lamp is integrated structure with front center console box. For exploded view of front center console assembly, refer to Exploded View.
Replacement
CAUTION:
Disconnect the battery negative terminal or remove power circuit fuse when performing the operation for preventing e ...