
Nissan Armada 2025-2026 Service and Repair Manual: Inspection
AFTER A COLLISION
WARNING:
To avoid the risk of death or severe injury:
Replace any seat belt assembly (including anchor bolts) if:
Anchor bolts are deformed or worn out.
PRELIMINARY CHECKS
Check the shoulder seat belt guide for third seat. Check that guide swivels freely and that webbing lays flat and does not bind in guide.
Check retractor operation:Fully extend the seat belt webbing and check for twists, tears or other damage. Allow the seat belt to retract. Check that webbing returns smoothly and completely into the retractor. If the seat belt does not return smoothly, wipe the inside of the loops with a clean paper cloth. Dirt build-up in the loops of that upper anchors can cause the seat belts to retract slowly. Fasten the seat belt. Check that the seat belt is securely fastened. Release the seat belt. Check that the webbing and tongue return to their original position.
Repeat steps above if necessary to check the other seat belts.
SEAT BELT RETRACTOR ON-VEHICLE CHECK
Emergency Locking Retractors (ELR)
 NOTE:
NOTE:
ELR Function Stationary Check
ELR Function Moving Check
WARNING:
Proceed to the designated safe area.
SEAT BELT RETRACTOR OFF-VEHICLE CHECK
Seat Belt Retractor (LH and RH)
Remove third seat belt retractor assembly. Refer to Removal and Installation.
The webbing can be pulled out when the angle (A) is 12 degrees or less.
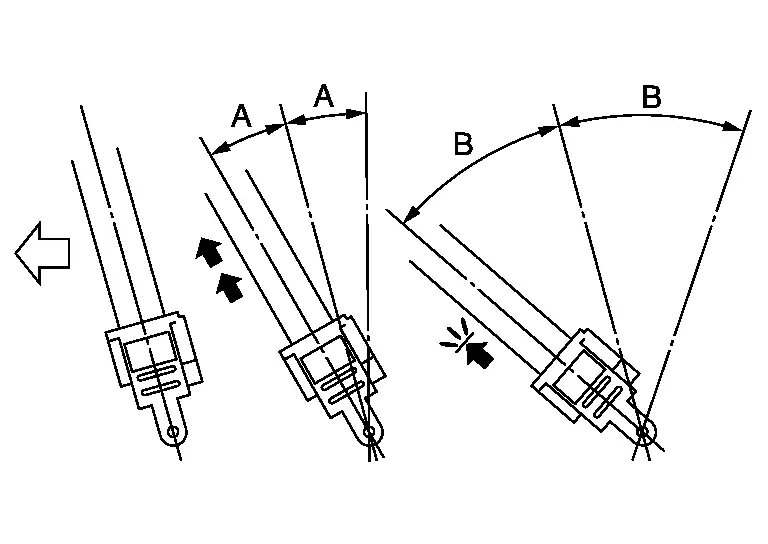
The webbing cannot be pulled out when the angle (B) is 27 degrees or more.
A and B : Tilting angles 
: Vehicle front
Replace the seat belt assembly if it does not operate normally.
Center Seat Belt Retractor
Remove third seat belt retractor assembly. Refer to Removal and Installation.
The webbing can be pulled out when the angle (A) is 12 degrees or less.
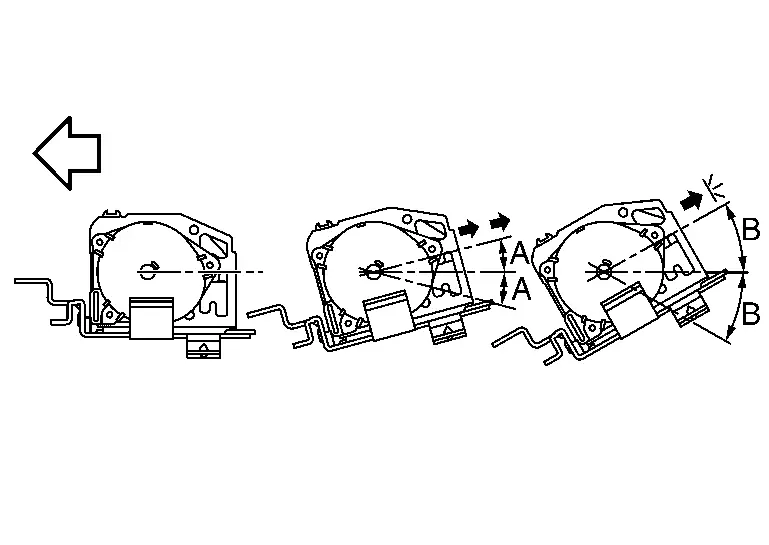
The webbing cannot be pulled out when the angle (B) is 27 degrees or more.
A and B : Tilting angles : Vehicle front
Replace the seat belt assembly if it does not operate normally.
 Removal and Installation
REMOVAL
Seat Belt Retractor (LH and RH)
Remove third seat assembly. Refer to Removal and Installation.
Remove anchor plate mounting anchor bolt .
Remove shoulder anchor.Remove back pillar garnish. R ...

Other materials:
Additional Service When Replacing Around View Monitor Control Unit
CAUTION:
When replacing the around view monitor control unit, always replace it with a new one. Around view monitor system does not operate properly in case of reuse of the around view monitor control unit from another vehicle.
When before writing the around view monitor control unit configuration, ...
Work flow
OVERALL SEQUENCE
Reference 1···On Board Diagnosis Function.
Reference 2···DTC Index.
Reference 3···Component Function Check.
Reference 4···Diagnosis Procedure.
DETAILED FLOW
OBTAIN INFORMATION ABOUT SYMPTOM
Interview the customer to obtain as much information as possible about the cond ...
Diagnosis Procedure
CHECK AUTO ANTI-DAZZLING MIRROR CIRCUIT
Check auto anti-dazzling mirror circuit. Refer to Diagnosis Procedure.
Is the inspection result normal?
YES>>
GO TO 2.
NO>>
Repair or replace the malfunctioning parts.
REPLACE GLASS MIRROR
Replace glass mirror. Refer to Removal and Installation.
...

0.0066