
Nissan Armada 2025-2026 Service and Repair Manual: Removal and Installation
CAUTION:
Never damage the body panel.
REMOVAL
Remove front kicking plate. Refer to Removal and Installation.
Remove rear kicking plate. Refer to Removal and Installation.
Disengage center pillar lower escutcheon fixing pawls, and then remove center pillar lower escutcheon.
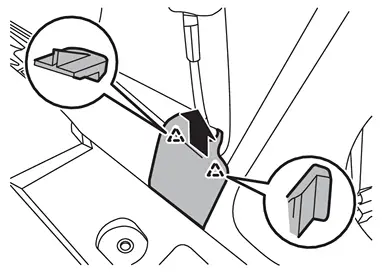
 | : Pawl |
Disengage center pillar lower garnish upper side fixing pawls according to numerical order 1→2 indicated by arrows as shown in the figure.
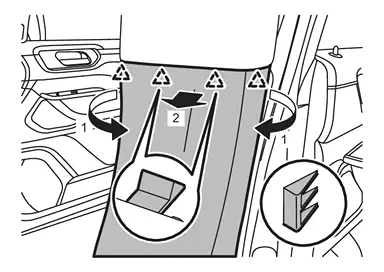
| : Pawl |
Disengage center pillar lower garnish fixing clips, and then remove center pillar lower garnish.
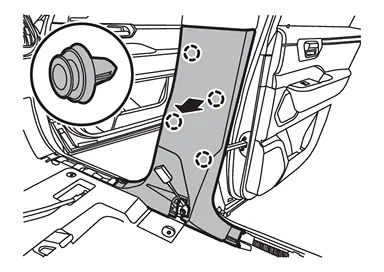
 | : Clip |
INSTALLATION
Note the following items, and then install in the reverse order of removal.
CAUTION:
Check in advance that pawls and clips are accurately aligned with the portions on center pillar upper garnish and body panel, and then install by pressing in.


Other materials:
Work Flow
CUSTOMER INTERVIEW
Squeak – (Like tennis shoes on a clean floor)
Creak – (Like walking on an old wooden floor)
Rattle – (Like shaking a baby rattle)
Knock – (Like a knock on a door)
Tick – (Like a clock second hand)
action or road conditions.
Thump – (Heavy, muffled knock noise)
Buzz †...
Removal and Installation
CAUTION:
Never bend the pawl of power window switch finisher.
REMOVAL
Remove front door finisher (passenger side). Refer to Removal & Installation.
Disengage door lock and unlock switch (passenger side) fixing pawls using a remover tool (A), and then remove door lock and unlock switch (passenger ...
Removal and Installation
REMOVAL
Radiator Air Guide Upper
Remove front grille upper. Refer to Removal and Installation (OFF ROAD MODELS) or Removal and Installation (CITY MODELS).
Remove radiator air guide upper fixing clips, and then remove radiator air guide upper.
Radiator Air Guide RH
Remove front bumper fascia. Refer t ...

0.0052