
Nissan Armada 2025-2026 Service and Repair Manual: Adjustment
FITTING ADJUSTMENT
Fitting Adjustment Standard Dimension
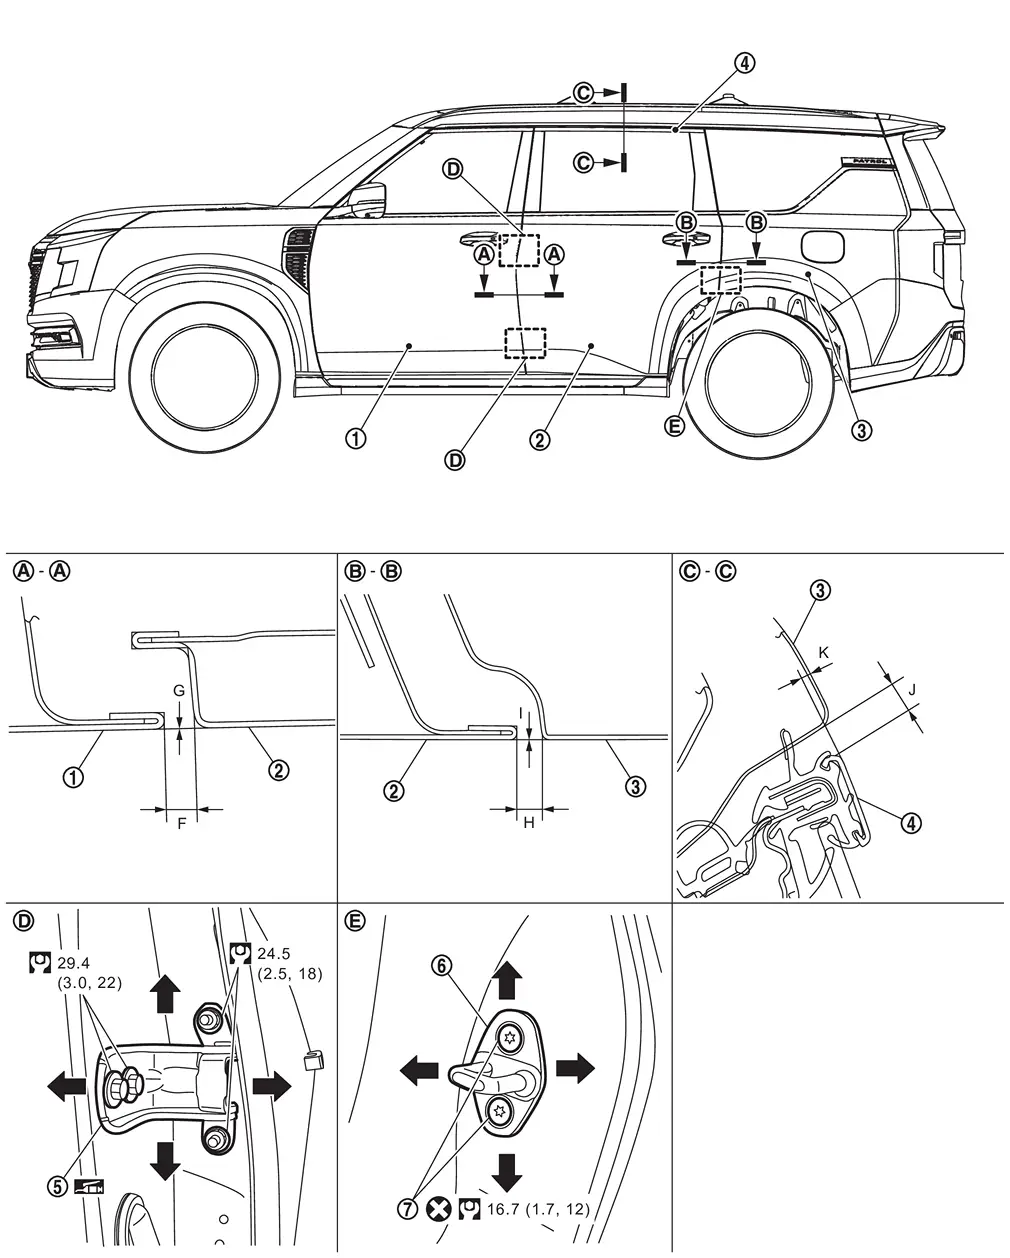
 | Front door panel |  | Rear door panel |  | Body side outer |
 | Rear door sash molding |  | Rear door hinge |  | Rear door striker |
 | TORX bolt | ||||
 | : Always replace after every disassembly. | ||||
 | : N·m (kg-m, ft-lb) | ||||
 | : Body grease | ||||
Unit: mm [in]
| Portion | Standard | |||
|---|---|---|---|---|
| Front door panel – Rear door panel |  – – | F | Clearance | 4.5 ± 1.0 [0.177 ± 0.039] |
| G | Surface height | 0.0 ± 1.0 [0.000 ± 0.039] | ||
| Rear door panel – Body side outer |  – – | H | Clearance | 4.5 ± 1.0 [0.177 ± 0.039] |
| I | Surface height | 0.0 ± 1.0 [0.000 ± 0.039] | ||
| Rear door sash molding – Body side outer |  – – | J | Clearance | 7.3 ± 1.8 [0.287 ± 0.071] |
| K | Surface height | 1.0 ± 1.7 [0.039 ± 0.067] | ||
Check the clearance and surface height between rear door and each part by visually and touching.
Fitting Adjustment Procedure
Loosen rear door hinge mounting nuts.
Adjust the surface height of rear door according to the fitting adjustment standard dimension by moving rear door panel.
Tighten rear door hinge mounting nuts to the specified torque.
CAUTION:
After installation, apply touch-up paint (the body color) onto the head of hinge mounting nuts.
Loosen rear door hinge mounting bolts.
Adjust the clearance of rear door according to the fitting adjustment standard dimension by moving rear door panel.
Tighten rear door hinge mounting bolts to the specified torque.
CAUTION:
After installation, apply touch-up paint (the body color) onto the head of hinge mounting bolts.
REAR DOOR STRIKER ADJUSTMENT
Adjust rear door striker so that it becomes parallel with door lock insertion direction.
 Inspection
Open and close rear door. Check that rear door hinge and rear door check link rotation portion moves smoothly.
Check rear door hinge rotating part for lubrication condition. Apply body grease if neces ...

Other materials:
Work Procedure
ADAS CONTROL UNIT 2 CONFIGURATION
>>
GO TO 2.
VIN REGISTRATION
Turn ignition switch OFF.
Turn ignition switch ON.
NOTE:
If ignition switch is not turned OFF after setting configuration, ADAS control unit 2 may detect DTC.
Perform VIN registration. Refer to Work Procedure.
>>
GO TO ...
Replacement
CAUTION:
TAIL LAMP/STOP LAMP
CAUTION:
Replacement of a single part is not possible due to the adoption of LED. For replacement, replace rear combination lamp as a set. Refer to Removal and Installation.
TAIL LAMP
CAUTION:
STOP LAMP
CAUTION:
REAR TURN SIGNAL LAMP
CAUTION:
BACK-UP LAMP
CAUTION:
REAR S ...
Inspection
WARNING:
LOOSENESS OF CONNECTED PART
Check each fixing bolt and nut for looseness using torque wrench. For each tightening torque, refer to followings;
Refer to Exploded View.
BACKLASH OF JOINT PART
Move the joint of propeller shaft up and down and from side to side (axial direction of shaft and rig ...

0.0054