Removal and Installation
REMOVAL
Remove front seat LH. Refer to Removal and Installation.
Remove front kicking plate inner LH and rear kicking plate inner LH. Refer to Removal and Installation.
Remove dash side finisher LH. Refer to Removal and Installation.
Remove center pillar lower garnish LH. Refer to Removal and Installation.
Flip the carpet to allow the work space.
Remove the around view monitor control unit mounting bolt  and nuts
  , and then remove the around view monitor control unit
  .
.
| : vehicle front |
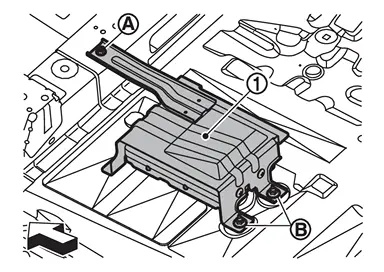
Disconnect the around view monitor control unit harness connectors.
INSTALLATION
Installation is the reverse order of removal.
CAUTION:
Perform the “ADDITIONAL SERVICE WHEN REPLACING AROUND VIEW MONITOR CONTROL UNIT” when after replacing around view monitor control unit. Refer to Description.
Other materials
Basic information
Example
Example
WARNING
In the Nissan Armada, improper adjustment of the HUD brightness or position
may obstruct the driver’s forward visibility through the windshield, increasing
the risk of accidents that could lead to serious injury or death.
Do not focus on the Head U ...
Precautions
Precaution for Supplemental Restraint System (SRS) "AIR BAG" and "SEAT BELT PRE-TENSIONER"
The Supplemental Restraint System such as “AIR BAG” and “SEAT BELT PRE-TENSIONER”, used along with a front seat belt, helps to reduce the risk or severity of injury to the driver and front passenger fo ...
Rear Door Weather-Strip
Removal and Installation
REMOVALApply protective tape (A) to rear door panel around rear door weather-strip fixing clips for preventing damage.
Disengage fixing clips on the reverse side of rear door weather-strip using a remover tool (A).
: Clip
CAUTION:
Never damage rear door panel.
...