Work Flow
WORK FLOW (WITH GR8-1200 NI)
Starting System Diagnosis With GR8-1200 NI
To test the starting system, use the following special service tool:
-
Multitasking battery and electrical diagnostic station GR8-1200 NI
 NOTE:
NOTE:
Refer to the diagnostic station Instruction Manual for proper starting system diagnosis procedures.
Overall Sequence
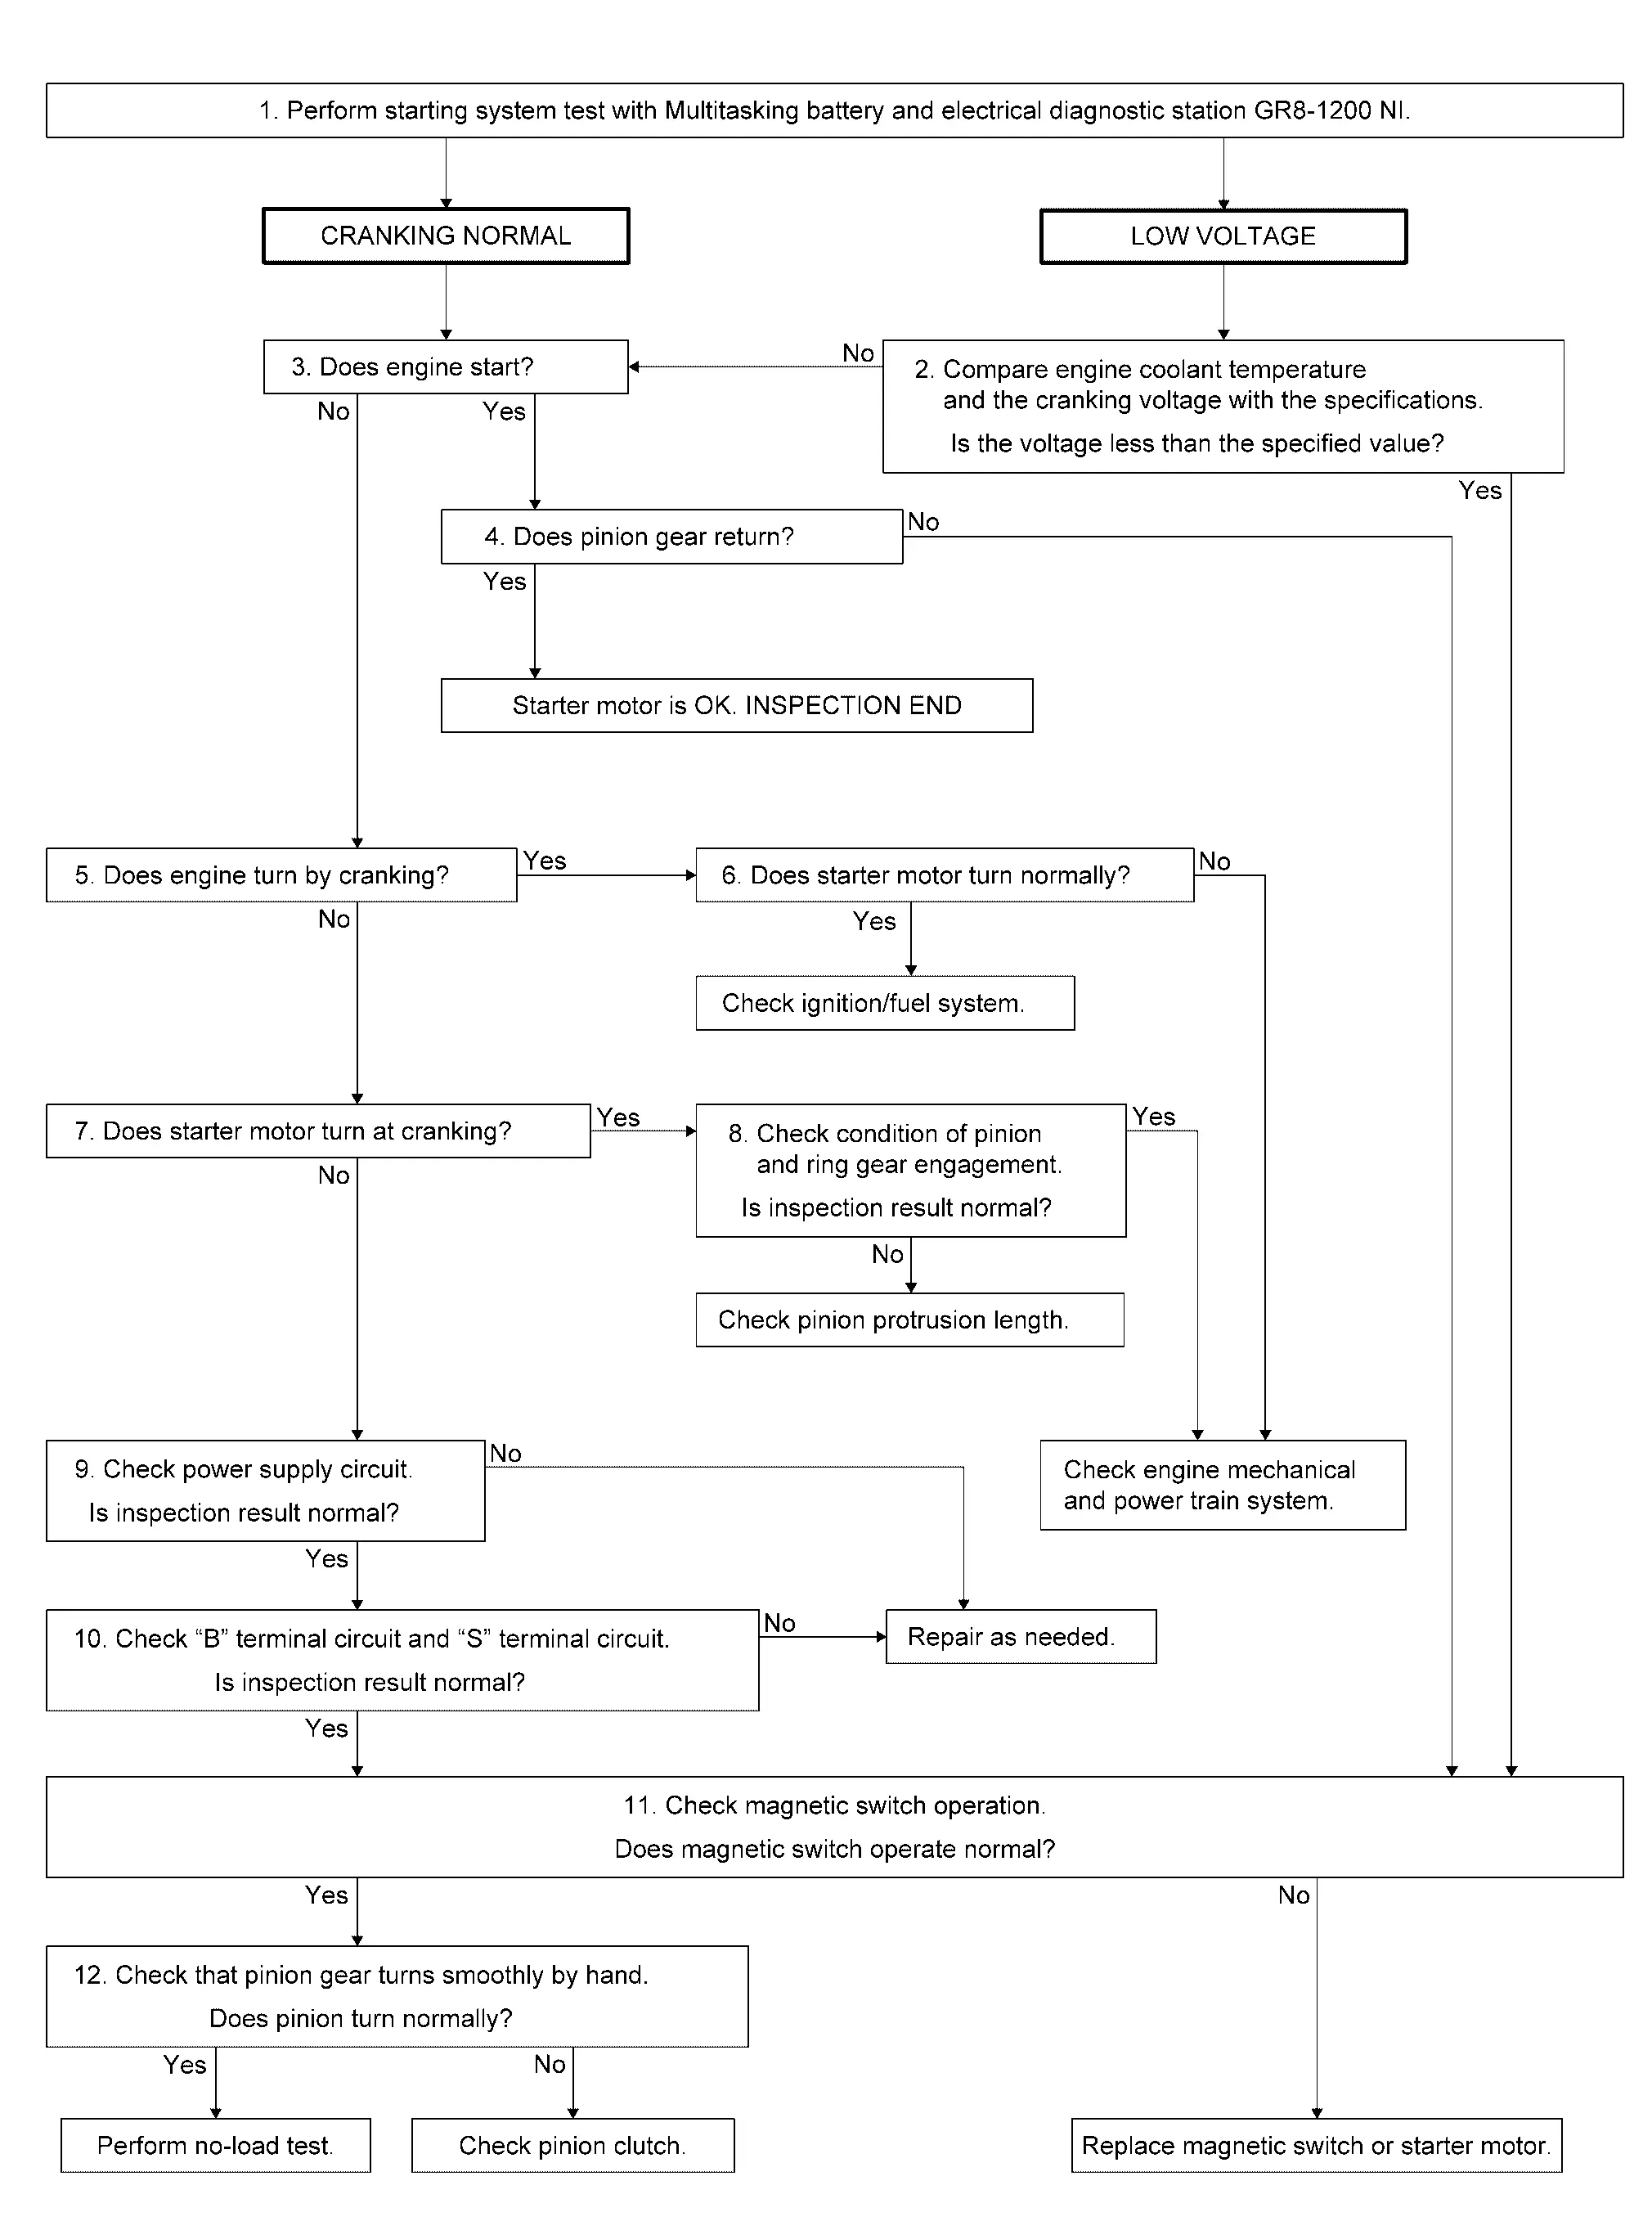
Detailed Flow
NOTE:
-
To ensure a complete and thorough diagnosis, the battery, starter motor and alternator test segments must be done as a set from start to finish.
-
If any malfunction is found, immediately disconnect the battery cable from the negative terminal.
DIAGNOSIS WITH MULTITASKING BATTERY AND ELECTRICAL DIAGNOSTIC STATION GR8-1200 NI
Perform starting system test with Multitasking battery and electrical diagnostic station GR8-1200 NI. For details and operating instructions, refer to diagnostic station Instruction Manual.
How is the test result?
CRANKING NORMAL>>GO TO 3.
LOW VOLTAGE>>GO TO 2.
CHARGE BATTERY>>Perform the slow battery charging procedure. (Initial rate of charge is 10A for 12 hours.) Perform battery test again. Refer to diagnostic station instruction manual.
REPLACE BATTERY>>Before replacing battery, clean the battery cable clamps and battery posts. Perform battery test again. Refer to diagnostic station instruction manual. If second test result is “REPLACE BATTERY�, then do so. Perform battery test again to confirm repair.
COMPARISON BETWEEN ENGINE COOLANT AND CRANKING VOLTAGE
Compare engine coolant temperature and the cranking voltage with the specifications.
| Engine coolant temperature [ °C (°F)] | Voltage [V] |
|---|---|
| −30 to −20 (−22 to −4) | 8.6 |
| −19 to −10 (−2 to 14) | 9.1 |
| −9 to 0 (16 to 32) | 9.5 |
| More than 1 (More than 34) | 9.9 |
Is the voltage less than the specified value?
YES>>GO TO 11.
NO>>GO TO 3.
CHECK ENGINE START
Crank engine and check that engine starts.
Does engine start?
YES>>GO TO 4.
NO>>GO TO 5.
CHECK RETURN OF PINION GEAR
Check that pinion gear returns to original position after engine starts.
Does pinion gear return?
YES>>Starter motor is OK. INSPECTION END
NO>>GO TO 11.
CHECK ENGINE SPEED WITH CRANKING
Check that engine turns while cranking.
Does engine turn by cranking?
YES>>GO TO 6.
NO>>GO TO 7.
CHECK STARTER MOTOR TURNING WITH CRANKING
Check that starter motor runs smoothly without abnormal noise at cranking.
Does starter motor turn normally?
YES>>Check ignition/fuel system.
NO>>Check engine mechanical and power train system.
CHECK STARTER MOTOR SPEED WITH CRANKING
Check that starter motor turns while cranking.
Does starter motor turn at cranking?
YES>>GO TO 8.
NO>>GO TO 9.
CHECK PINION GEAR AND RING GEAR ENGAGEMENT
Check condition of pinion and ring gear engagement.
Is inspection result normal?
YES>>Check engine mechanical and power train system.
NO>>Check pinion protrusion length. Refer to Inspection.
CHECK POWER SUPPLY CIRCUIT
Check the following conditions.
-
Fuse and fusible link
-
Charge condition, corrosion, and connection condition of battery. Refer to Diagnosis Procedure.
Are these inspection results normal?
YES>>GO TO 10.
NO>>Repair as needed.
CHECK STARTING SYSTEM WIRING
Check the following.
-
“B� terminal circuit. Refer to Diagnosis Procedure.
-
“S� terminal circuit. Refer to Diagnosis Procedure.
Are these inspection results normal?
YES>>GO TO 11.
NO>>Repair as needed.
CHECK MAGNETIC SWITCH OPERATION
Check magnetic switch operation. Refer to Inspection.
Does magnetic switch operate normal?
YES>>GO TO 12.
NO>>Replace magnetic switch or starter motor.
CHECK PINION TURNING
-
Remove starter motor.
-
Check that pinion turns smoothly by hand.
Does pinion turn normally?
YES>>Perform no-load test of starter motor. Refer to Inspection.
NO>>Check pinion clutch. Refer to Inspection.
WORK FLOW (WITHOUT GR8-1200 NI)
Overall Sequence
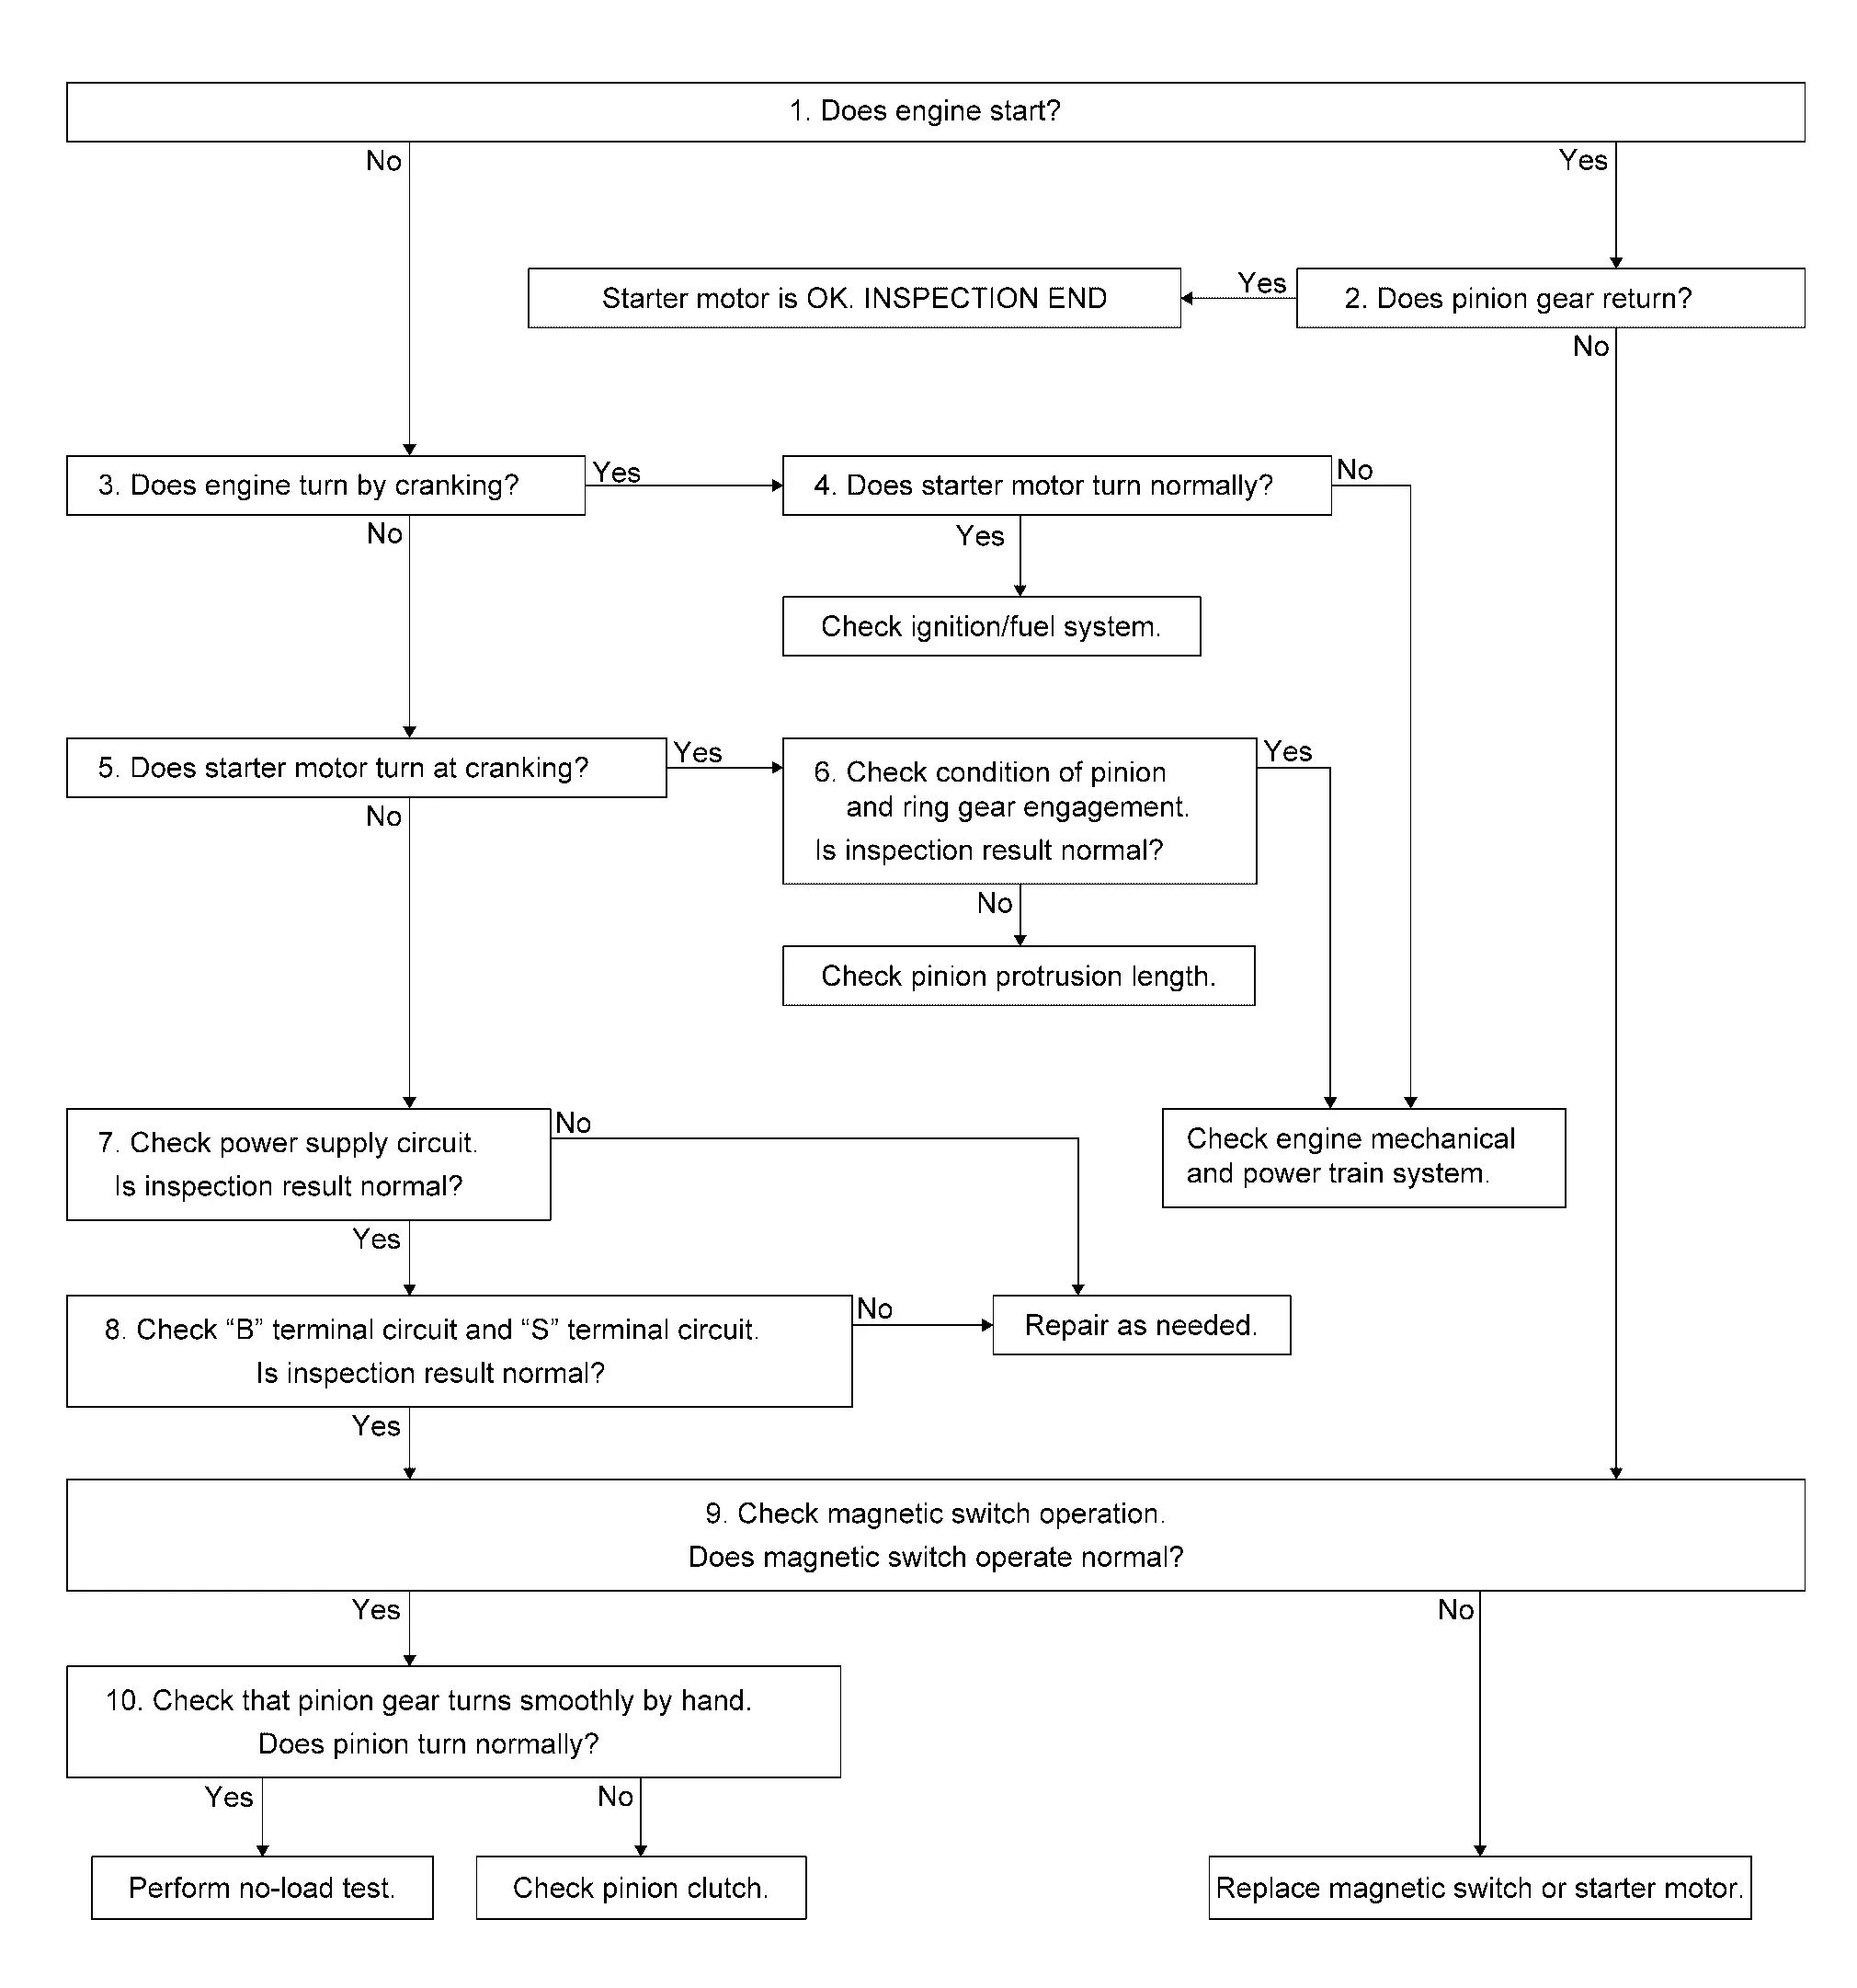
Detailed Flow
NOTE:
If any malfunction is found, immediately disconnect the battery cable from the negative terminal.
CHECK ENGINE START
Crank engine and check that engine starts.
Does engine start?
YES>>GO TO 2.
NO>>GO TO 3.
CHECK RETURN OF PINION GEAR
Check that pinion gear returns to original position after engine starts.
Does pinion gear return?
YES>>Starter motor is OK. INSPECTION END
NO>>GO TO 9.
CHECK ENGINE SPEED WITH CRANKING
Check that engine turns while cranking.
Does engine turn by cranking?
YES>>GO TO 4.
NO>>GO TO 5.
CHECK STARTER MOTOR TURNING WITH CRANKING
Check that starter motor runs smoothly without abnormal noise at cranking.
Does starter motor turn normally?
YES>>Check ignition/fuel system.
NO>>Check engine mechanical and power train system.
CHECK STARTER MOTOR SPEED WITH CRANKING
Check that starter motor turns while cranking.
Does starter motor turn at cranking?
YES>>GO TO 6.
NO>>GO TO 7.
CHECK PINION GEAR AND RING GEAR ENGAGEMENT
Check condition of pinion and ring gear engagement.
Is inspection result normal?
YES>>Check engine mechanical and power train system.
NO>>Check pinion protrusion length. Refer to Inspection.
CHECK POWER SUPPLY CIRCUIT
Check the following conditions.
-
Fuse and fusible link
-
Charge condition, corrosion, and connection condition of battery. Refer to Diagnosis Procedure.
Are these inspection results normal?
YES>>GO TO 8.
NO>>Repair as needed.
CHECK STARTING SYSTEM WIRING
Check the following.
-
“B� terminal circuit. Refer to Diagnosis Procedure.
-
“S� terminal circuit. Refer to Diagnosis Procedure.
Are these inspection results normal?
YES>>GO TO 9.
NO>>Repair as needed.
CHECK MAGNETIC SWITCH OPERATION
Check magnetic switch operation. Refer to Inspection.
Does magnetic switch operate normal?
YES>>GO TO 10.
NO>>Replace magnetic switch or starter motor.
CHECK PINION TURNING
-
Remove starter motor.
-
Check that pinion turns smoothly by hand.
Does pinion turn normally?
YES>>Perform no-load test of starter motor. Refer to Inspection.
NO>>Check pinion clutch. Refer to Inspection.
Other materials
Tire Pressure Sensor
Exploded View
Screw
Tire pressure sensor
Valve
Valve core
Valve cap
: N·m (kg-m, in-lb)
: Always replace after every disassembly.
: Parts that are replaced as a set when the tire is replaced.
Removal & Installation
WARNING:
Jacking up or lift up the vehicle ma ...
Back Door Opener Switch Assembly
Removal and Installation
REMOVAL
Remove back door finisher. Refer to Removal and Installation.
Disconnect license plate lamp harness connectors.
Remove back door opener switch assembly fixing pawls using a remover tool (A), and then remove back door opener switch .
: Pawl
INSTALLATIONIn ...
Roof Antenna
Exploded View
With ProPILOT ASSIST 2.1
Roof antenna
: N·m (kg-m, in-lb)
Without ProPILOT ASSIST 2.1
Roof antenna
: N·m (kg-m, in-lb)
Removal & Installation
REMOVALRemove the headlining assemb ...