Exploded View
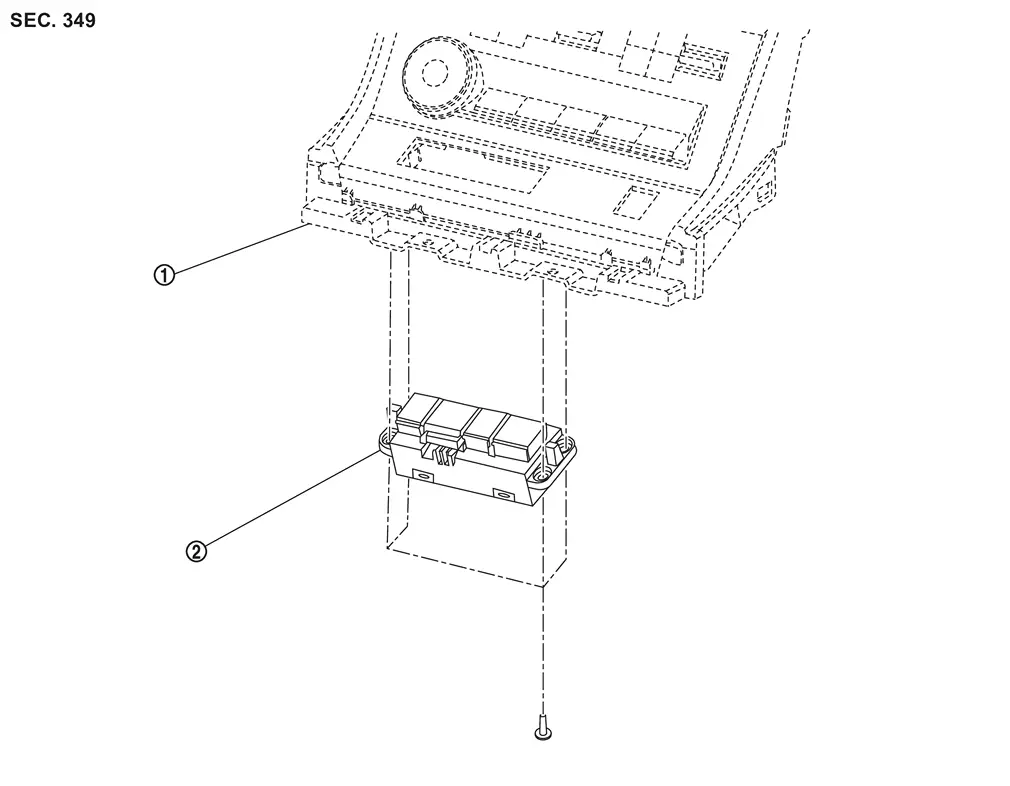
 |
Front center console switch finisher assembly |  |
Electric shift selector |
Removal and Installation
CAUTION:
-
Never disassemble the electronic shift selector.
-
When holding the electronic shift selector, hold the vehicle mounting part.
-
Never allow foreign materials to enter into electronic shift selector.
-
There is connector on the back of electric shift selector, therefore never press down on electric shift selector from above when it is placed on a flat surface.
-
Electric shift selector in the contains a strong magnet, persons with an electro-medical apparatus should keep it away from his/her body. Otherwise it may cause the electro-medical apparatus to malfunction.
-
Keep it away from magnetic objects such as magnetic cards and metal products (e.g. watches).
-
Never subject the electric shift selector to impact by dropping or hitting, water splash or high humidity.
-
Never attach strong magnets such as smartphone magnets to the area
 as shown in the figure.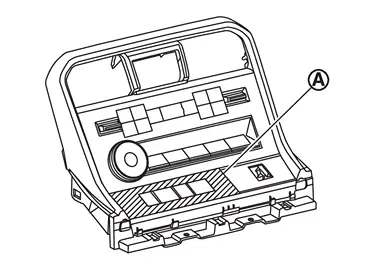
-
When the electric shift selector is dropped or hit, never reuse it.
Removal
Remove front center console switch finisher assembly from center console assembly. Refer to Removal and Installation.
Remove electric shift selector mounting screws and remove electric shift selector from front center console switch finisher assembly.
Installation
Note the following, and install in the reverse order of removal.
CAUTION:
When the electric shift selector is replaced, perform "ADDITIONAL SERVICE WHEN REPLACING ELECTRIC SHIFT SELECTOR" Refer to Description.
-
When installing the electric shift selector to the front center console switch finisher assembly, perform the following procedure.
-
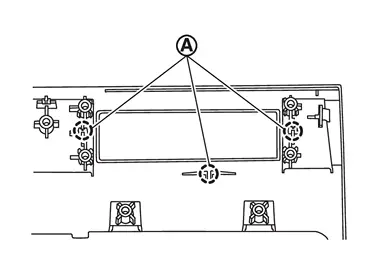
Push the electric shift selector until it engages to the front center console switch finisher assembly locator pin
.
-
Tighten the electric shift selector mounting screws in the order as shown in the figure.
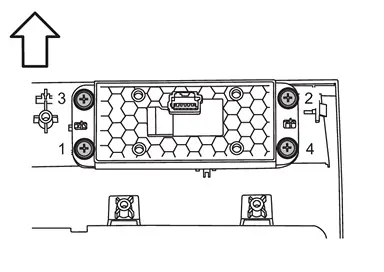
: vehicle front CAUTION:
Check that the front center console switch finisher assembly ribs
,  and
and  and the electric shift selector surface
  are parallel before tightening the mounting screws.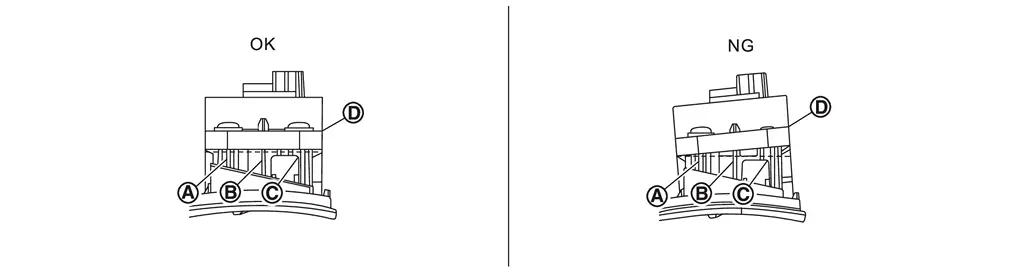
-
Connect electric shift sensor harness connector.
-
-
Perform inspection after installation. Refer to Inspection.
Inspection
Inspection after Installation
Shift Button Operation
Check the shift button operation status according to the following procedure. When there is malfunction, repair or replace the electric shift selector.
CAUTION:
Work safely with the wheels chocked and the vehicle stopped.
-
Check that each shift button is smoothly operated without any twisting, catching, noise, or others by pressing each one.
-
Check that each shift button returns to the original position after pressing each one without catching.
SHIFT POSITION
Check the shift operation status in READY state according to the following procedure. When there is malfunction, perform inspection for the electric shift system.
CAUTION:
Work safely with the wheels chocked and the vehicle stopped.
-
Check that the shift position changes to the position corresponding to the shift button, when pressing each shift button while the brake pedal is depressed.
-
Check that the shift position does not change from P position, even if each shift button is pressed without depressing the brake pedal while the shift position is P.
-
Check that the back-up lamp lights up when the shift position is set to R.
-
Check that the shift position changes to M, when pressing D/M button while the shift position is D.
-
Check that the shift position changes to D, when pressing D/M button while the shift position is M.
Other materials
Torque Converter and Converter Housing Oil Seal
Exploded View
A/T assembly
Converter housing oil seal
Seal ring
Torque converter
: Always replace after every disassembly.
: Apply ATF
Removal and Installation
WARNING:
Jacking up or lift up the vehicle may the vehicle height to go down which cause a p ...
Front Fender Drip Cover
Removal and Installation
REMOVALRemove cowl top side seal between cowl top cover and fender drip cover. Refer to Removal and Installation.
Disengage fixing clips, and then remove front fender drip cover.
: Clip
Disengage fixing clips, and then remove hood side seal.INSTALLATIONInstall in the ...
Vehicle Security Alarm Does Not Activate
Description
Alarm does not operate when alarm operating condition is satisfied.
Diagnosis Procedure
CHECK DOOR SWITCH
Check door switch. Refer to ComponentFunctionCheck.
Is the inspection result normal?
YES>>
GO TO 2.
NO>>
Replace the malfunctioning door switch
CHECK HOOD SWITCH
Check ...