Removal and Installation
REMOVAL
Fully open fuel filler base assembly.
Disengage fuel filler lid fixing pawl using a removal tool (A), and then remove fuel filler lid  according to numerical order 1→2 indicated by arrows as shown in figure.
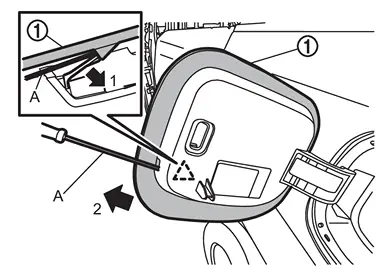
 |
: Pawl |
INSTALLATION
Note the following items, and then install in the reverse order of removal.
CAUTION:
After installation, check fuel filler lid assembly open/close, lock/unlock operation.
 NOTE:
NOTE:
-
The following table shows the specified values for checking normal installation status.
-
Fitting adjustment cannot be performed.
Unit: mm [in]
| Portion | Clearance | Evenness |
|---|---|---|
| Fuel filler lid – Body side outer |
3.0 ± 1.0 [0.118 ± 0.039] |
0.0 ± 1.0 [0.000 ± 0.039] |
Other materials
Noise, Vibration and Harshness (nvh) Troubleshooting
NVH Troubleshooting Chart
Use the chart below to find the cause of the symptom. If necessary, repair or replace these parts. Possible cause and SUSPECTED PARTS Symptom Reference
BRAKE
Noise Shake Shimmy, Judder
Pads damaged
×
—
—
FRONT DISC BRAKE: Inspection and Adjustment
...
Door Mirror
Exploded View
Door mirror cover
Power folding motor
Door mirror finisher
Side turn signal lamp
Puddle lamp bracket (with puddle lamp)
Puddle lamp (with puddle lamp)
Door mirror housing assembly
Glass mirror
Door mirror base cover
Door mirror base gasket
Door mirror ...
Steering Torque Calibration
Work Procedure
After replacing the ADAS control unit 2 and after replacing or removing the following steering components, the steering torque calibration is necessary to operate the system normally.
Steering wheel
Spiral cable
Steering angle sensor
Steering column assembly
Steering gear ass ...