To start your Nissan Armada engine using a booster battery, it is essential to carefully follow the proper procedures and safety precautions outlined below to avoid damage or injury.
WARNING
- Improper jump starting of the Nissan Armada can result in a battery explosion,
causing severe injury or even death.
It may also lead to serious electrical system damage.
- Hydrogen gas emitted by the battery is highly explosive. Keep sparks, flames, and smoking materials away from the Nissan Armada battery at all times.
- Avoid contact with battery fluid. The electrolyte is a highly corrosive
sulphuric acid solution that can cause severe burns to skin, eyes, and surfaces.
If contact occurs, immediately flush the affected area thoroughly with clean water.
- Always keep the Nissan Armada battery and related components out of reach of children.
- Use only a 12-volt booster battery. Using an incorrect voltage may damage the Nissan Armada electrical system.
- When working near the battery, wear proper eye protection and remove any metal jewelry such as rings or bracelets. Avoid leaning directly over the battery while jump starting the Nissan Armada.
- Never attempt to jump start a frozen battery, as it may rupture or explode.
- The Nissan Armada is equipped with an automatic cooling fan that may activate at any time. Keep hands, tools, and clothing clear of moving components.
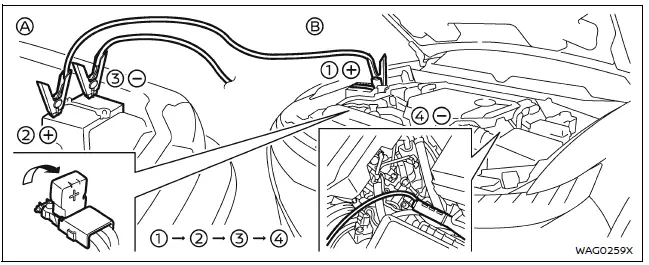
WARNING
Strictly follow the procedure below when jump starting your Nissan Armada.
Failure to follow these instructions may result in damage to the charging system or personal injury.
1. If using another vehicle as a power source, position both vehicles (A and B) so that their batteries are close enough for the jumper cables to reach, but ensure the vehicles do not come into contact.
2. Engage the parking brake on both vehicles. Place the Nissan Armada transmission in the P (Park) position and turn off all unnecessary electrical systems such as lights, climate control, and audio.
3. Turn the ignition switch of the Nissan Armada to the OFF position.
4. Connect the jumper cables in the correct order as illustrated (1 → 2 → 3 → 4), ensuring secure and proper connections.
CAUTION
- Always connect the positive (+) terminal to the positive (+) terminal and the negative (−) cable to a proper ground point on the Nissan Armada body—not directly to the battery negative terminal.
- Ensure jumper cables are kept clear of moving engine components and that clamps do not accidentally contact other metal surfaces.
5. Start the engine of the booster vehicle (A) and allow it to run for several minutes to build up charge.
6. Maintain the booster vehicle engine speed at approximately 2,000 rpm, then attempt to start the Nissan Armada (vehicle B).
If the Nissan Armada does not start, switch the ignition OFF. Open and close the driver’s door with the Intelligent Key inside the vehicle, then wait at least 3 minutes without operating any systems before attempting again.
CAUTION
Do not operate the starter motor for more than 10 seconds at a time. If the Nissan Armada does not start, wait at least 10 seconds before trying again to prevent overheating or damage.
7. Once the Nissan Armada engine starts, carefully disconnect the jumper cables in reverse order (4 → 3 → 2 → 1), removing the negative cable first and then the positive cable.
NOTE:
If the Nissan Armada battery has been fully discharged, a "Headlight System Error" message may appear after jump starting. This does not prevent normal headlight operation.
To clear this message, turn the ignition OFF, open and close the driver’s door, wait approximately 3 minutes without operating any controls, and then restart the Nissan Armada engine.
Push starting
Do not attempt to push-start the Nissan Armada under any circumstances.
CAUTION
- Nissan Armada models equipped with automatic transmissions cannot be push-started or tow-started. Doing so may cause serious transmission damage.
- Vehicles equipped with a three-way catalyst may suffer catalytic converter damage if push-started.
- Never attempt to start the Nissan Armada by towing. Sudden forward movement when the engine starts may result in a collision.
Other materials
Rear Door Parting Seal
Removal and Installation
REMOVALRear Door Parting Seal FrontFully open rear door.
Remove rear door parting seal front clip.Apply protective tape (A) to rear door panel around rear door parting seal front clip for preventing damage.
Disengage fixing pawls using a remover tool (A), and then remove re ...
Precautions
Precaution for Supplemental Restraint System (SRS) "AIR BAG" and "SEAT BELT PRE-TENSIONER"
The Supplemental Restraint System such as “AIR BAG� and “SEAT BELT PRE-TENSIONER�, used along with a front seat belt, helps to reduce the risk or severity of injury to the driver and front passenger fo ...
Luggage Room Lamp
Exploded View
Roof rear garnish
Luggage room lamp
: Pawl
: vehicle front
Removal and Installation
CAUTION:
Disconnect the battery negative terminal or remove power circuit fuse when performing the operation for preventing electric leakage. Refer to Precautions for Remov ...