Exploded View
REMOVAL
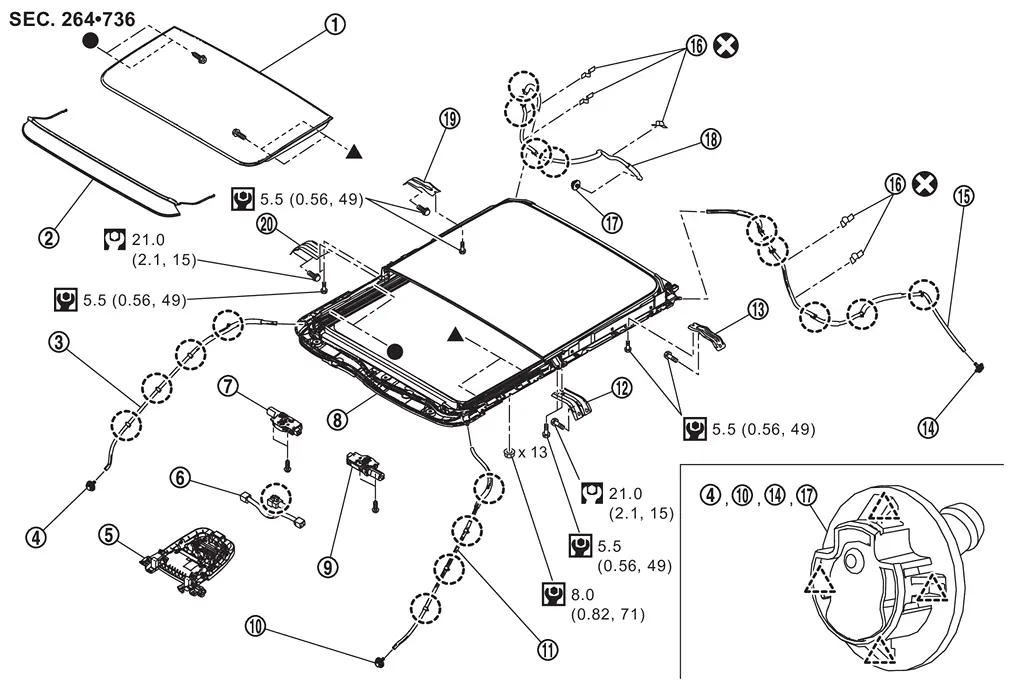
 |
Glass lid |  |
Wind deflector |  |
Front drain hose RH |
 |
Front drain connector RH |  |
Map lamp assembly |  |
Harness connector assembly |
 |
Moonroof motor assembly |  |
Moonroof unit assembly |  |
Sunshade motor assembly |
 |
Front drain connector LH |  |
Front drain hose LH |  |
Front moonroof bracket LH |
 |
Rear moonroof bracket LH |  |
Rear drain connector LH |  |
Rear drain hose LH |
 |
Protector tape |  |
Rear drain connector RH |  |
Rear drain hose RH |
 |
Rear moonroof bracket RH |  |
Front moonroof bracket RH | ||
 |
: Clip | ||||
 |
: Pawl | ||||
 |
: Always replace after every disassembly. | ||||
 |
: N·m (kg-m, in-lb) | ||||
 |
: N·m (kg-m, ft-lb) | ||||
 , : Indicates that the part is connected at points with same symbol in actual vehicle. , : Indicates that the part is connected at points with same symbol in actual vehicle. |
|||||
DISASSEMBLY
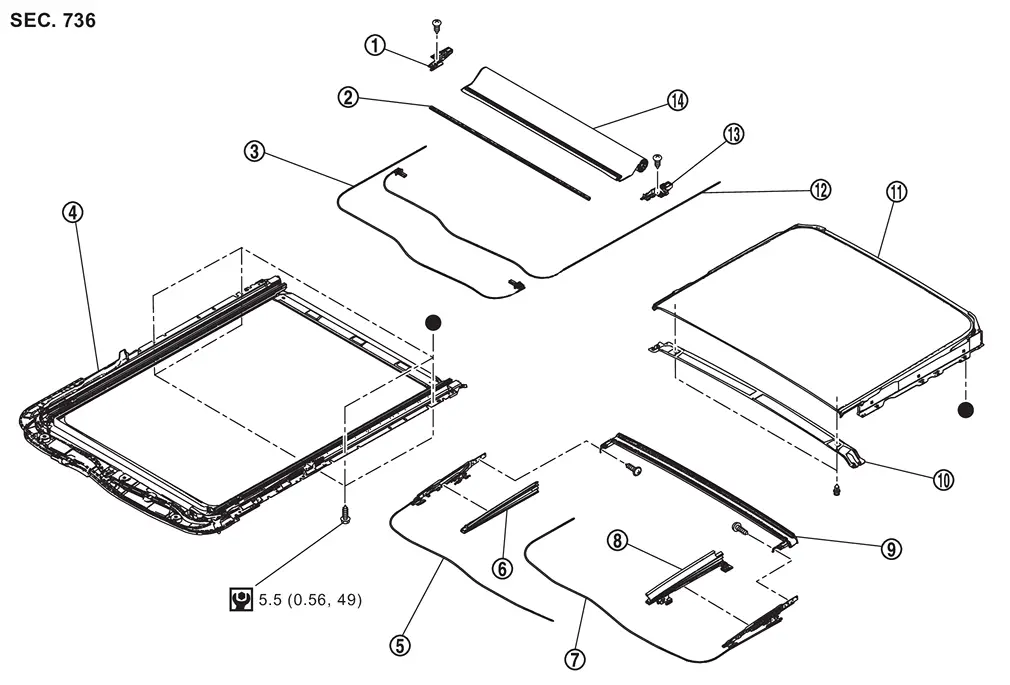
|
Sunshade base RH | |
Rollshade stay | |
Sunshade slider LH |
|
Moonroof frame assembly | |
Glass lid guide RH | |
Side trim RH |
|
Glass lid guide LH | |
Side trim LH | |
Drain assembly |
|
Center reinforce frame | |
Rear moonroof glass | |
Sunshade slider RH |
|
Sunshade base LH | |
Sunshade | ||
|
: N·m (kg-m, in-lb) | ||||
| : Indicates that the part is connected at points with same symbol in actual vehicle. |
|||||
Removal and Installation
CAUTION:
-
Always work with a helper.
-
When removing/installing moonroof unit assembly, use cloths to protect the seats and trim from damage.
REMOVAL
Remove wind deflector. Refer to Removal and Installation.
Remove glass lid. Refer to Removal and Installation.
Remove headlining. Refer to Removal and Installation.
Disconnect front and rear drain hoses from moonroof unit assembly.
Remove moonroof motor assembly. Refer to Removal and Installation.
Remove sunshade motor assembly. Refer to Removal and Installation.
Remove curtain air bag module. Refer to Removal & Installation.
Remove front moonroof bracket mounting bolts  , and then remove front moonroof bracket.
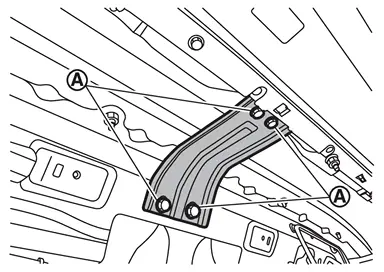
Remove rear moonroof bracket mounting bolts , and then remove rear moonroof bracket.
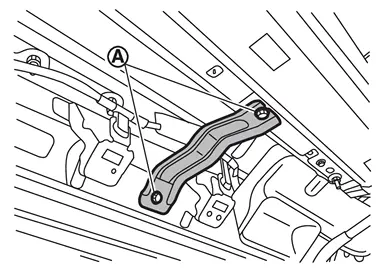
Remove moonroof unit assembly mounting nuts, and then remove moonroof unit assembly from back door opening.
INSTALLATION
Temporarily tighten the mounting nuts to the front end and side rail of moonroof unit assembly.
Temporarily tighten the mounting bolts to the front moonroof brackets and rear moonroof brackets.
Tighten the front end and side rail mounting nuts diagonally in order. For the specified torque, refer to Exploded View.
CAUTION:
Install moonroof unit assembly evenly without any distortion on moonroof unit assembly.
Tighten the mounting bolts to the rear moonroof brackets. For the specified torque, refer to Exploded View.
Tighten the mounting bolts to the front moonroof brackets. For the specified torque, refer to Exploded View.
Install curtain air bag module. Refer to Removal & Installation.
Install sunshade motor assembly. Refer to Removal and Installation.
Install moonroof motor assembly. Refer to Removal and Installation.
Connect front drain hoses and rear drain hoses.
Install headlining. Refer to Removal and Installation.
Install glass lid. Refer to Removal and Installation.
Install wind deflector. Refer to Removal and Installation.
CAUTION:
-
After installing moonroof unit assembly, perform the leak test and check that there is no malfunction.
-
After installation, perform fitting adjustment. Refer to Adjustment.
-
After installation of moonroof unit assembly, perform additional service. Refer to Description.
Disassembly and Assembly
DISASSEMBLY
Remove rear moonroof glass. Refer to Removal and Installation.
Remove sunshade. Refer to Removal and Installation.
Remove sunshade slider. Refer to Removal and Installation.
Remove drain assembly. Refer to Removal and Installation.
Remove glass lid guide. Refer to Removal and Installation.
ASSEMBLY
Assemble in the reverse order of disassembly.
Other materials
Diagnosis and Repair Work Flow
Work Flow
OVERALL SEQUENCEDETAILED FLOWGET INFORMATION FOR SYMPTOM
Get detailed information from the customer about the symptom (the condition and the environment when the incident/malfunction occurs).
Check operation condition of the function that is malfunctioning.
>>
GO TO 2.
CHECK DTC
...
Engine Under Cover
Exploded View
Engine under cover front
Engine under cover rear
N·m (kg-m, ft-lb)
Removal and Installation
WARNING:
REMOVALRemove mounting bolts, and then remove engine under cover rear.
Remove mounting bolts, and then remove engine under cover front.INSTALLATIONInst ...
Normal Operating Condition
Description
Because of modified sine wave output, the AC 120V outlet may not operate normally for electric appliance of which electric power consumption is 150W or less.
Electric appliances requiring a large amount of electric power consumption at startup (e.g., CRT-based TV, power tool)
Measurin ...