Removal and Installation
REMOVAL
CAUTION:
Never excessively pull rear door glass run.
Remove rear door sash cover. Refer to Removal and Installation.
Remove rear door sash inner cover and inside seal. Refer to Removal and Installation.
Reconnect power window main switch connector with rear door finisher.
 NOTE:
NOTE:
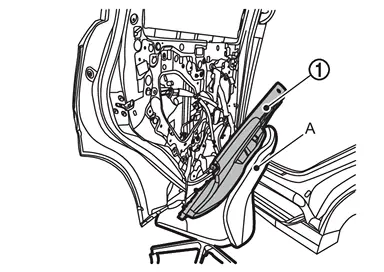
The rear door finisher  is big and heavy component. When reconnect it, use the chair/similar something (A) to support rear door finisher as shown in the figure.
Fully open rear door glass.
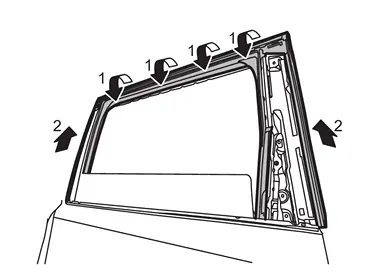
Disengage rear door glass run from rear door panel according to numerical order 1→2 indicated by arrows as shown in the figure, and then remove rear door glass run.
CAUTION:
Should be pulled out slowly to prevent damage rear door glass run.
INSTALLATION
Note the following items, and then install in the reverse order of removal.
CAUTION:
-
When installing rear door glass run between rear door panel/rear door lower sash and rear door glass, make sure engage glass run sash of rear door panel and rear door lower sash.
-
After installing, perform the inspection and adjustment. Refer to Inspection and Adjustment.
Other materials
Rab System Symptoms
Symptom Table
CAUTION:
Perform the self-diagnosis with CONSULT before the symptom diagnosis. Perform the trouble diagnosis if any DTC is detected. Symptom Confirmation item Reference page
RAB system display does not display
Combination meter
On Board Diagnosis Function
...
Rear Door
Exploded View
Rear door panel
Grommet
Rear door striker
TORX bolt
Rear door protector
Rear door check link
Rear door hinge (lower)
Rear door hinge (upper)
Rear door weather-strip
Rear door parting seal lower 2
Rear door parting seal lower 1
Rear door parting sea ...
Hood Lock Control Handle
Removal and Installation
REMOVALDisengage hood lock control handle fixing pawl, and then remove hood lock control handle.
: Pawl
INSTALLATIONNote the following items, and then install in the reverse order of removal.CAUTION:
After installation, perform hood lock control inspection. Refer to In ...