
Nissan Armada 2025-2026 Service and Repair Manual: Removal and Installation
REMOVAL
Remove tires. Refer to ROAD WHEEL TIRE : Removal & Installation.
Set suitable jack under rear lower link.
CAUTION:
Check the stable condition when using a suitable jack.
Never damage rear lower link.
Loosen rear lower link mounting nuts (frame side).
Separate rear lower link from axle housing.
Lower suitable jack, and remove coil spring.
CAUTION:
Check the stable condition when using a suitable jack.
Never damage rear lower link.
Remove lower rubber seat.
Remove upper spring seat mounting bolts, and remove upper spring seats and upper rubber seats.
Remove rear lower link mounting nut, eccentric disc, and adjusting bolt and then remove rear lower link.
Perform inspection after removal. Refer to Inspection and Adjustment.
INSTALLATION
Note the following, and install in the reverse order of removal.
Install coil spring
 by aligning lower end of coil spring with lower rubber seat
  as shown in the figure.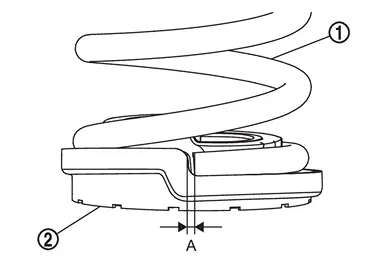
Dimension (A) : 5 mm (0.20 in) or less CAUTION:
Set coil spring so that its paint marks
 and are aligned with the position from the bottom end of the coil spring shown in the figure.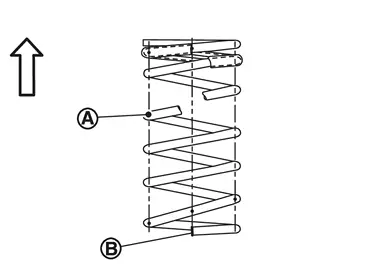

: Upper side 
: Vehicle inside Never allow foreign matter (e.r.dust).
Perform final tighting of rear lower link by the following procedures.
Measure between wheel center and fender arch (A).
 NOTE:
NOTE:Note the measurements.
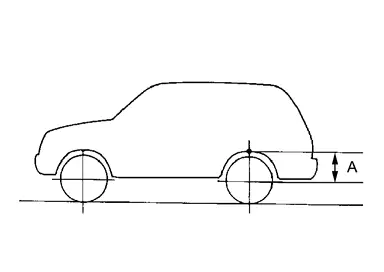
Set the wheel chocks on the front tires.
Jack up the rear of the vehicle and set the rigid rack.
Remove the rear tires.
CAUTION:
Never damage threaded part of ball joint.
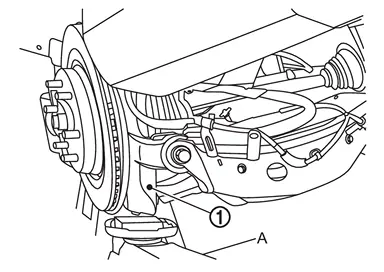
CAUTION:
Never damage axle housings.
Check the stable condition when using a suitable jack.
Never float the vehicle.
NOTE:Jack up left and right at the same time.
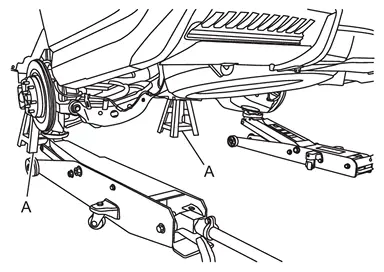
Measure between wheel center and fender arch (A).
CAUTION:
Check the measurements are within +20 mm (0.79 in) from step 1.
If the measurements are +20 mm (0.79 in) or more, perform step 6 again.
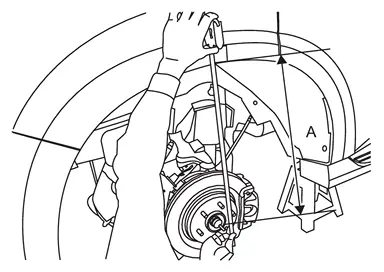
Tight the mounting nuts of rear lower link to the specified torque. Refer to Exploded View.
Perform inspection after installation. Refer to Inspection.
 Exploded View
Frame Adjusting bolt Eccentric disc Rear lower link Axle housing Lower rubber seat Coil spring Upper rubber seat Upper spring seat : Always replace after every disassembly. : N·m (kg-m, f ...
 Inspection
INSPECTION AFTER REMOVAL
Check rear lower link, bushing and coil spring for deformation, crack, and damage. Replace it if necessary.
INSPECTION AFTER INSTALLATION
Check wheel alignment. Refer to Inspe ...
Other materials:
Exploded View
Anchor bolt Retaining washer Seat belt adjuster LH Seat belt adjuster RH Shoulder anchor LH Shoulder anchor RH Spacer Seat belt pre-tensioner retractor LH Seat belt pre-tensioner retractor RH Lap pre-tensioner LH Lap pre-tensioner RH Seat belt buckle RH Seat belt buckle LH : N·m (kg- ...
Control Units and Electrical Parts
PRECAUTIONS
Never reverse polarity of battery terminals.
Install only parts specified for a vehicle.
Before replacing the control unit, check the input and output and functions of the component parts.
Do not apply excessive force when disconnecting a connector.
Do not apply excessive shock to the c ...
Difference between predictive and actual distances
Basic information
The Nissan Armada RearView Monitor provides reference guidelines only. The actual
distance to objects may differ depending on terrain and object positioning.
On uneven surfaces such as slopes or when objects extend outward, the displayed
distance may not accurately reflect re ...

0.0053