
Nissan Armada 2025-2026 Service and Repair Manual: Removal and Installation
REMOVAL
Remove fender cover. Refer to Removal and Installation.
Remove front fender drip cover. Refer to Removal and Installation.
Remove front combination lamp and head lamp. Refer to Removal and Installation.
Remove front fender protector. Refer to Removal and Installation.
Remove front door assembly. Refer to Removal and Installation.
Disengage front fender baffle upper part  fixing pawls, and then remove front fender baffle upper part from front fender assembly.
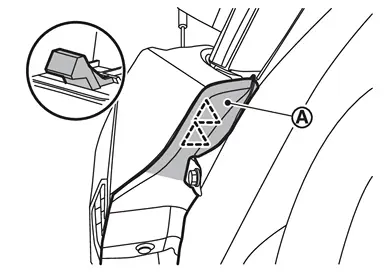
 | : Pawl |
Remove front fender baffle fixing clips, and then remove front fender baffle.
Remove front fender assembly mounting bolts, and then front fender assembly.
Remove front fender bracket mounting bolts, and then remove front fender bracket.
INSTALLATION
Note the following items, and then install in the reverse order of removal.
CAUTION:
When installation, adjust the following part.
Hood assembly: Refer to Adjustment.
Front door panel: Refer to Adjustment.
After installation, apply the touch-up paint (the body color) onto the head of front fender mounting bolts.
 Front Fender
...
 Fender Cover
...
Other materials:
Work Procedure
Perform action test to verify the customer's concern.
Perform action test and check the system operation after system diagnosis.
NOTE:
Perform the Intelligent Blind Spot Intervention system action test after checking that the I-LI system operates normally because the Intelligent Blind Spot Interven ...
Exploded View
CAUTION:
Never remove or disassemble parts unless instructed as shown in the figure.
High pressure fuel pump insulator High pressure fuel pump O-ring High pressure fuel pump lifter Bracket Holder Fuel feed hose To fuel rail (bank 1). Refer to Exploded View. To centralized under-floor piping. ...
Fuel-filler door
Basic information
CAUTION
Avoid directing high-pressure water, such as from a pressure washer,
onto or around the Nissan Armada fuel-filler door area.
Always ensure the fuel-filler door is securely closed before using an
automatic or high-pressure car wash.
Opening the fuel-filler do ...

0.0102