
Nissan Armada 2025-2026 Service and Repair Manual: Removal and Installation
CAUTION:
There are some cautions for the clips of "Reuse" removal/install procedure. If you want reuse back door window glass, you should be read each caution at first.
Never damage painted surface and surrounded parts.
REMOVAL
Replacement Back Door Window Glass
Remove back door inner finisher. Refer to Removal and Installation.
Remove back door upper garnish. Refer to Removal and Installation.
Remove back door side garnish. Refer to Removal and Installation.
Remove intelligent rear view mirror camera [rear camera (driving video recorder)]. Refer to Removal and Installation [with rear camera (driving video recorder)].
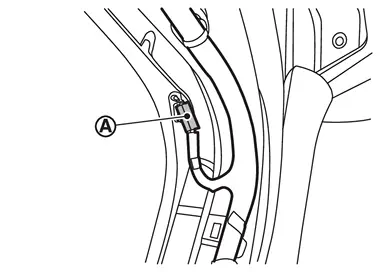
Disconnect window defogger connector  (LH and RH side).
Remove rear spoiler. Refer to Removal and Installation.
Remove rear side spoiler. Refer to Removal and Installation.
Remove back door finisher upper or tail lamp. Refer to following.
Back door finisher upper : Removal and Installation.
Tail lamp : Removal and Installation.
Remove rear wiper motor. Refer to Removal and Installation.
Apply protective tapes (A) on back door panel around back door window glass to protect painted surface from damage.
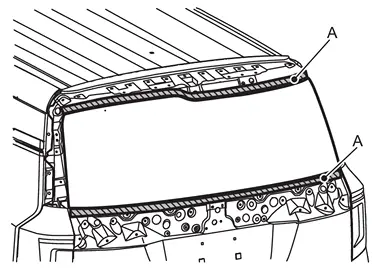
Cut the adhesive  using a windshield cutter (A) between along with back door window glass
  and back door outer panel
  .
.
CAUTION:
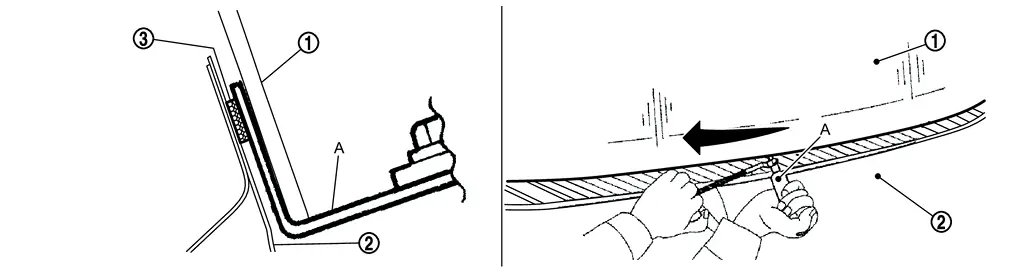
Use piano wire to cut adhesive if its difficult to use windshield cutter.
Cut the adhesive using a piano wire.Pass the piano wire passenger room to bonded area of back door window glass using a wire pierce.
CAUTION:
Never use plane surface of wire pierce tip vertically.
Never damage back door outer panel and surrounding parts.
CAUTION:
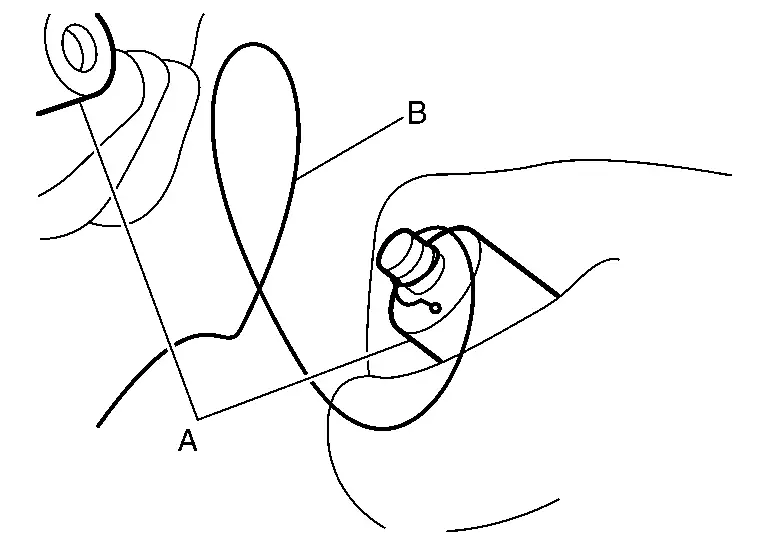
To cut adhesive, 2 workers are required.
Use suction lifter (A) to remove back door window glass from the vehicle.
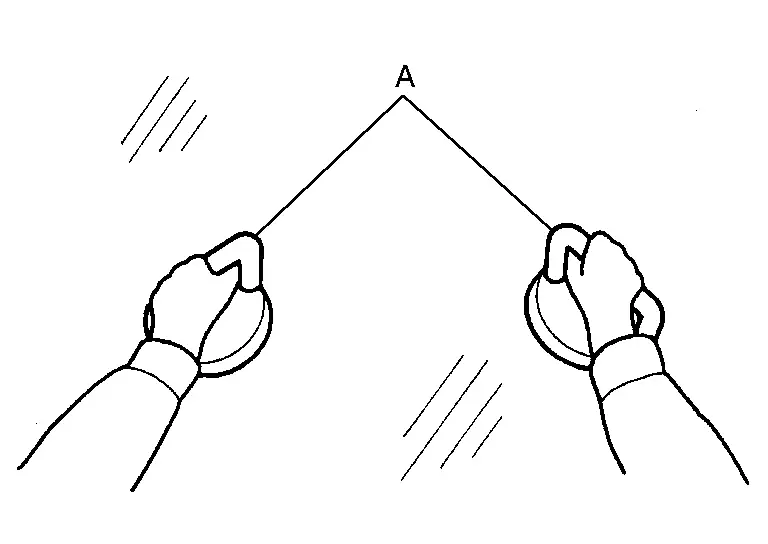
CAUTION:
Due to weight of back door window glass, 2 workers are required.
Remove remaining parts from back door outer panel.
Reuse Back Door Window Glass
CAUTION:
Never remove clips before recording clips location after removed back door window glass.
Never damage back door window glass.
Never use a windshield cutter.
Remove back door inner finisher. Refer to Removal and Installation.
Remove back door upper garnish. Refer to Removal and Installation.
Remove back door side garnish. Refer to Removal and Installation.
Remove intelligent rear view mirror camera [rear camera (driving video recorder)]. Refer to Removal and Installation [with rear camera (driving video recorder)].
Disconnect window defogger connector (LH and RH side).
Remove rear spoiler. Refer to Removal and Installation.
Remove rear side spoiler. Refer to Removal and Installation.
Remove back door finisher upper or tail lamp. Refer to following.
Back door finisher upper : Removal and Installation.
Tail lamp : Removal and Installation.
Remove rear wiper motor. Refer to Removal and Installation.
Apply protective tapes (A) on back door outer panel around back door window glass to protect painted surface from damage.
Apply matching marks (A) to back door window glass and back door outer panel.
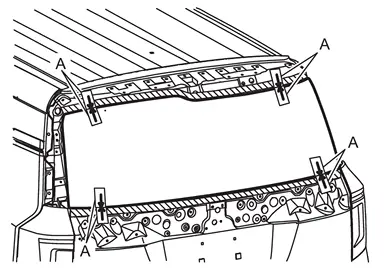
CAUTION:
To prevent the gap when install back door window glass put on matching marks.
Cut the adhesive using a piano wire.Pass the piano wire passenger room to bonded area of back door window glass using a wire pierce.
CAUTION:
Never press piano wire excessively against edge of back door window glass.
Never use plane surface of wire pierce tip vertically.
CAUTION:
To cut adhesive, 2 workers are required by all means.
Use suction lifter (A) to remove back door window glass from the vehicle.
CAUTION:
Due to weight of back door window glass, 2 workers are required by all means.
Remove remaining parts from back door outer panel.
INSTALLATION
CAUTION:
Never use back door window glass if it damaged.
Apply touch-up paint that same as body-color if the painted surface be damaged.
No need to applying painted surface primer onto painted surface.
Wipe the primer using degreasing agent, etc. if you apply it onto not-adhesive part by mistake.
Follow the instruction sheet of primer/adhesive when it is drying.
Replacement Back Door Window Glass
Make the remaining adhesive on back door outer panel to thin and smooth using a cutter knife or scraper as shown in the figure.
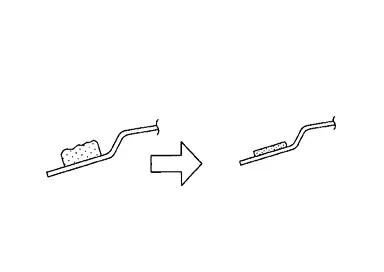
Place back door window glass on the vehicle temporarily, and then apply matching marks (A) on back door window glass and back door outer panel as shown in the figure.
CAUTION:
To prevent the gap when install new back door window glass put on matching marks by all means.
Due to weight of back door window glass, 2 workers are required by all means.
Set suction lifter (A) to back door window glass on glass stand (B).
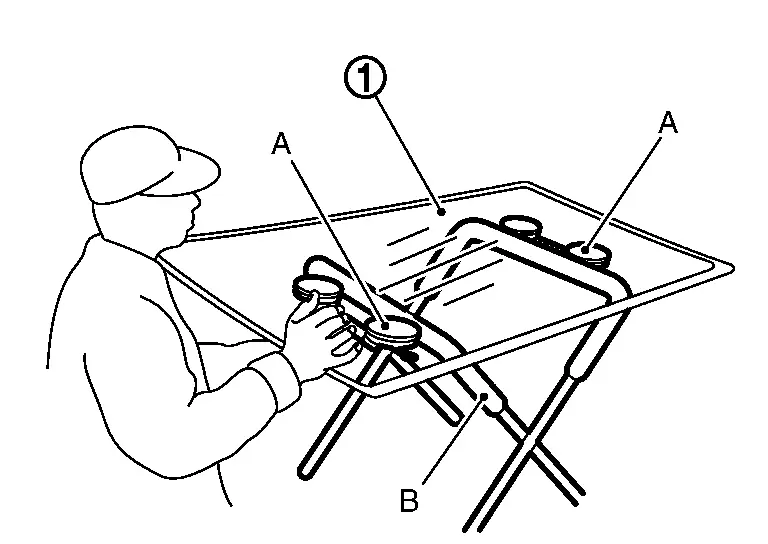
Clean the bonded area on back door window glass and back door outer panel using a white gasoline or degreasing agent.
Install dam sealant rubber.Clean back door widow glass to install position of dam sealant rubber using white gasoline or degreasing agent. Install dam sealant rubber while removing release liner as shown in the figure.
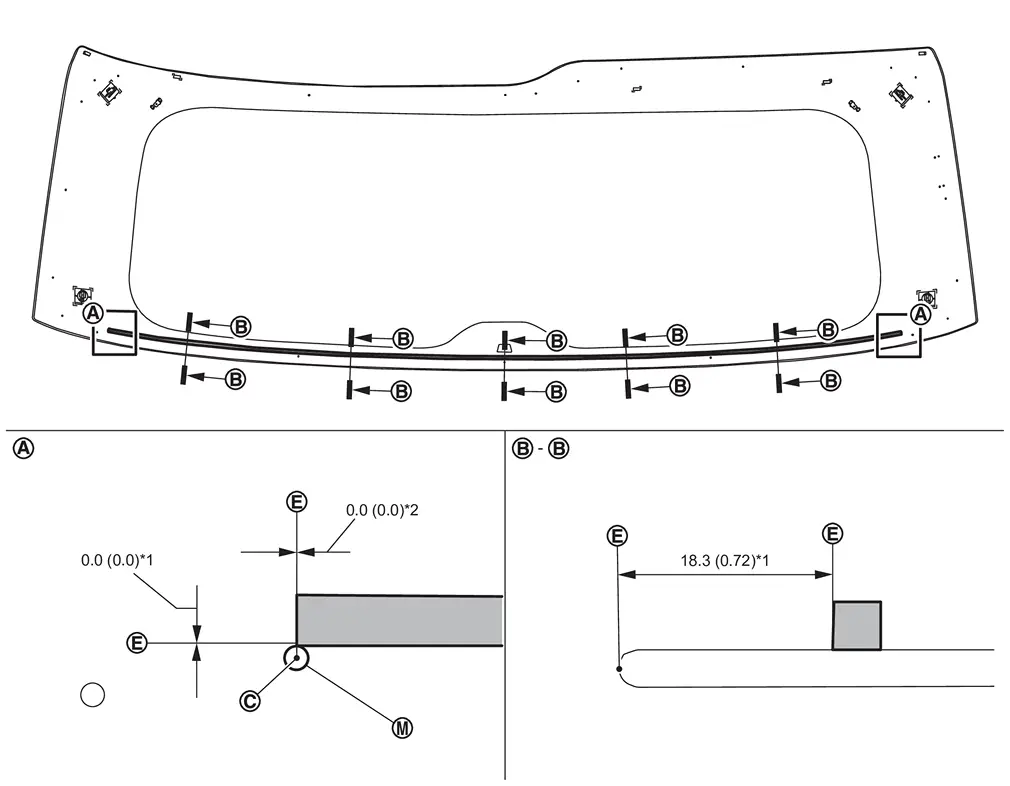
Unit: mm (in)
| *1 | : ± 1.5 mm (0.06 in) |
| *2 | : ± 5.0 mm (0.20 in) |
 | Center |
 | Edge |
 | Matching mark |
Install back door widow glass molding.Clean back door window glass to install position of back door window glass molding using white gasoline or degreasing agent. Apply glass primer on back door window glass of back door window glass molding install positions. Install back door window glass molding while removing release liner as shown in the figure.
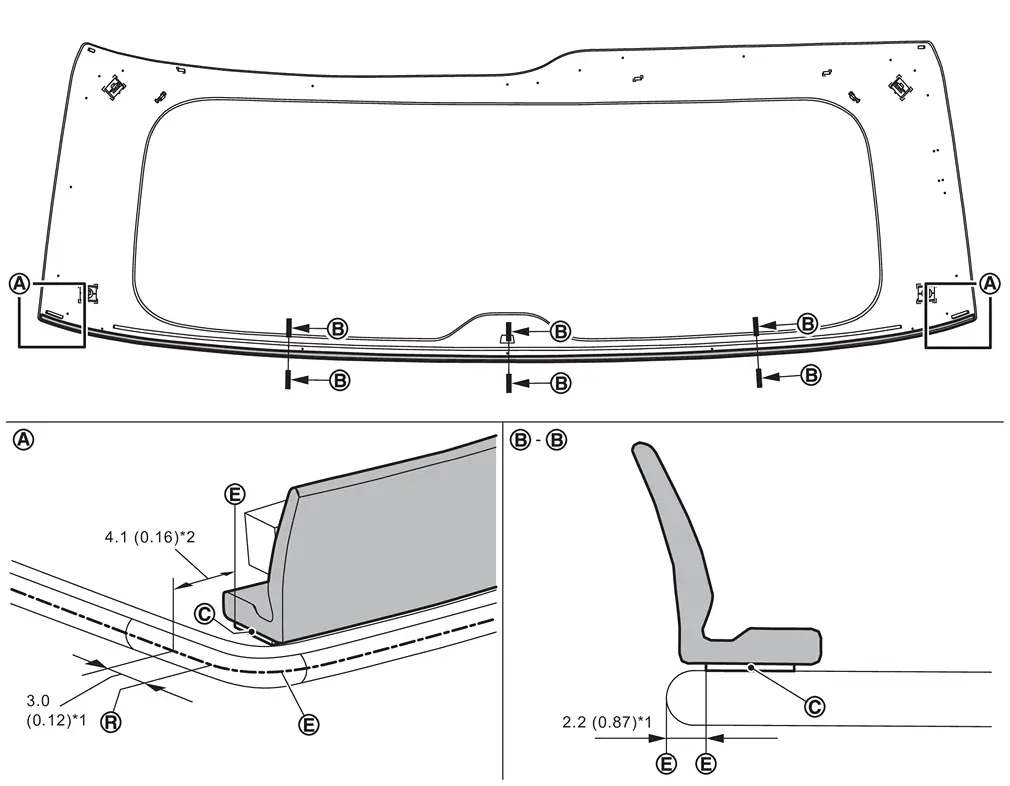
Unit: mm (in)
| *1 | : ± 1.0 mm (0.04 in) |
| *2 | : ± 1.5 mm (0.06 in) |
| Double-sided tape |
| Edge |
 | R-end |
Install spacer C.Clean back door window glass molding to install position of spacer C using white gasoline or degreasing agent. Apply glass primer on back door window glass molding install positions of spacer C. Remove release liner of double-sided tape, and then install spacer C as shown in the figure.
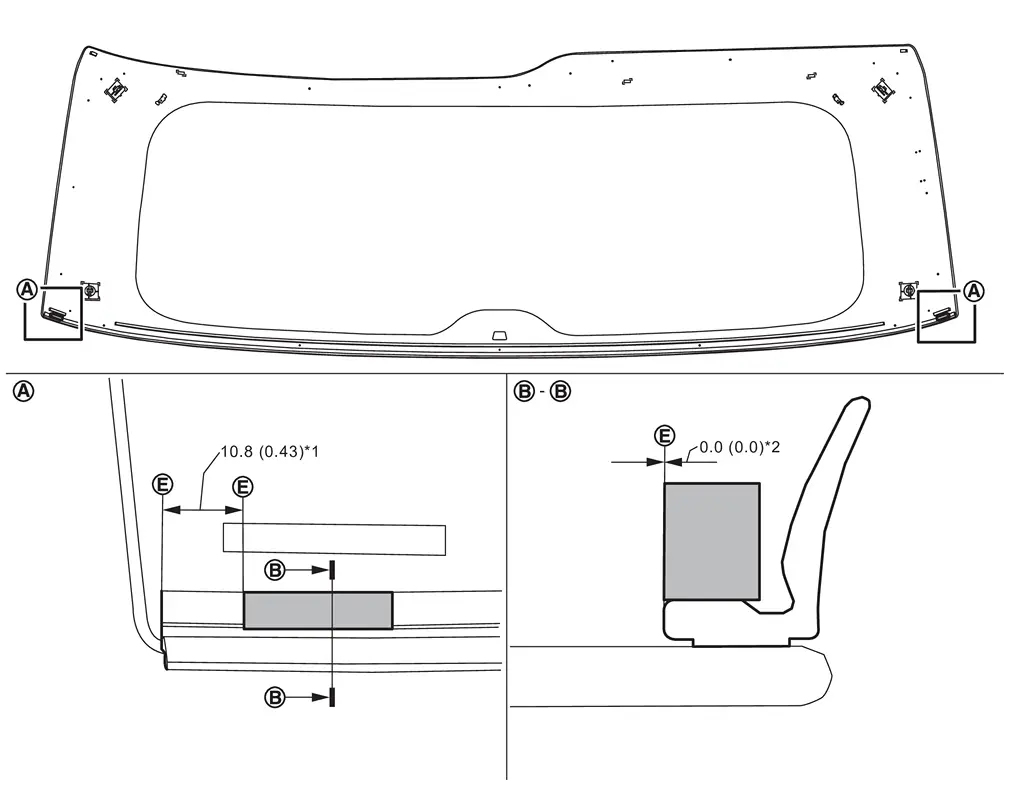
Unit: mm (in)
| *1 | : ± 3.0 mm (0.19 in) |
| *2 | : ± 1.0 mm (0.04 in) |
| Edge |
Apply glass primer along the entire circumference of back door window glass. For the range of glass primer, refer to Exploded View.
Apply adhesive to back door window glass by using an adhesive gun. For the volume of adhesive, refer to Exploded View.
CAUTION:
The start/stop positions to adhesive are along with adhesive marks as shown in the figure.
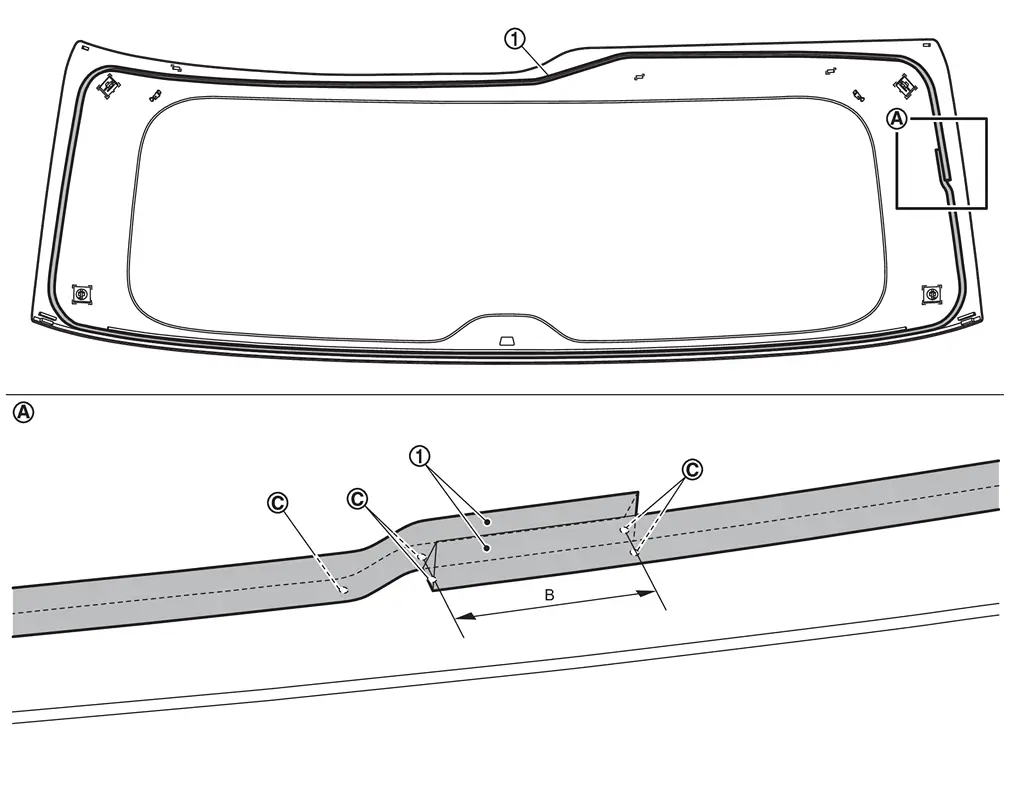
| B | : More than 30 mm (1.18 in) |
Install back door window glass to vehicle by checking the matching marks on back door outer panel and back door window glass.
CAUTION:
Due to weight of back door window glass, 2 workers are required.
Press entire surface of back door window glass lightly to fit it completely.
CAUTION:
Dry the adhesive according to the specification of adhesive kit.
After installing back door window glass, keep the all door glasses open until the adhesive is completely cured.
Never drive the vehicle before the adhesive is completely cured.
Remove protective tapes.
Install the removed parts.
CAUTION:
Adjust the rear wiper arm auto stop position. Refer to Adjustment.
Check the matching with surrounding parts. Adjust if necessary.
After installing, perform the inspection. Refer to Inspection.
Reuse Back Door Window Glass
CAUTION:
Before working, check and understand the clips status following bellow.
Take the matching marks
for record correctly install position if clips and/or clips base are leaving on back door window glass as shown in the figure.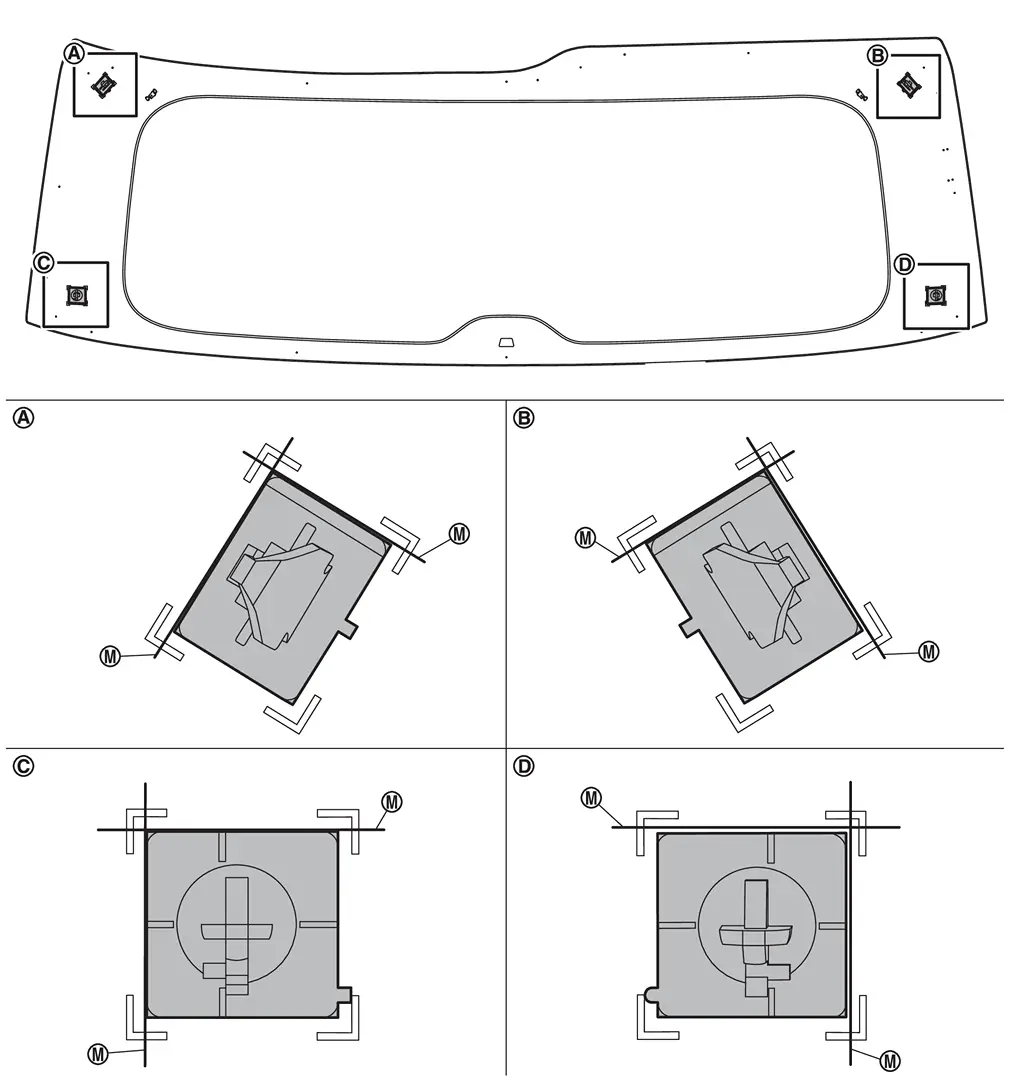
Replace as a new back door window glass assembly if the clips and/or base of clips are removed from back door window glass because new clips cannot be installed position.
Never reuse back door window glass if it has damage, scratch, clack, etc.
Make the remaining adhesive on back door outer panel to thin and smooth using a cutter knife or scraper as shown in the figure.
Remove remaining adhesive etc. using a cutter knife or scraper back door window glass.
Clean the bonded area on back door window glass and back door outer panel using a white gasoline or degreasing agent.
Install clips.Remove remaining clips after taking the matching marks. Clean back door window glass to install position of clips by using white gasoline or degreasing agent. Apply glass primer on back door window glass of clip install positions. Remove release liner of double-sided tape for installing clips. Install clips on back door window glass along with matching marks as shown in the figure.
Install spacer A.Clean back door widow glass to install position of spacer A using white gasoline or degreasing agent. Remove release liner of double-sided tape, and then install spacer A as shown in the figure.
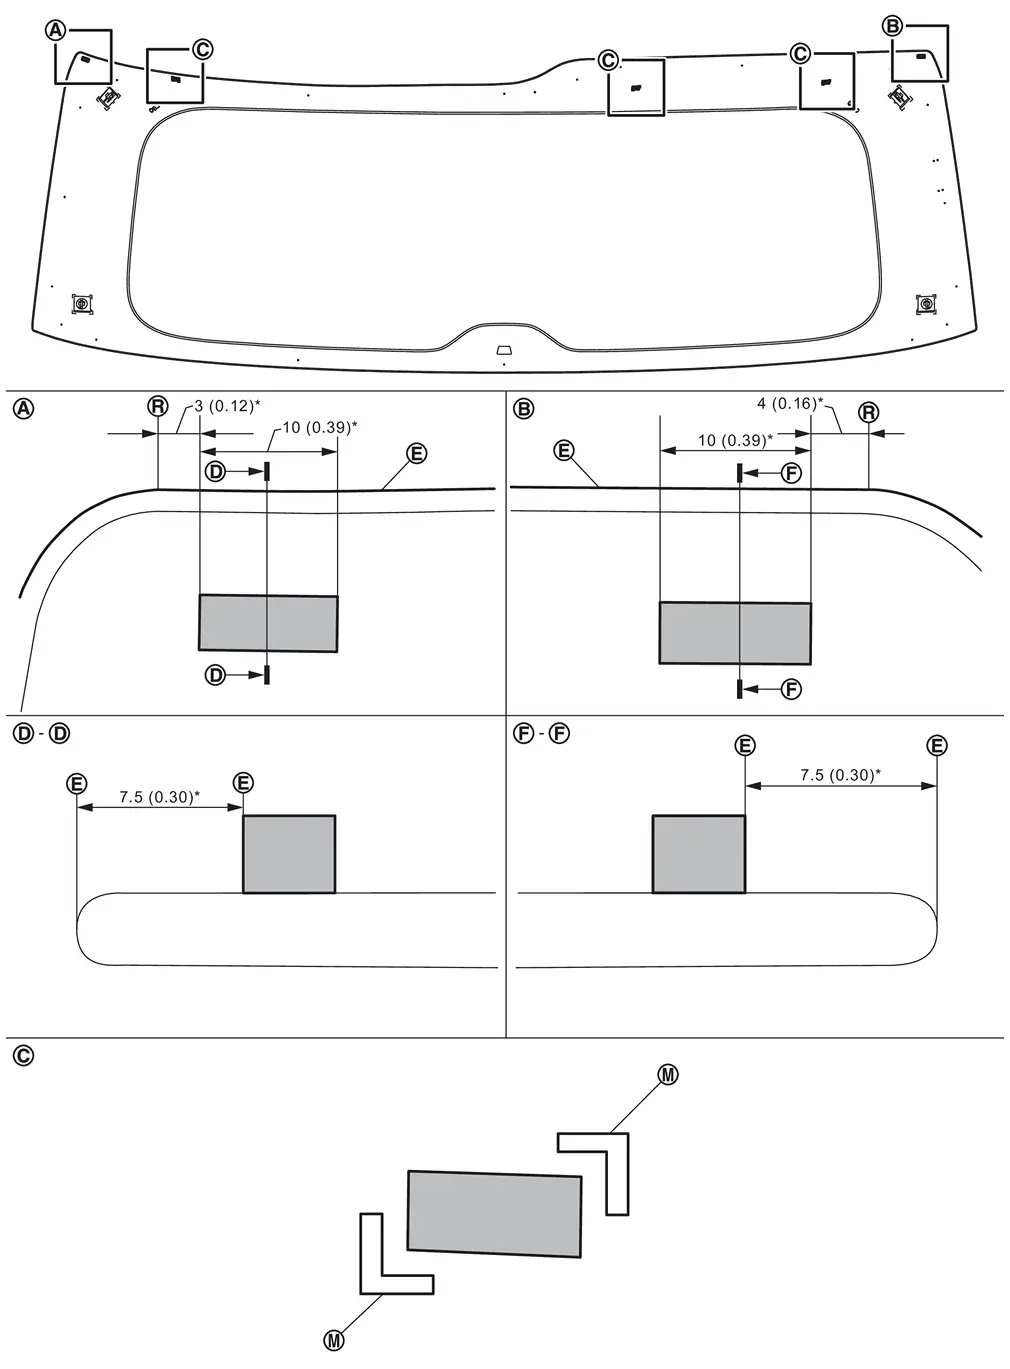
Unit: mm (in)
| * | : ± 2.0 mm (0.08 in) |
| : Install to matching marks inside. |
| Edge |
| R-end |
Install dam sealant rubber.Clean back door widow glass to install position of dam sealant rubber using white gasoline or degreasing agent. Install dam sealant rubber while removing release liner as shown in the figure.
Unit: mm (in)
| *1 | : ± 1.5 mm (0.06 in) |
| *2 | : ± 5.0 mm (0.20 in) |
| Center |
| Edge |
| Matching mark |
Install spacer B.Clean back door window glass to install position of spacer B using white gasoline or degreasing agent. Remove release liner of double-sided tape, and then install spacer B as shown in the figure.
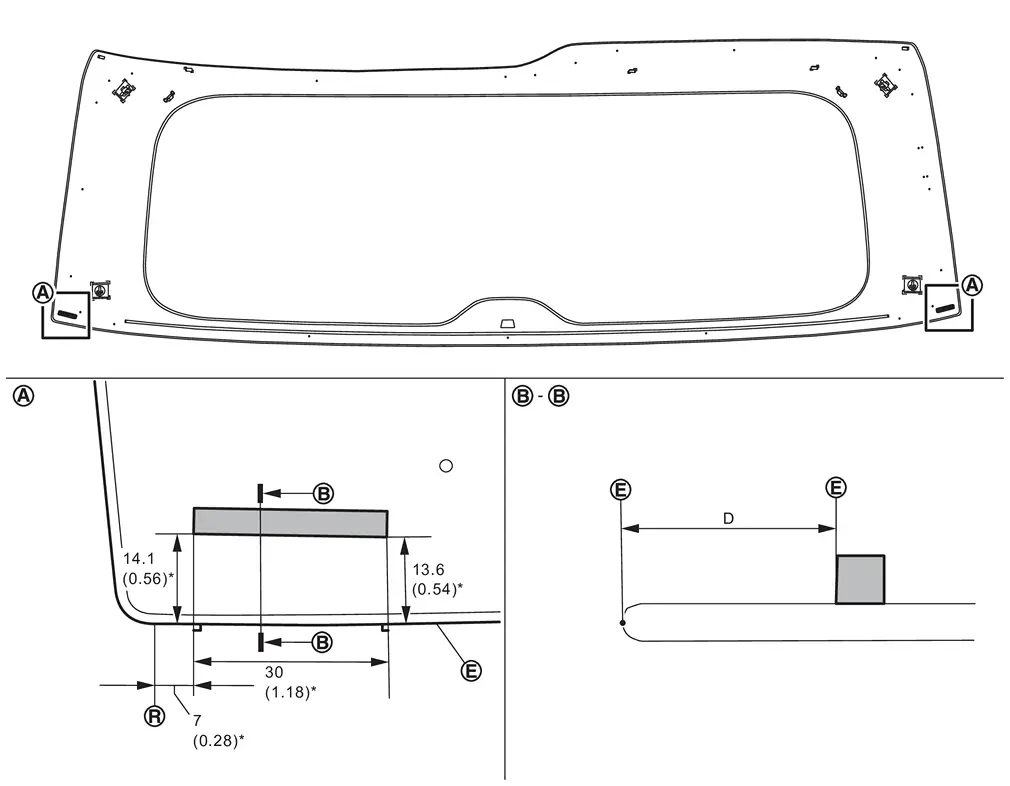
Unit: mm (in)
| D | : Dimensions |
| * | : ± 2.0 mm (0.08 in) |
| Edge |
| R-end |
Install back door widow glass molding.Clean back door window glass to install position of back door window glass molding using white gasoline or degreasing agent. Apply glass primer on back door window glass of back door window glass molding install positions. Install back door window glass molding while removing release liner as shown in the figure.
Unit: mm (in)
| *1 | : ± 1.0 mm (0.04 in) |
| *2 | : ± 1.5 mm (0.06 in) |
| Double-sided tape |
| Edge |
| R-end |
Install spacer C.Clean back door window glass molding to install position of spacer C using white gasoline or degreasing agent. Apply glass primer on back door window glass molding to install position of spacer C. Remove release liner of double-sided tape, and then install spacer C as shown in the figure.
Unit: mm (in)
| *1 | : ± 3.0 mm (0.19 in) |
| *2 | : ± 1.0 mm (0.04 in) |
| Edge |
Apply glass primer along the entire circumference of back door window glass. For the range of glass primer, refer to Exploded View.
Apply adhesive to back door window glass by using an adhesive gun. For the volume of adhesive, refer to Exploded View.
CAUTION:
The start/stop positions to applying adhesive are along with adhesive marks as shown in the figure.
| B | : More than 30 mm (1.18 in) |
Install back door window glass to vehicle by checking the matching marks on back door outer panel and back door window glass.
CAUTION:
Due to weight of back door window glass, 2 workers are required.
Press entire surface of back door window glass lightly to fit it completely.
CAUTION:
Dry the adhesive according to the specification of adhesive kit.
After installing back door window glass, keep the all door glasses open until the adhesive is completely cured.
Never drive the vehicle before the adhesive is completely cured.
Remove protective tapes.
Install the removed parts.
CAUTION:
Adjust the rear wiper arm auto stop position. Refer to Adjustment.
Check the matching with surrounding parts. Adjust if necessary.
After installing, perform the inspection. Refer to Inspection.
 Exploded View
Back door outer panel Back door window glass Spacer A Clip upper RH Clip lower Spacer B Spacer C Back door window glass molding Dam sealant rubber Clip upper LH Glass primer Adhesive Adh ...
 Inspection
WATER LEAKAGE INSPECTION
CAUTION:
If leakage was found, start over from the beginning as back door window glass removal, install and leaking check.
...
Other materials:
Component Inspection (Heated Steering Wheel Relay)
CHECK HEATED STEERING WHEEL RELAY CONTINUITY
Check continuity between heated steering wheel relay terminals.
CAUTION:
Connect the fuse between the terminals when applying the voltage.
Heated steering wheel relay Condition Continuity Terminal 3 − 5 Apply 12 V direct current between terminals ...
Exploded View
Circular clip Dust shield Housing Snap ring Ball cage/steel ball/inner race assembly Stopper ring Boot band Boot Shaft Circular clip Joint sub-assembly : Wheel side : Always replace after every disassembly. 1: NISSAN Genuine grease or equivalent. 2: Apply paste [service parts (44003 ...
FUEL LEVEL SENSOR UNIT, FUEL FILTER AND FUEL PUMP ASSEMBLY : Removal & Installation
WARNING:
WARNING:
Be sure to read “General Precautions� when working on the fuel system. Refer to GENERAL PRECAUTION : Precautions.
REMOVAL
Check fuel level on a level ground. If the fuel level is 7/8 of the fuel tank (full or nearly full), draw appropriate amount of fuel from the fuel tank.
...

0.005