
Nissan Armada 2025-2026 Service and Repair Manual: Removal and Installation
WARNING:
CAUTION:
For repair and mending of irradiation area of side radar, be careful the following.
Never affix a sticker (including transparent one) or install an accessory to the detecting range of side radar.
Since it affects side radar performance, there are some restrictions on the various construction on rear bumper of the vehicle equipped with side radar. Refer to Inspection (Front bumper) or Inspection (Rear bumper) for detailed information.
Never reuse the side radar bracket. Always use new side radar bracket when removing and replacing side radar bracket and/or rear bumper facia.
Do not use the side radar if the lens has flaws.
Perform side radar alignment every time the side radar is removed and installed. Refer to Work Procedure.
 NOTE:
NOTE:
Always lock the side radar connector.
Do not touch the side radar lens and keep lens area clean.
FRONT SIDE RADAR
REMOVAL
Remove front bumper fascia. Refer to Removal and Installation.
Disconnect front side radar harness connector , follow the procedure below.
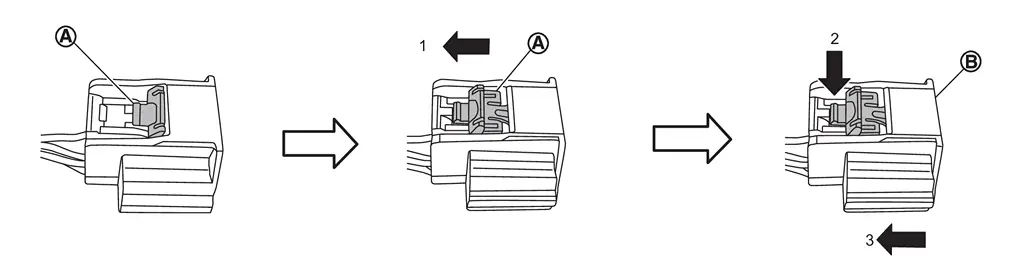
 of the connector toward the direction (1). Keep pushing (2) in the lock of connector and remove the harness connector
  to ward the direction (3).
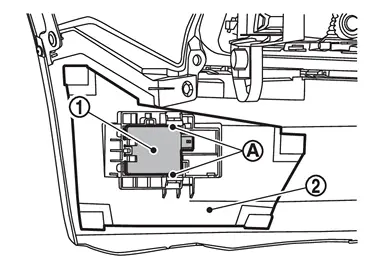
Release pawls , and remove the front side radar  from front side radar bracket
  .
.
INSTALLATION
CAUTION:
If the side radar is removed, perform "SIDE RADAR ALIGNMENT". Refer to Work Procedure.
If side radar is being replaced or has been disconnected, perform "ADDITIONAL SERVICE WHEN REPLACING SIDE RADAR". Refer to Work Procedure.
Be careful not to install the parts left and right reversed.
Do not mark on the front side radar as it may affect the radar recognize performance.
Never reuse the front side radar bracket. Always use new front side radar bracket when removing and replacing front side radar bracket and/or front bumper facia.
Degrease and clean the inner side of the front bumper fascia base line and then apply primer (3M K500,K520 or equivalent) on the front side radar bracket installing face , which is shown as on the figure.
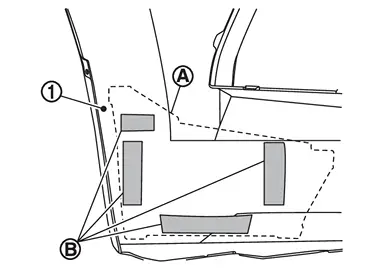
CAUTION:
Never apply two coats of primer. Applying two coats or more of primer results in excessively thick film and this may allow the front side radar bracket to come off from primer under exfoliation.
Dry the primer for more than 3 minutes and peel off the double sided tape releasing paper (film).
CAUTION:
Primer drying time depends on temperature and therefore confirm that primer has dried.
Install the front side radar bracket to the front bumper fascia and pressure bond the front side radar bracket.
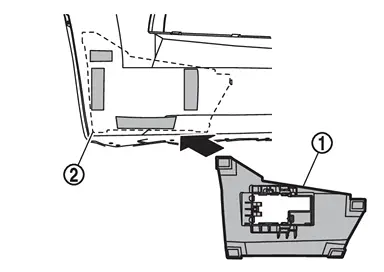
CAUTION:
After installing the front side radar bracket, leave it at least for 2 - 3 hours.
Shake the front side radar bracket up and down and then right and left to confirm that the front side radar bracket to front bumper fascia has been installed (bonded) firmly.
Install the front side radar by locking it with the pawls of the front side radar bracket .
Connect front side radar harness connector , follow the procedure below.
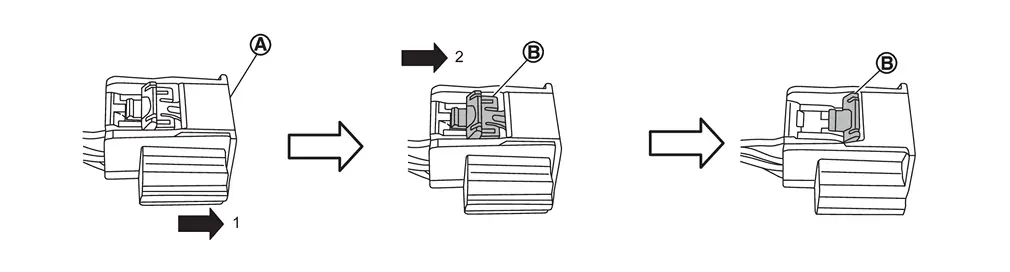
of the connector toward the direction (2).
Install the front bumper fascia. Refer to Removal and Installation.
SIDE RADAR REAR
REMOVAL
Remove rear bumper fascia. Refer to Removal and Installation.
Release clips , and remove the rear side radar bracket cover .
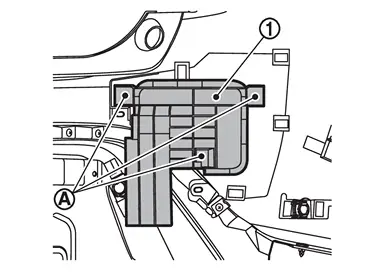
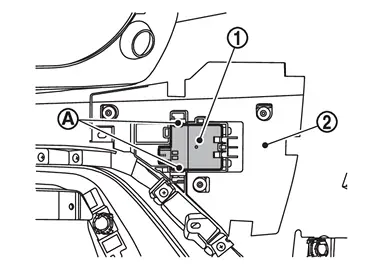
Disconnect rear side radar harness connector , follow the procedure below.
of the connector toward the direction (1). Keep pushing (2) in the lock of connector and remove the harness connector to ward the direction (3).
Release pawls , and remove the rear side radar from rear side radar bracket . 
INSTALLATION
CAUTION:
If the side radar is removed, perform "SIDE RADAR ALIGNMENT". Refer to Work Procedure.
If side radar is being replaced or has been disconnected, perform "ADDITIONAL SERVICE WHEN REPLACING SIDE RADAR". Refer to Work Procedure.
Be careful not to install the parts left and right reversed.
Do not mark on the rear side radar as it may affect the radar recognize performance.
Never reuse the rear side radar bracket. Always use new rear side radar bracket when removing and replacing rear side radar bracket and/or rear bumper facia.
Degrease and clean the inner side of the rear bumper fascia base line and then apply primer (3M K500,K520 or equivalent) on the rear side radar bracket installing face , which is shown as on the figure.
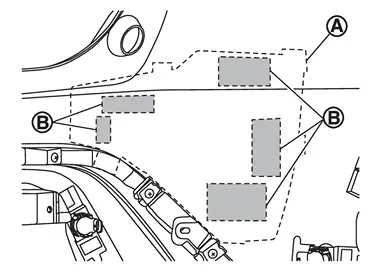
CAUTION:
Never apply two coats of primer. Applying two coats or more of primer results in excessively thick film and this may allow the rear side radar bracket to come off from primer under exfoliation.
Dry the primer for more than 3 minutes and peel off the double sided tape releasing paper (film).
CAUTION:
Primer drying time depends on temperature and therefore confirm that primer has dried.
Install the rear side radar bracket to the rear bumper fascia and pressure bond the rear side radar bracket.
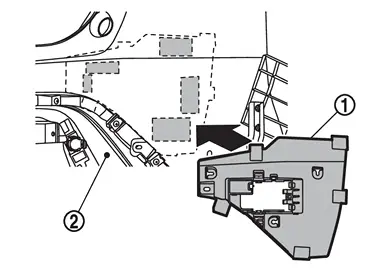
CAUTION:
After installing the rear side radar bracket, leave it at least for 2 - 3 hours.
Shake the rear side radar bracket up and down and then right and left to confirm that the rear side radar bracket to rear bumper fascia has been installed (bonded) firmly.
Install the rear side radar by locking it with the pawls of the rear side radar bracket .
Connect rear side radar harness connector , follow the procedure below.
of the connector toward the direction (2).
Install the rear side radar bracket cover to rear side radar bracket.
Install the rear bumper fascia. Refer to Removal and Installation.
 Exploded View
SIDE RADAR FRONT
Front bumper fascia Front LH side radar bracket Side radar front LH Side radar front RH Front RH side radar bracket
SIDE RADAR REAR
Rear bumper fascia Rear RH side radar bra ...
 Bsw Indicator
...
Other materials:
Symptom Table
Symptom Possible causeInspection itemAll function does not operateFusible linkFuseThird seat control unit power supply/ground circuit
Check power supply and ground circuit (third seat control unit)
Third seat control unit RH: Refer to Diagnosis Procedure.Third seat control unit LH: Refer to Diagnos ...
Removal and Installation
CAUTION:
Never damage the roof panel.
REMOVAL
CAUTION:
Fully open back door.
Release roof rear garnish portion of back door weather-strip. Refer to Removal and Installation.
Release connector tongue of third seat belt retractor from roof rear garnish.
Remove luggage room lamp. Refer to Removal and I ...
Removal and Installation
CAUTION:
Never damage the body panel.
REMOVAL
Remove front kicking plate. Refer to Removal and Installation.
Remove hood lock control handle (driver side). Refer to Removal and Installation.
Disengage dash trim clip from dash side finisher.
Disengage dash side finisher fixing clips, and then remo ...

0.0064