Exploded View
SIDE RADAR FRONT
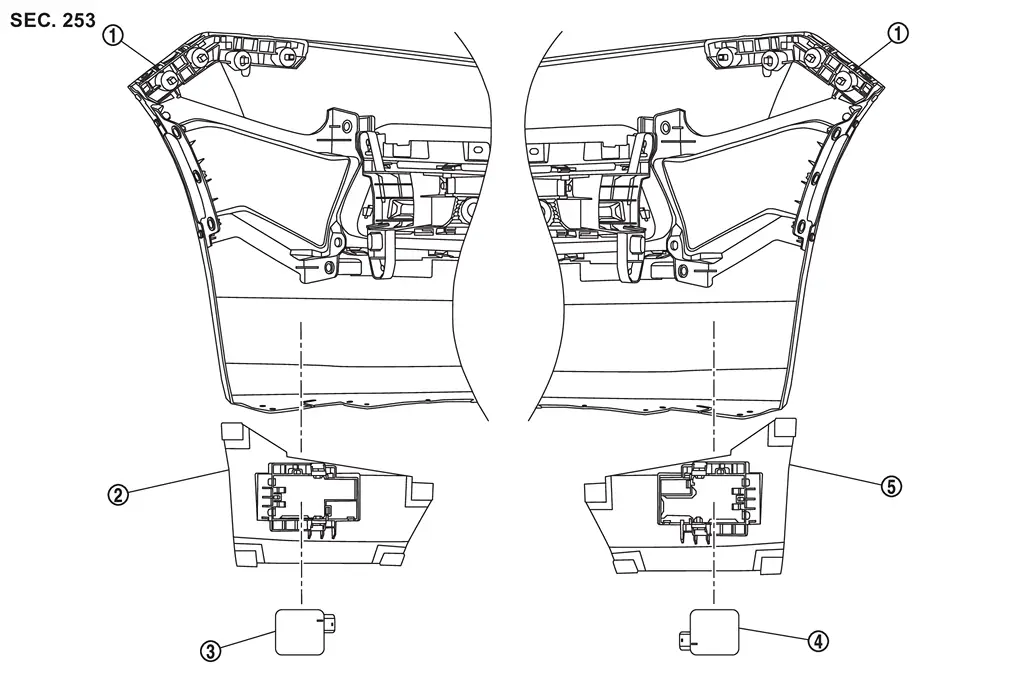
 |
Front bumper fascia |  |
Front LH side radar bracket |  |
Side radar front LH |
 |
Side radar front RH |  |
Front RH side radar bracket |
SIDE RADAR REAR
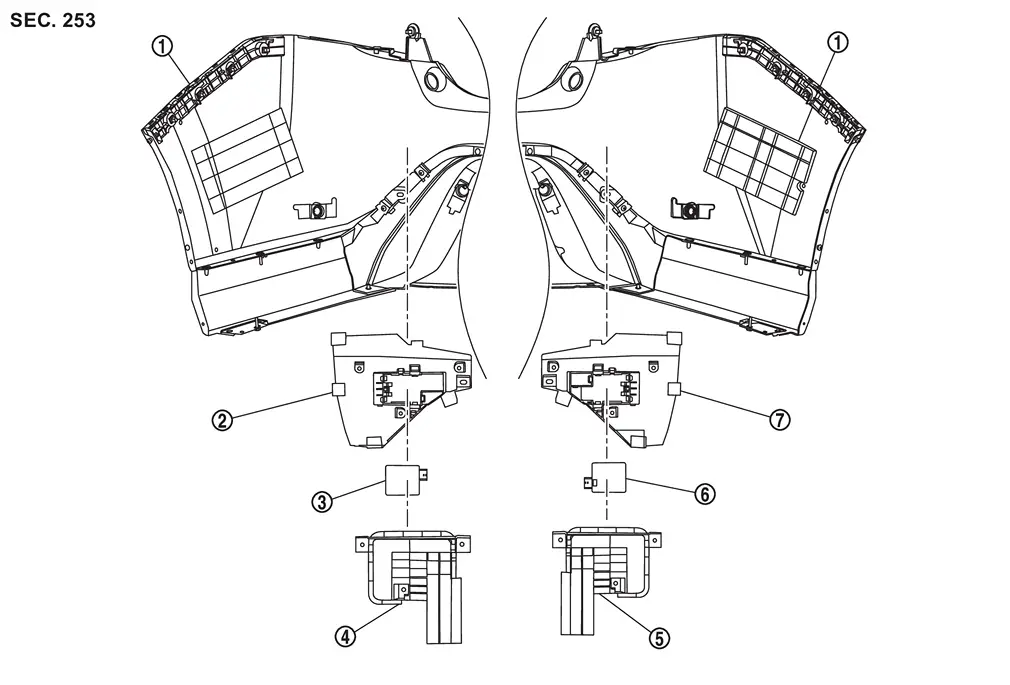
|
Rear bumper fascia | |
Rear RH side radar bracket | |
Rear RH side radar |
|
Rear RH side radar bracket cover | |
Rear LH side radar bracket cover |  |
Rear LH side radar |
 |
Rear LH side radar bracket |
Removal and Installation
WARNING:
-
Jacking up or lift up the vehicle may the vehicle height to go down which cause a personal injury and/or damage to the air suspension component parts. Refer to Precaution for when Jacking and Lifting Up the vehicle with Electronic Air Suspension System.
CAUTION:
-
For repair and mending of irradiation area of side radar, be careful the following.
-
Do not leave cracks, scratches and deformations in the side radar irradiation area.
-
Never affix a sticker (including transparent one) or install an accessory to the detecting range of side radar.
-
Since it affects side radar performance, there are some restrictions on the various construction on rear bumper of the vehicle equipped with side radar. Refer to Inspection (Front bumper) or Inspection (Rear bumper) for detailed information.
-
Never reuse the side radar bracket. Always use new side radar bracket when removing and replacing side radar bracket and/or rear bumper facia.
-
-
Do not use the side radar if the lens has flaws.
-
Perform side radar alignment every time the side radar is removed and installed. Refer to Work Procedure.
 NOTE:
NOTE:
-
Always lock the side radar connector.
-
Do not touch the side radar lens and keep lens area clean.
FRONT SIDE RADAR
REMOVAL
Remove front bumper fascia. Refer to Removal and Installation.
Disconnect front side radar harness connector , follow the procedure below.
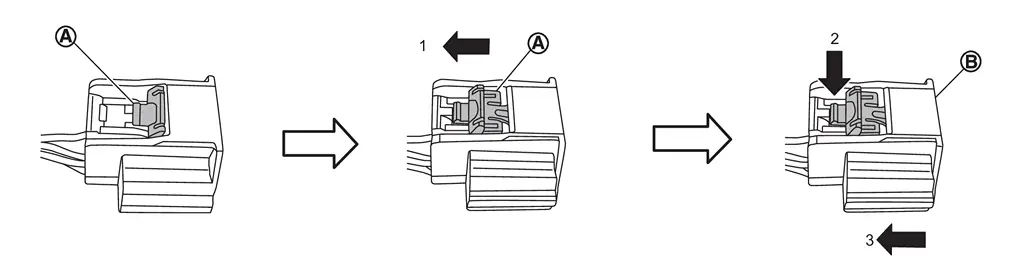
 of the connector toward the direction (1). Keep pushing (2) in the lock of connector and remove the harness connector
  to ward the direction (3).
Release pawls , and remove the front side radar from front side radar bracket .
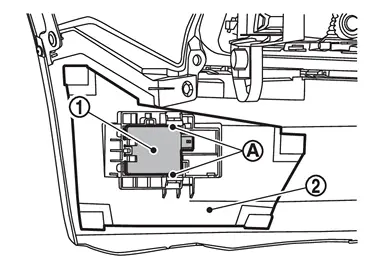
INSTALLATION
CAUTION:
-
If the side radar is removed, perform "SIDE RADAR ALIGNMENT". Refer to Work Procedure.
-
If side radar is being replaced or has been disconnected, perform "ADDITIONAL SERVICE WHEN REPLACING SIDE RADAR". Refer to Work Procedure.
-
Be careful not to install the parts left and right reversed.
-
Do not mark on the front side radar as it may affect the radar recognize performance.
-
Never reuse the front side radar bracket. Always use new front side radar bracket when removing and replacing front side radar bracket and/or front bumper facia.
Degrease and clean the inner side of the front bumper fascia base line and then apply primer (3M K500,K520 or equivalent) on the front side radar bracket installing face , which is shown as on the figure.
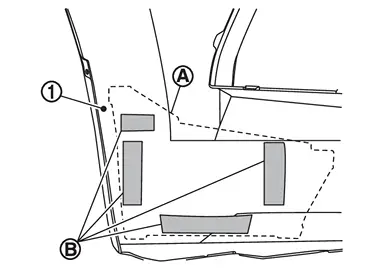
CAUTION:
Never apply two coats of primer. Applying two coats or more of primer results in excessively thick film and this may allow the front side radar bracket to come off from primer under exfoliation.
Dry the primer for more than 3 minutes and peel off the double sided tape releasing paper (film).
CAUTION:
Primer drying time depends on temperature and therefore confirm that primer has dried.
Install the front side radar bracket to the front bumper fascia and pressure bond the front side radar bracket.
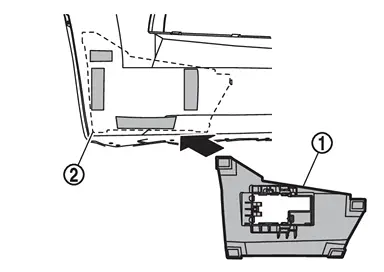
CAUTION:
-
When the temperature is less than 15°C (59°F), use a drier etc., to warm the adhesion face and proceed the work.
-
After installing the front side radar bracket, leave it at least for 2 - 3 hours.
Shake the front side radar bracket up and down and then right and left to confirm that the front side radar bracket to front bumper fascia has been installed (bonded) firmly.
Install the front side radar by locking it with the pawls of the front side radar bracket .
Connect front side radar harness connector , follow the procedure below.
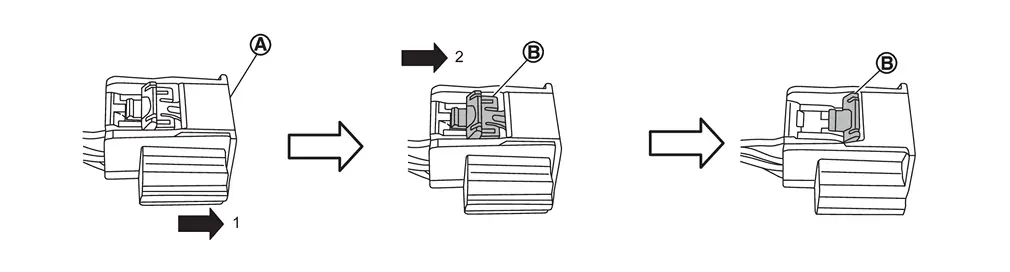
of the connector toward the direction (2).
Install the front bumper fascia. Refer to Removal and Installation.
SIDE RADAR REAR
REMOVAL
Remove rear bumper fascia. Refer to Removal and Installation.
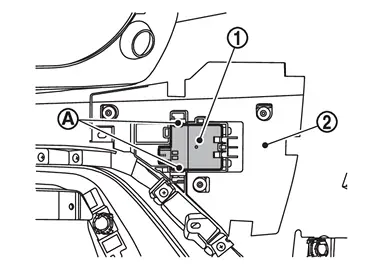
Release clips , and remove the rear side radar bracket cover .
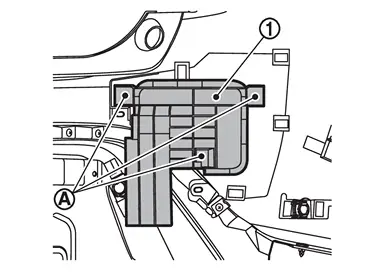
Disconnect rear side radar harness connector , follow the procedure below.
of the connector toward the direction (1). Keep pushing (2) in the lock of connector and remove the harness connector to ward the direction (3).
Release pawls , and remove the rear side radar from rear side radar bracket .
INSTALLATION
CAUTION:
-
If the side radar is removed, perform "SIDE RADAR ALIGNMENT". Refer to Work Procedure.
-
If side radar is being replaced or has been disconnected, perform "ADDITIONAL SERVICE WHEN REPLACING SIDE RADAR". Refer to Work Procedure.
-
Be careful not to install the parts left and right reversed.
-
Do not mark on the rear side radar as it may affect the radar recognize performance.
-
Never reuse the rear side radar bracket. Always use new rear side radar bracket when removing and replacing rear side radar bracket and/or rear bumper facia.
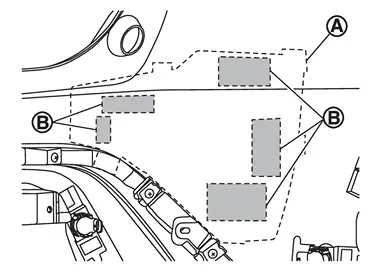
Degrease and clean the inner side of the rear bumper fascia base line and then apply primer (3M K500,K520 or equivalent) on the rear side radar bracket installing face , which is shown as on the figure.
CAUTION:
Never apply two coats of primer. Applying two coats or more of primer results in excessively thick film and this may allow the rear side radar bracket to come off from primer under exfoliation.
Dry the primer for more than 3 minutes and peel off the double sided tape releasing paper (film).
CAUTION:
Primer drying time depends on temperature and therefore confirm that primer has dried.
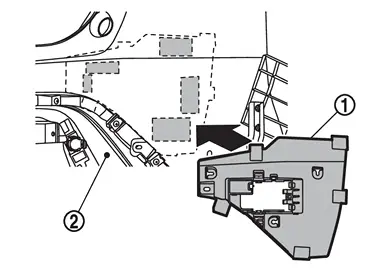
Install the rear side radar bracket to the rear bumper fascia and pressure bond the rear side radar bracket.
CAUTION:
-
When the temperature is less than 15°C (59°F), use a drier etc., to warm the adhesion face and proceed the work.
-
After installing the rear side radar bracket, leave it at least for 2 - 3 hours.
Shake the rear side radar bracket up and down and then right and left to confirm that the rear side radar bracket to rear bumper fascia has been installed (bonded) firmly.
Install the rear side radar by locking it with the pawls of the rear side radar bracket .
Connect rear side radar harness connector , follow the procedure below.
of the connector toward the direction (2).
Install the rear side radar bracket cover to rear side radar bracket.
Install the rear bumper fascia. Refer to Removal and Installation.
Other materials
Drive Plate
Exploded View
Crankshaft position sensor
Dowel pin
Drive plate
: N·m (kg-m, ft-lb)
: N·m (kg-m, in-lb)
Removal and Installation
REMOVALRemove A/T assembly from the vehicle. Refer to following :
2WD models: Refer to Removal and Installation.
4WD models: Refer to Removal and ...
Noise, Vibration, and Harshness (nvh) Troubleshooting
NVH Troubleshooting Chart
Use the chart below to find the cause of the symptom. If necessary, repair or replace these parts. Possible cause and SUSPECTED PARTS Symptom Reference
Vibration Shake Noise
Uneven rotating torque
×
×
Inspection
Center bearing improper installation
× ...
Normal Operating Condition
Symptom Description
Symptom Result
The brake pedal may occasionally vibrate slightly while braking.
This occurs when the electrical brake control unit is operating normally and is not a malfunction.
Operating noise may occur from the electrical brake control unit.
Depending on vehicle co ...