Inspection
WARNING:
-
Jacking up or lift up the vehicle may the vehicle height to go down which cause a personal injury and/or damage to the air suspension component parts. Refer to Precaution for when Jacking and Lifting Up the vehicle with Electronic Air Suspension System.
FLUID LEAKAGE
Check transfer surrounding area (oil seal, drain plug, and filler plug etc.) for fluid leakage.
FLUID LEVEL
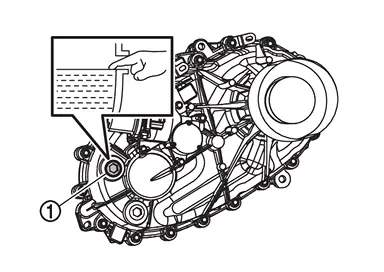
Remove filler plug  . Then check that fluid is filled up from mounting hole for the filler plug.
CAUTION:
Never start engine while checking fluid level.
Install filler plug on transfer and then tighten to the specified torque.
CAUTION:
Never reuse filler plug.
| Specified torque | : 37.5 N·m (3.8 kg-m, 28 ft-lb) |
Draining
WARNING:
-
Jacking up or lift up the vehicle may the vehicle height to go down which cause a personal injury and/or damage to the air suspension component parts. Refer to Precaution for when Jacking and Lifting Up the vehicle with Electronic Air Suspension System.
The ignition switch OFF.
Remove the drain plug .
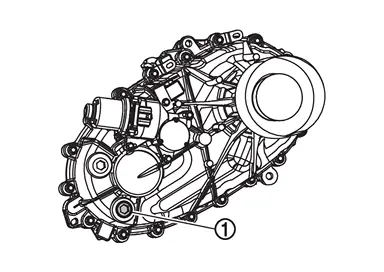
Drain transfer fluid.
Install drain plug to transfer and tighten to the specified torque.
CAUTION:
Never reuse drain plug.
| Specified torque | : 37.5 N·m (3.8 kg-m, 28 ft-lb) |
Refilling
WARNING:
-
Jacking up or lift up the vehicle may the vehicle height to go down which cause a personal injury and/or damage to the air suspension component parts. Refer to Precaution for when Jacking and Lifting Up the vehicle with Electronic Air Suspension System.
The ignition switch OFF.
Remove filler plug . Fill up with new transfer fluid up to mounting hole for the filler plug.
| Recommended fluid and capacity: | Refer to Fluids and Lubricants. |
CAUTION:
Carefully fill the fluid. (Fill up for approximately 3 minutes.)
Leave the vehicle for 3 minutes, and check the fluid level again.
Install filler plug on transfer and tighten to the specified torque.
CAUTION:
Never reuse filler plug.
| Specified torque | : 37.5 N·m (3.8 kg-m, 28 ft-lb) |
Other materials
Starting the engine
Basic information
1. Apply the parking brake.
2. Confirm that the Nissan Armada is in the P (Park) position.
The Intelligent Key must be inside the Nissan Armada when operating the ignition
system.
3. Press the ignition switch to the ON position. Then depress the brake pedal
and press the ig ...
Headlining
Exploded View
Without Moonroof Models
Roof rear garnish
Room lamp bracket
Headlining assembly
Third assist grip RH
Personal lamp bracket
Personal lamp
Second assist grip RH
Vanity mirror lamp bracket
Front assist grip RH
Vanity mirror lamp
Map lamp bracket
Sun v ...
Rear Side Spoiler
Exploded View
Rear side spoiler
Double-sided tape
[t: 2.5 mm (0.098 in)]
: Clip
: Always replace after every disassembly.
Removal and Installation
REMOVALFully open back door.
Remove rear combination lamp cover. Refer to Removal and Installation.
Remove rear side spoile ...