Exploded View
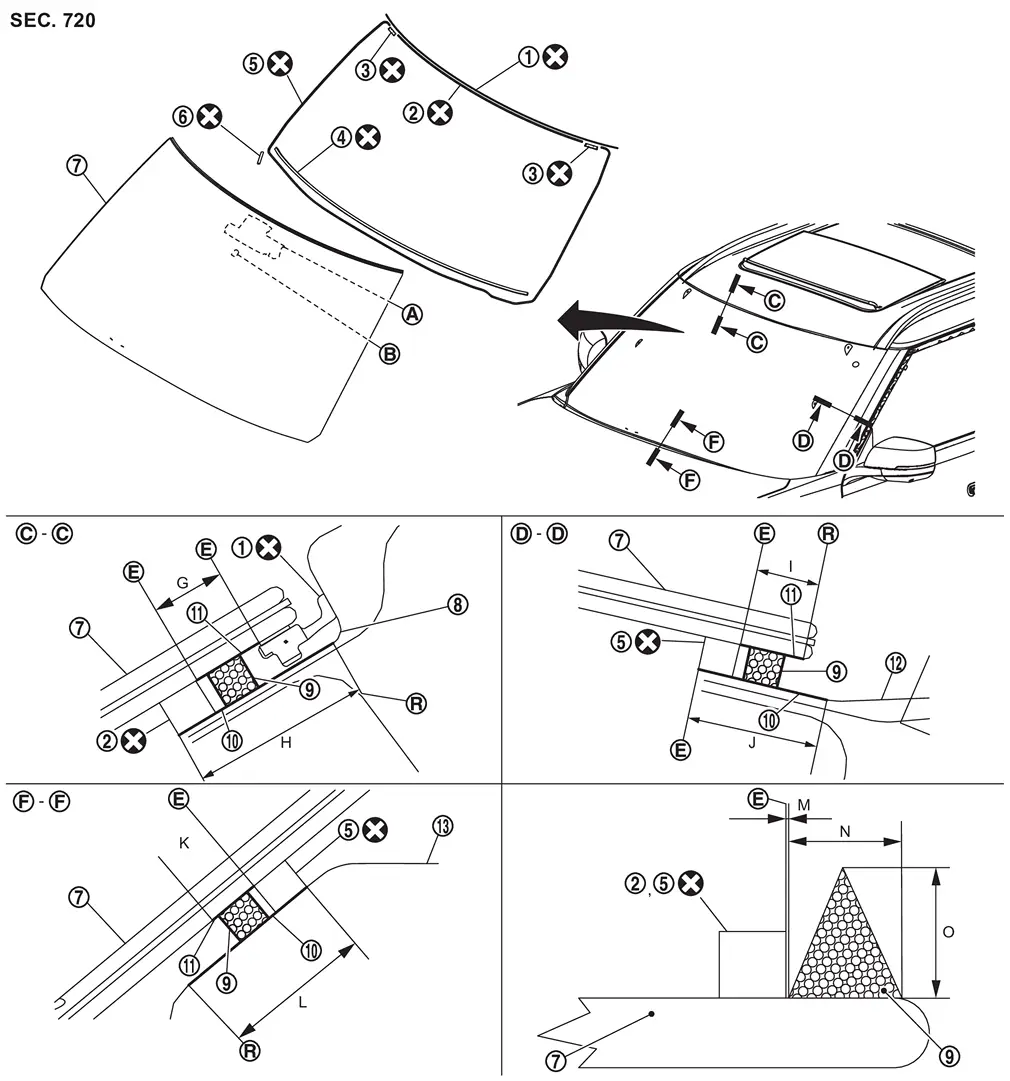
 |
Windshield molding |  |
Dam sealant rubber upper |  |
Clip |
 |
Insulator |  |
Dam sealant rubber |  |
Spacer |
 |
Windshield glass |  |
Roof panel |  |
Adhesive |
 |
Painted surface primer |  |
Glass primer |  |
Body side outer panel |
 |
Dash panel | ||||
 |
: Bracket | ||||
 |
: Inside mirror base | ||||
 |
: Edge | ||||
 |
: R end | ||||
 |
: Always replace after every disassembly. | ||||
Unit: mm (in)
| Portion | Primer range | Adhesive range | |||||
|---|---|---|---|---|---|---|---|
| M | N | O | |||||
| Windshield glass - Roof panel |  - - |
G | Between windshield molding and dam sealant rubber upper |
0 + 1.0, - 0.0 (0.0 + 0.04, - 0.0) |
7.0 + 2.0, - 0.0 (0.28 + 0.08, - 0.0) |
12.0 + 2.0, - 0.0 (0.47 + 0.08, - 0.0) |
|
| H | From R-end, more than 20.0 (0.79) | ||||||
| Windshield glass - Body side outer panel |  - - |
I | Between R-end and dam sealant rubber | ||||
| J | From body side panel edge, more than 15.4 (0.61) | ||||||
| Windshield glass - Dash panel |  - - |
K | From dam sealant rubber, more than 11.0 (0.43) | ||||
| L | From dash panel R-end, more than 19.0 (0.75) | ||||||
Removal and Installation
CAUTION:
-
There are some cautions for the clips of "Reuse" removal/install procedure. If you want reuse windshield glass, you should be read each caution at first.
-
Never damage painted surface and surrounded parts.
REMOVAL
Replacement Windshield Glass
Remove inside mirror or intelligent rear view mirror. Refer to following.
-
Inside mirror : Removal and Installation.
-
Intelligent rear view mirror : Removal and Installation.
Remove front camera unit. Refer to Removal and Installation (with front camera unit).
Remove front camera (driving video recorder). Refer to Removal and Installation (with driving video recorder system).
Remove light & rain sensor. Refer to Removal and Installation (if equipped).
Remove headlining assembly. Refer to Removal and Installation.
Remove map lamp bracket. Refer to Removal and Installation.
Remove cowl top cover. Refer to Removal and Installation.
Remove front pillar finisher. Refer to Removal and Installation.
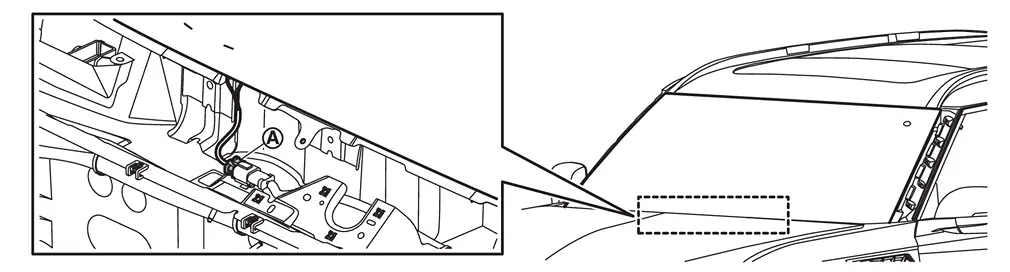
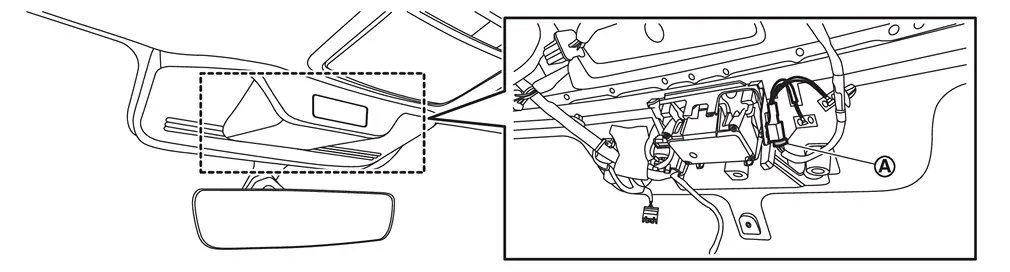
Disconnect windshield glass harness connector (if equipped).Disconnect windshield glass harness connectors .
-
Under the cowl top cover
-
Inside vehicle
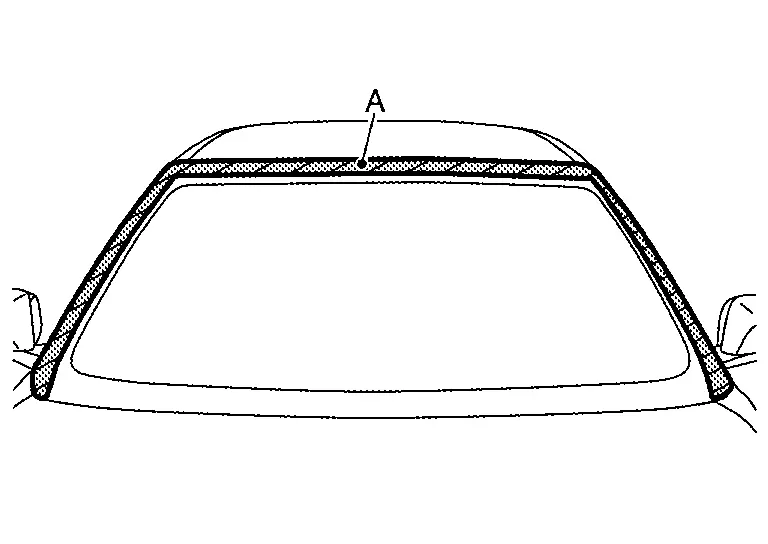
Apply protective tape (A) on roof panel and body side outer panel around windshield glass to protect painted surface from damage.
Insert a windshield cutter (A) between windshield glass and each panel . Cut the adhesive by pulling the windshield cutter, keeping the tip parallel to the edge of windshield glass.
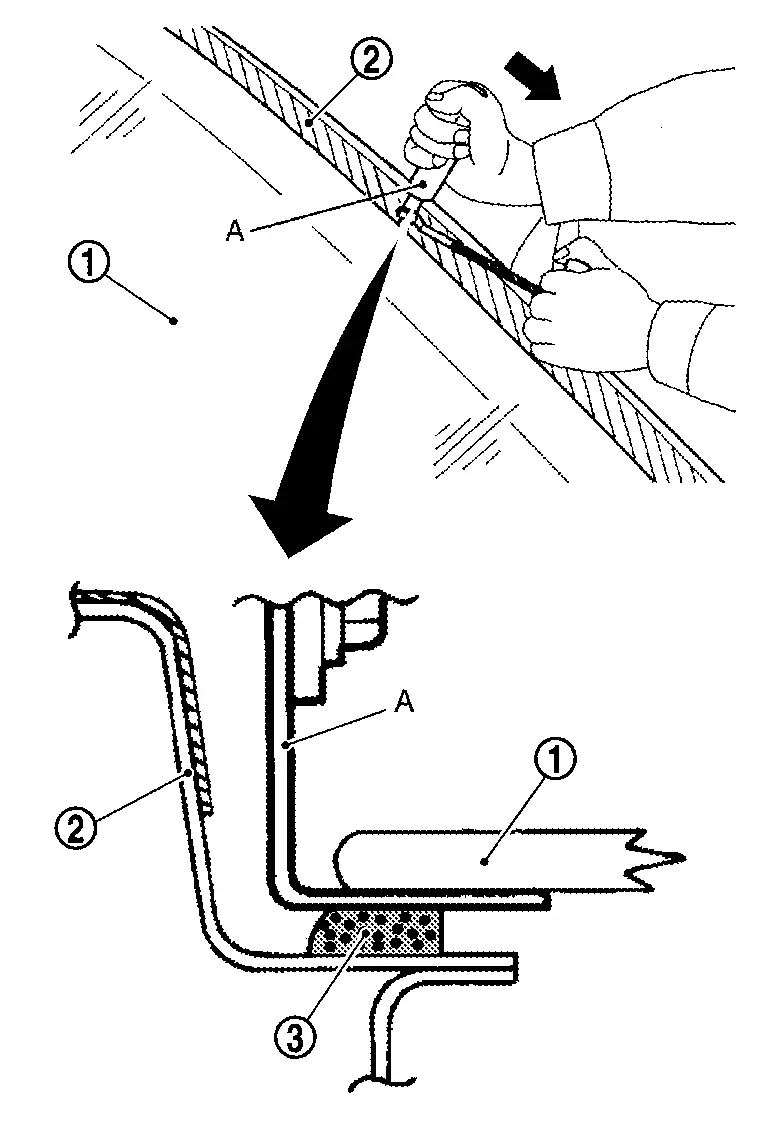
CAUTION:
Use piano wire to cut adhesive if its difficult to use windshield cutter.
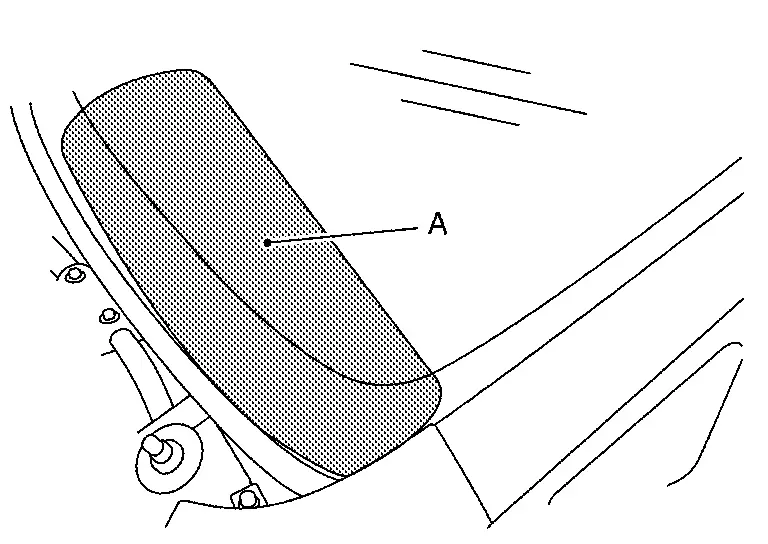
Apply protective standish cover (A) on instrument panel to protect it from damage.
Cut the adhesive using a piano wire.Pass the piano wire (B) from passenger room to bonded area of windshield glass using a wire pierce (A).
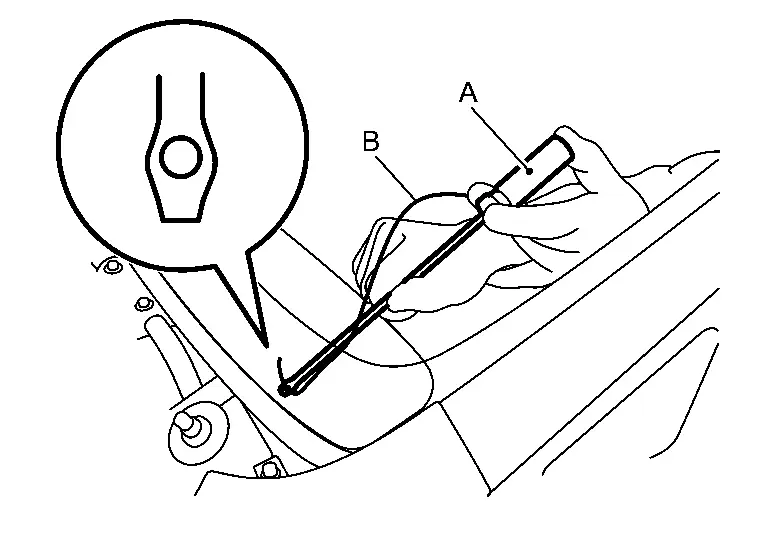
CAUTION:
-
Never use plane surface of wire pierce tip vertically.
-
Never press piano wire excessively against edge of windshield glass.
-
Never damage surrounding parts.
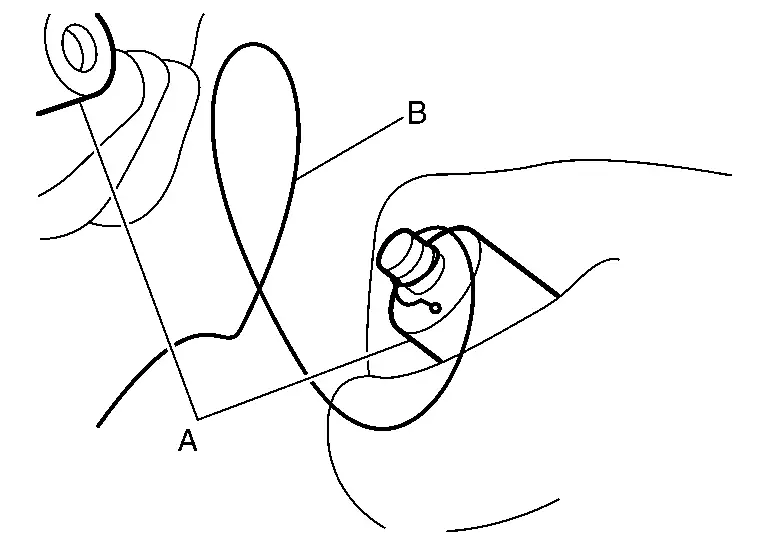
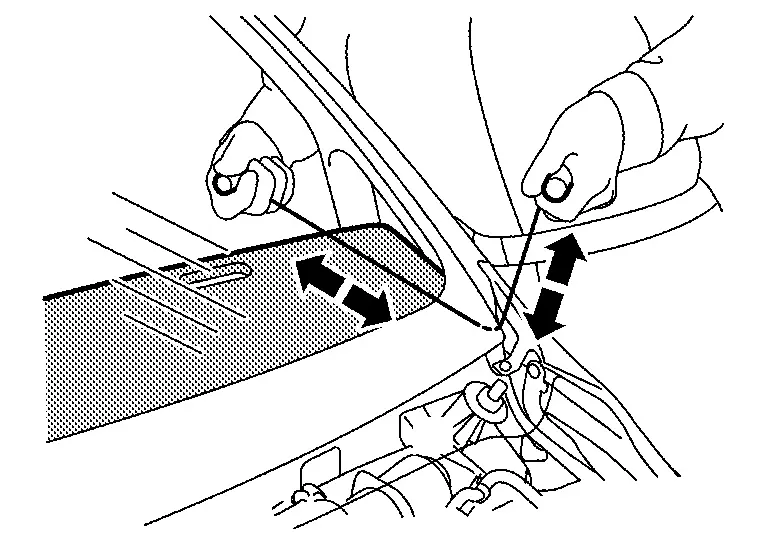
CAUTION:
-
Never press piano wire excessively against edge of windshield glass.
-
To cut adhesive, 2 workers are required by all means.
Use suction lifter (A) to remove windshield glass from the vehicle.
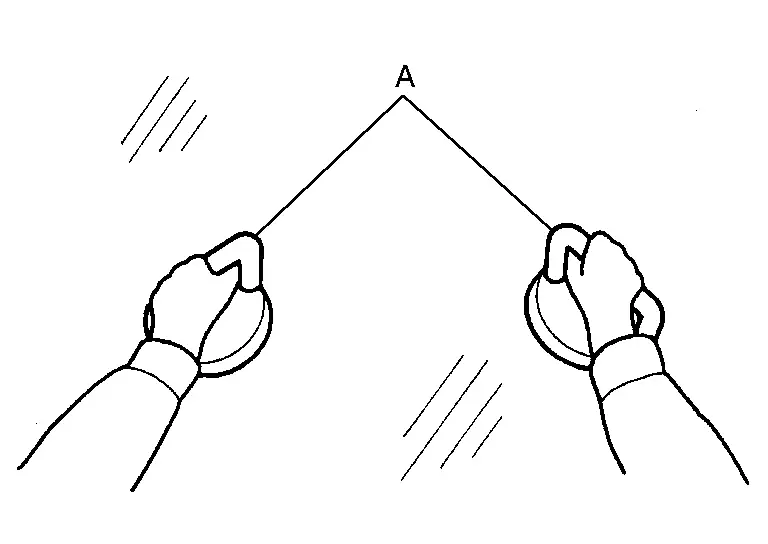
CAUTION:
Due to weight of windshield glass, 2 workers are required.
Remove remaining clips, windshield molding, dam sealant rubbers, spacer, insulator from the vehicle.
Reuse Windshield Glass
CAUTION:
-
Never remove clips before recording clips location after removed windshield glass.
-
Never use a windshield cutter if the windshield glass is reused. (It may scratch the glass surface.)
-
Never damage windshield glass and body panel.
Remove inside mirror or intelligent rear view mirror. Refer to following.
-
Inside mirror : Removal and Installation.
-
Intelligent rear view mirror : Removal and Installation.
Remove front camera unit. Refer to Removal and Installation (with front camera unit).
Remove front camera (driving video recorder). Refer to Removal and Installation (with driving video recorder system).
Remove light & rain sensor. Refer to Removal and Installation (if equipped).
Remove headlining assembly. Refer to Removal and Installation.
Remove map lamp bracket. Refer to Removal and Installation.
Remove cowl top cover. Refer to Removal and Installation.
Disconnect windshield glass harness connector (if equipped).Disconnect windshield glass harness connectors .
-
Under the cowl top cover
-
Inside vehicle
Record clip install position.Apply protective tape (A) to record the clip install position.
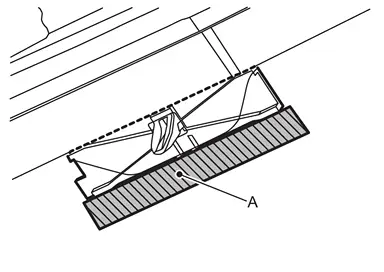
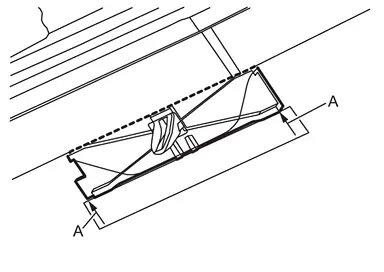
Apply protective tape (A) on roof panel and body side outer panel around windshield glass to protect painted surface from damage.
Apply matching marks to windshield glass, roof panel, and both side of body side outer panel.
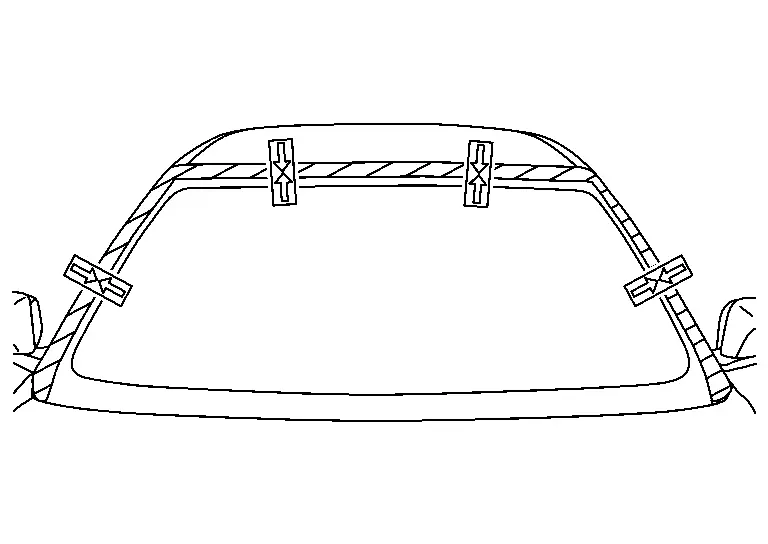
CAUTION:
To prevent the gap when install windshield glass put on matching marks.
Apply protective standish cover (A) on instrument panel to protect it from damage.
Cut the adhesive using a piano wire.Pass the piano wire (B) from passenger room to bonded area of windshield glass using a wire pierce (A).
CAUTION:
-
Never use plane surface of wire pierce tip vertically.
-
Never press piano wire excessively against edge of windshield glass.
-
Never damage surrounding parts.
CAUTION:
-
Never press piano wire excessively against edge of windshield glass.
-
To cut adhesive, 2 workers are required.
Use suction lifter (A) to remove windshield glass from the vehicle.
CAUTION:
Due to weight of windshield glass, 2 workers are required.
Remove remaining clips, windshield molding, dam sealant rubbers, spacer, insulator from the vehicle.
INSTALLATION
CAUTION:
-
Never damage windshield glass, each body panel, surrounding parts, etc.
-
Never use windshield glass if it damaged.
-
Apply touch-up paint that same as body-color if the painted surface be damaged.
-
Confirm the type of each primer because it has 2-types. (Never use for wrong side.)
-
Wipe the primer using degreasing agent, etc. if you apply it onto not-adhesive part by mistake.
-
Follow the instruction sheet of primer/adhesive when it is drying.
Replacement Windshield Glass
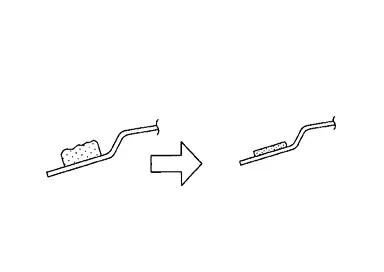
Use a cutter knife or scraper, and leave the adhesive on the body side thin and smooth as shown in the figure.
Place new windshield glass on the vehicle temporarily, put on matching marks on windshield glass, roof panel, and both side of body side outer panel.
CAUTION:
To prevent the gap when install new windshield glass put on matching marks.
Use suction lifter (A) to set windshield glass on glass stand (B).
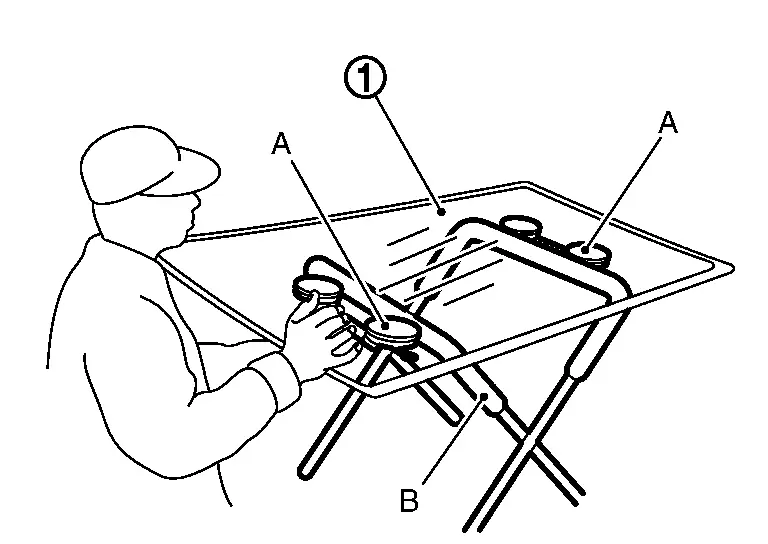
Clean the bonded area on windshield glass and body panel side using a white gasoline or degreasing agent.
Install dam sealant rubber upper.Clean windshield glass to install position of dam sealant rubber upper by using white gasoline or degreasing agent. Remove release liner of double-sided tape for installing dam sealant rubber upper. Install dam sealant rubber upper on windshield glass as shown in the figure.
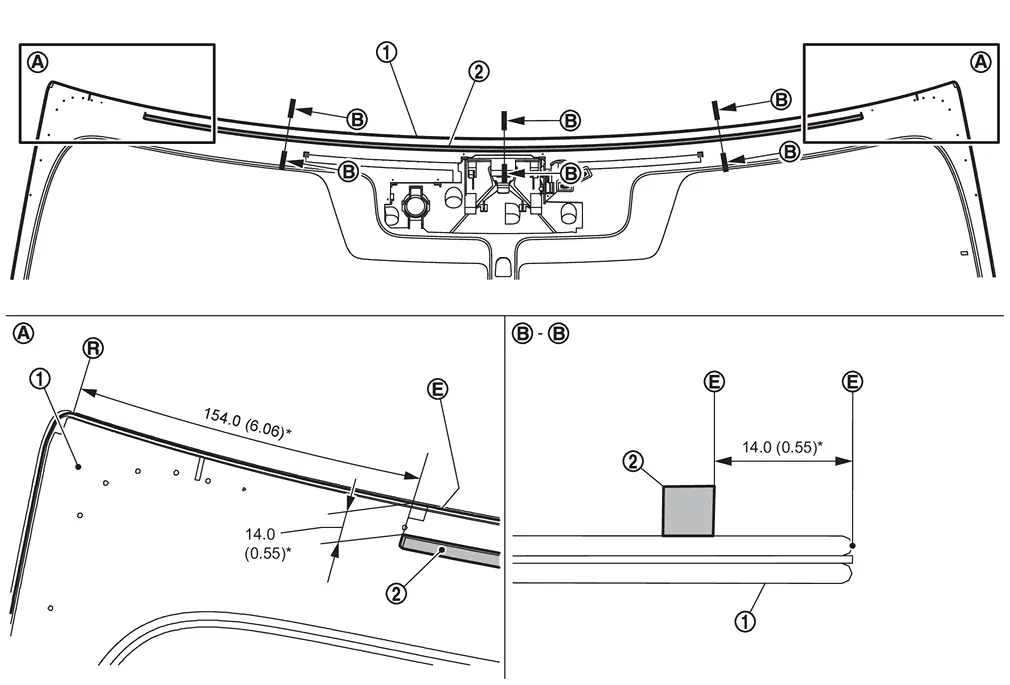
Unit: mm (in)
| * | : ± 1.0 mm (0.04 in) |
|
Edge |
|
R-end |
Install insulator.Clean windshield glass to install position of insulator by using white gasoline or degreasing agent. Remove release liner of double-sided tape for installing insulator. Install insulator on windshield glass as shown in the figure.
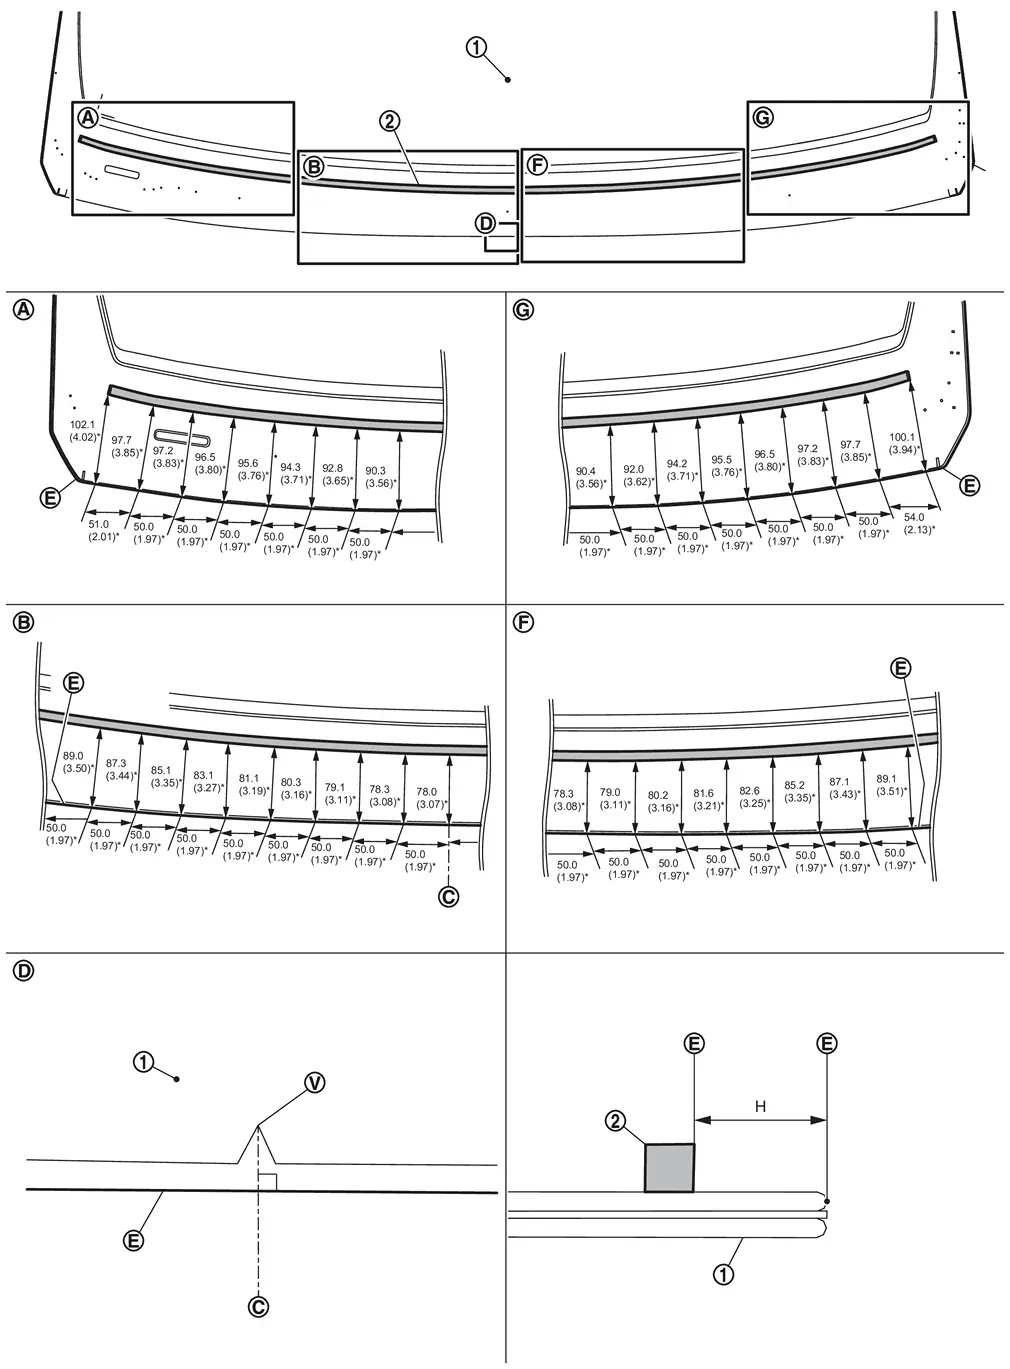
Unit: mm (in)
| * | : ± 2.0 mm (0.08 in) |
|
Edge |
|
Center |
 |
Vertex |
| H | : Dimensions |
Install dam sealant rubber.Clean windshield glass to install position of dam sealant rubber by using white gasoline or degreasing agent. Remove release liner of double-sided tape for installing dam sealant rubber. Install dam sealant rubber on windshield glass as shown in the figures.
-
Top left and right
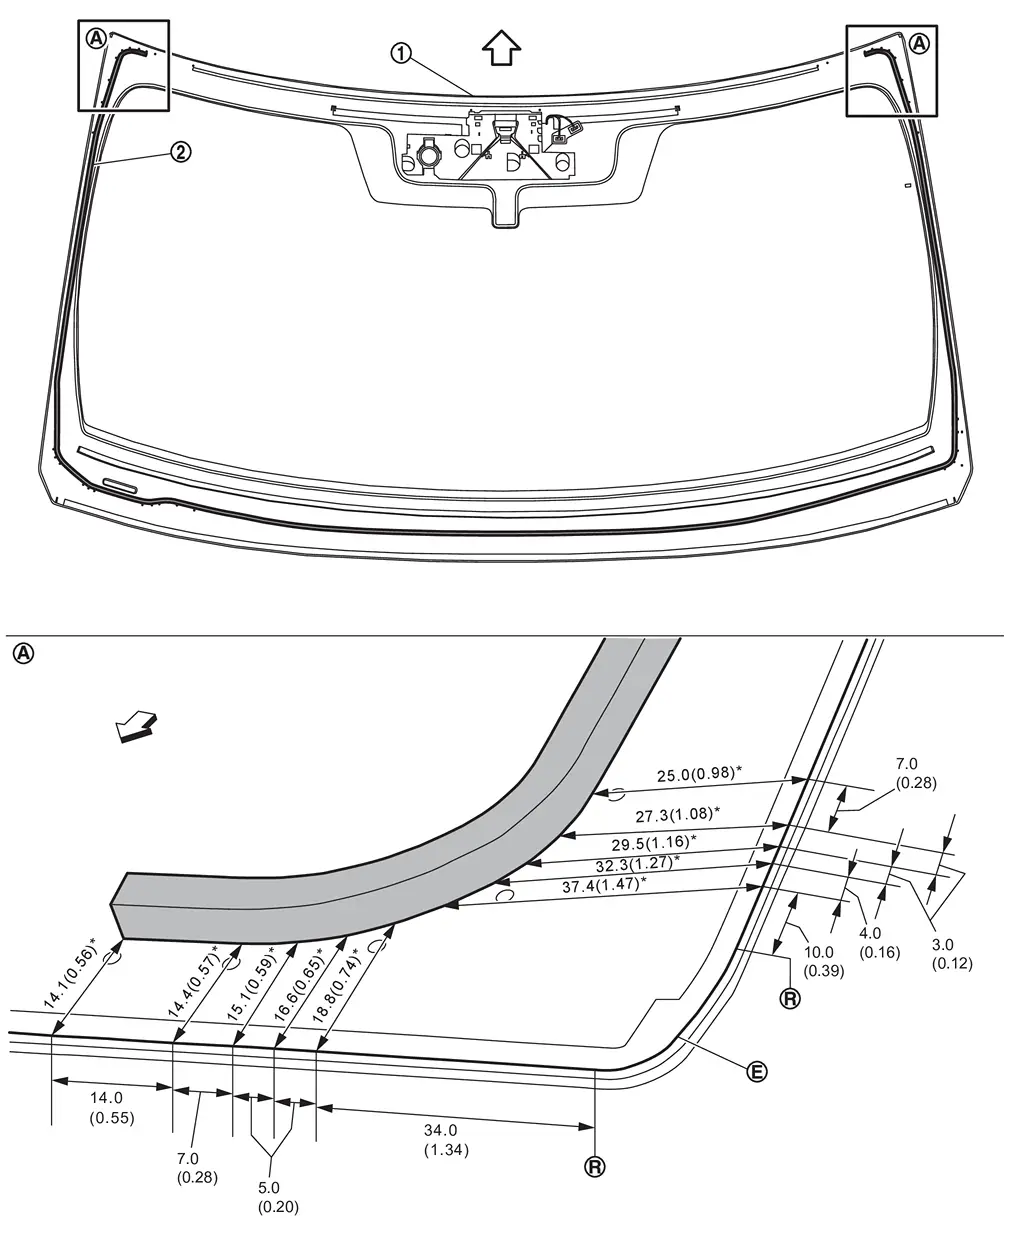
Unit: mm (in)
* : ± 1.0 mm (0.04 in) Edge R-end : Upward -
Side left and right
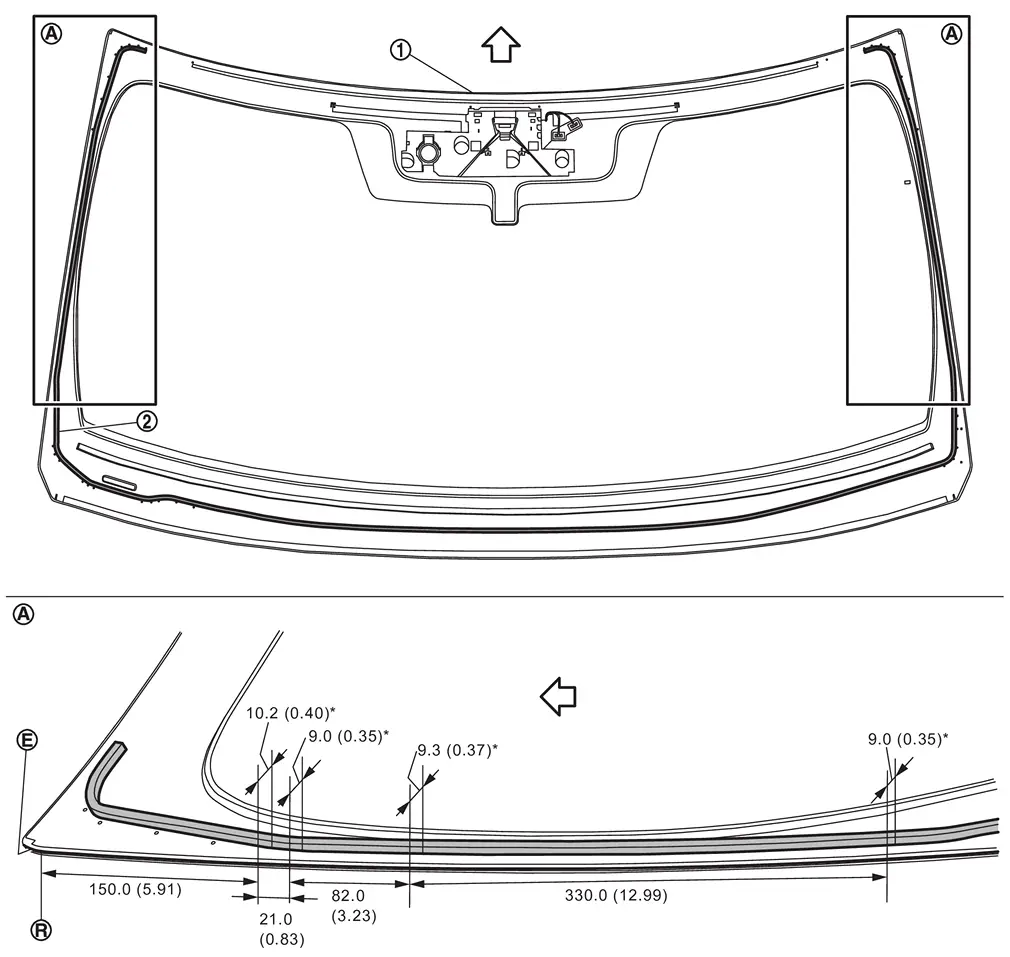
Unit: mm (in)
* : ± 1.0 mm (0.04 in) Edge R-end : Upward -
Lower left
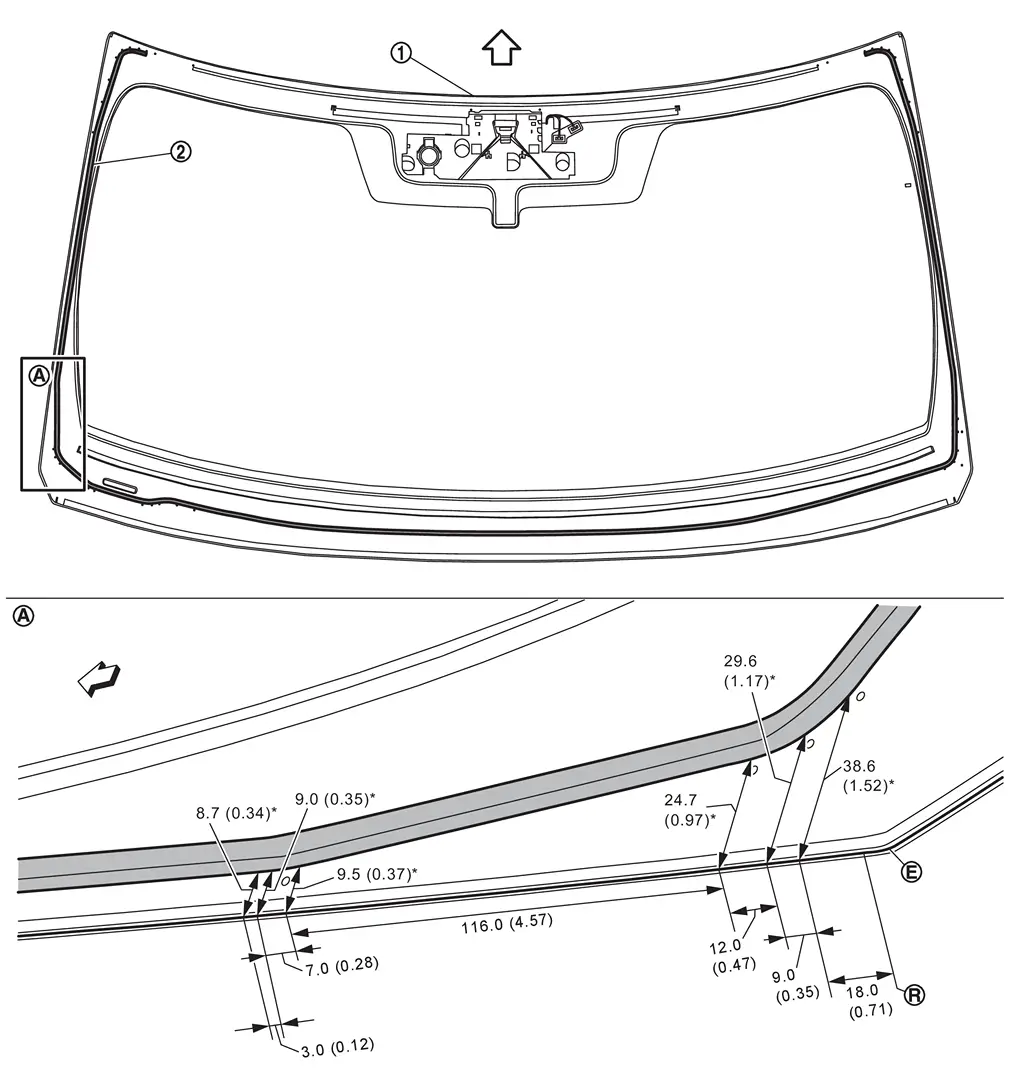
Unit: mm (in)
* : ± 1.0 mm (0.04 in) Edge R-end : Upward -
Bottom left
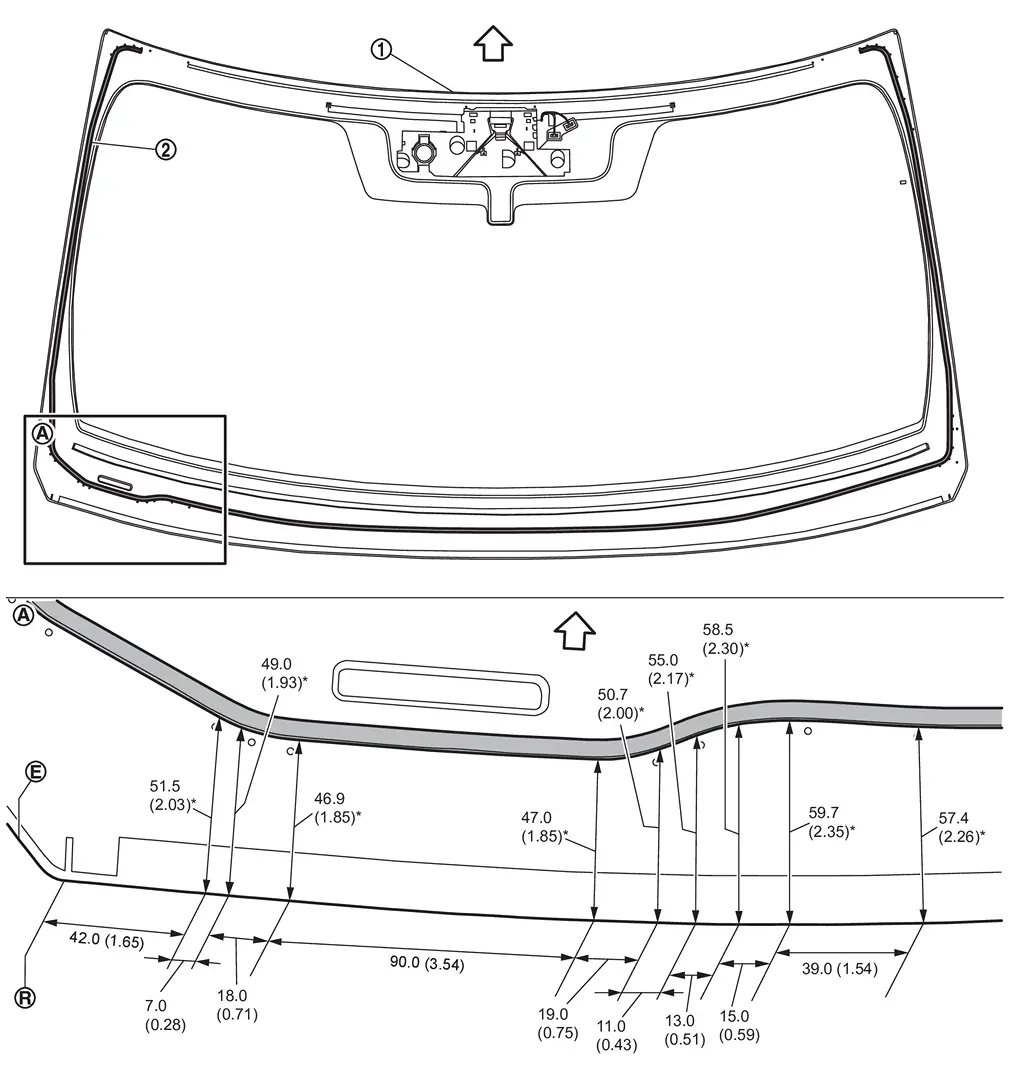
Unit: mm (in)
* : ± 1.0 mm (0.04 in) Edge R-end : Upward -
Bottom middle left
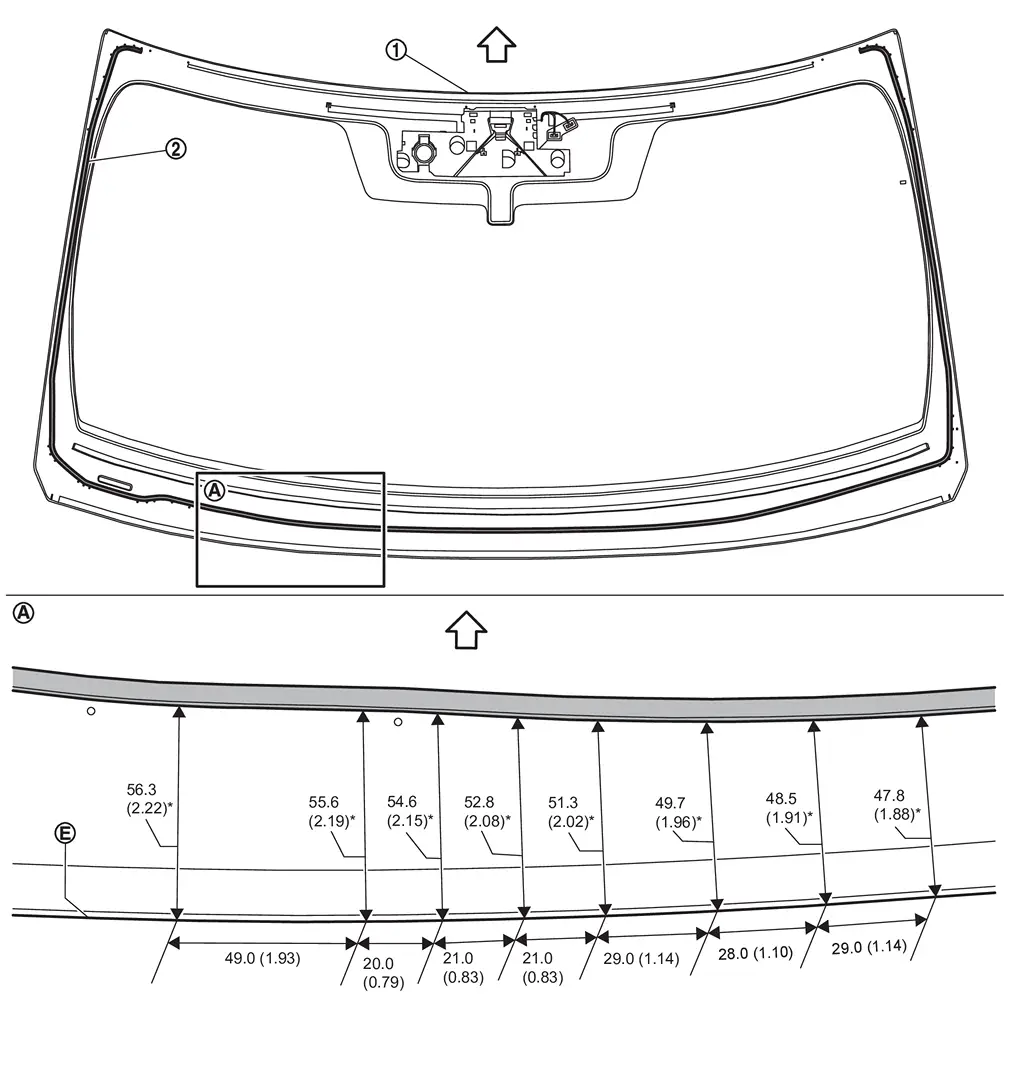
Unit: mm (in)
* : ± 1.0 mm (0.04 in) Edge : Upward -
Bottom center left
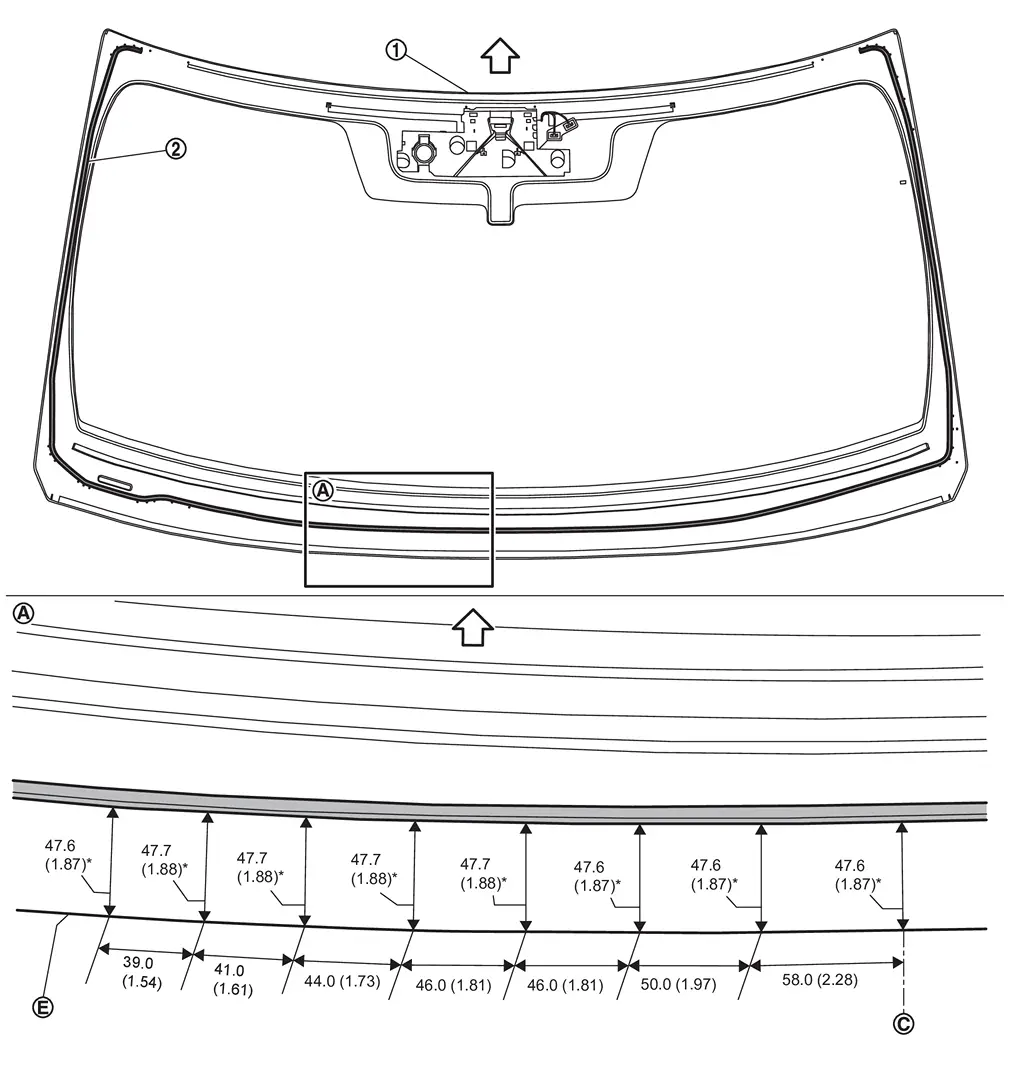
Unit: mm (in)
* : ± 1.0 mm (0.04 in) Center Edge : Upward -
Bottom center right
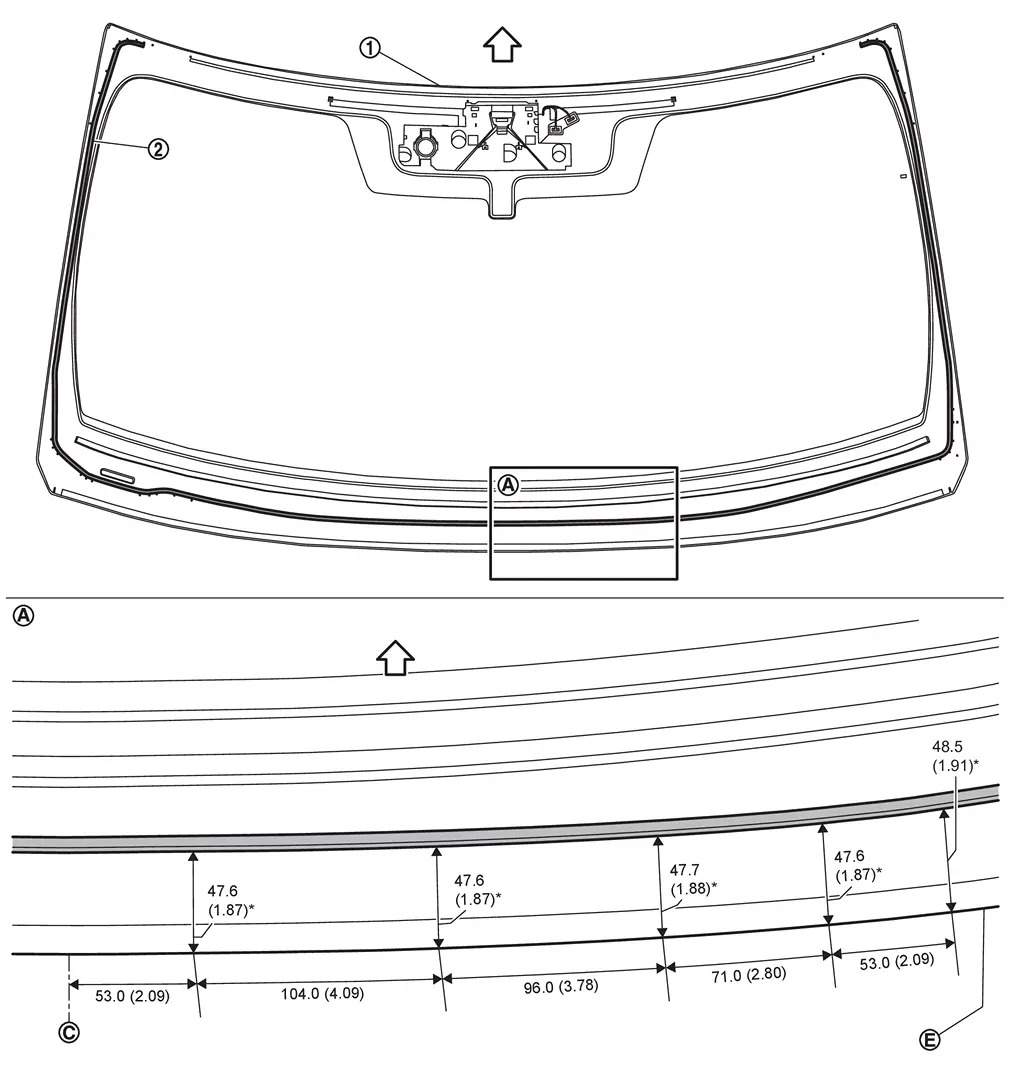
Unit: mm (in)
* : ± 1.0 mm (0.04 in) Center Edge : Upward -
Bottom right
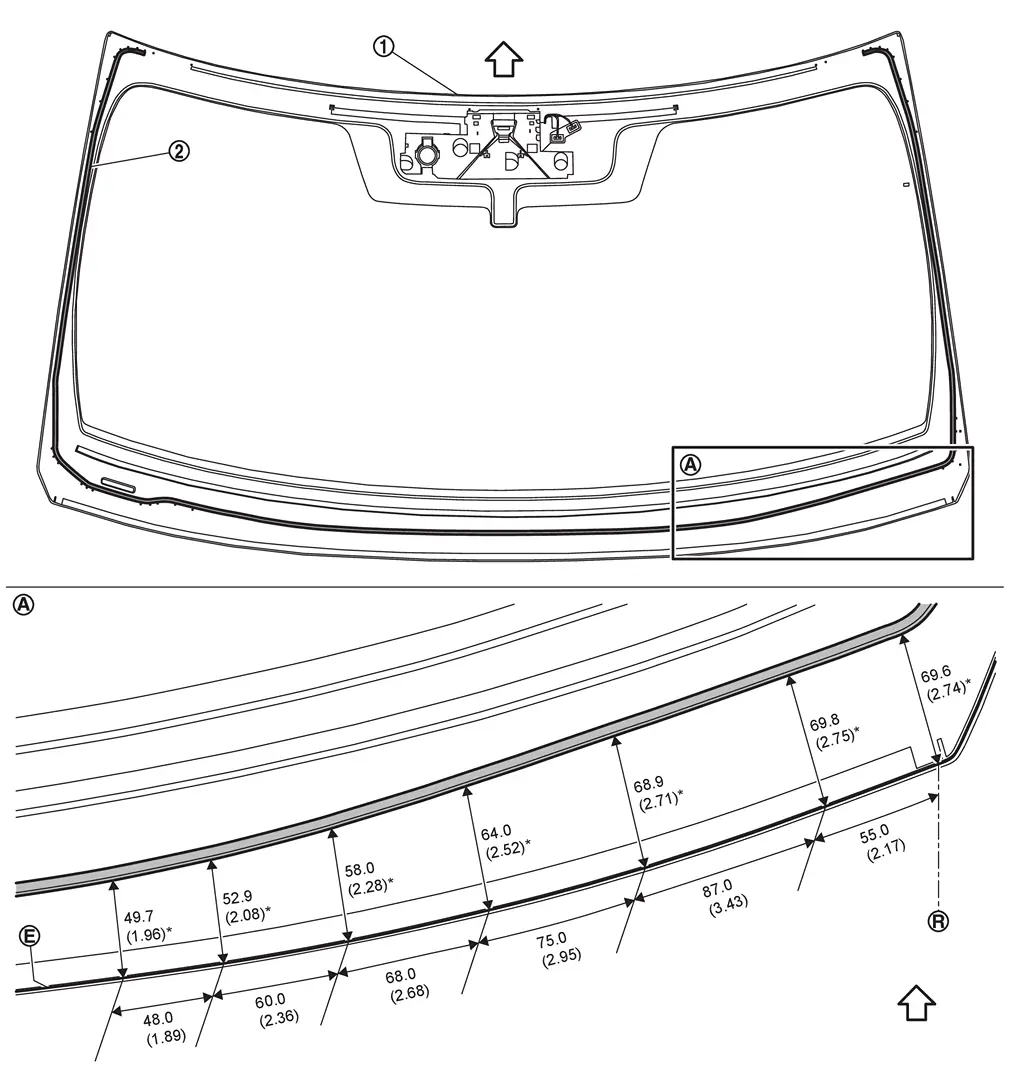
Unit: mm (in)
* : ± 1.0 mm (0.04 in) Edge R-end : Upward -
Lower right
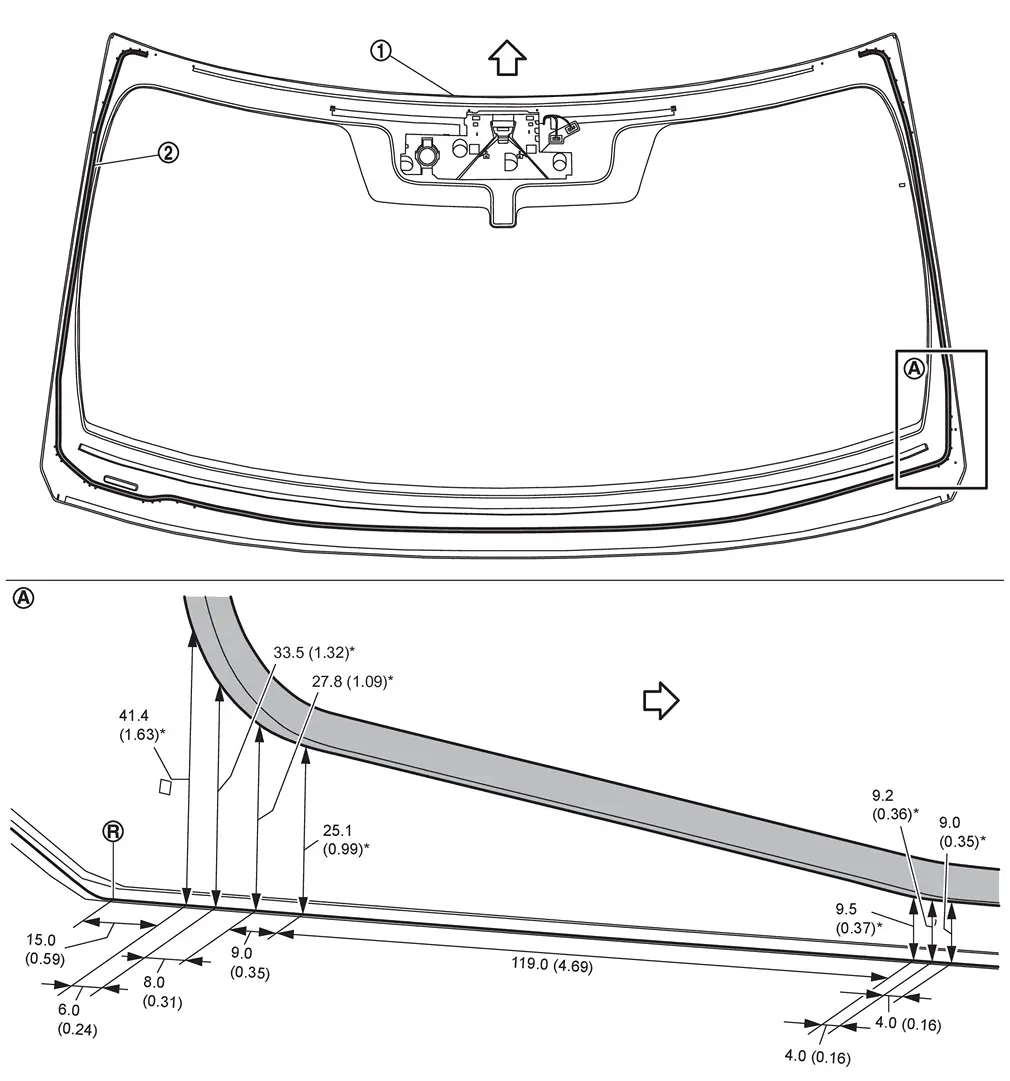
Unit: mm (in)
* : ± 1.0 mm (0.04 in) R-end : Upward
Install spacer.Clean windshield glass to install position of spacer by using white gasoline or degreasing agent. Remove release liner of double-sided tape for installing spacer. Install spacer on windshield glass as shown in the figures.
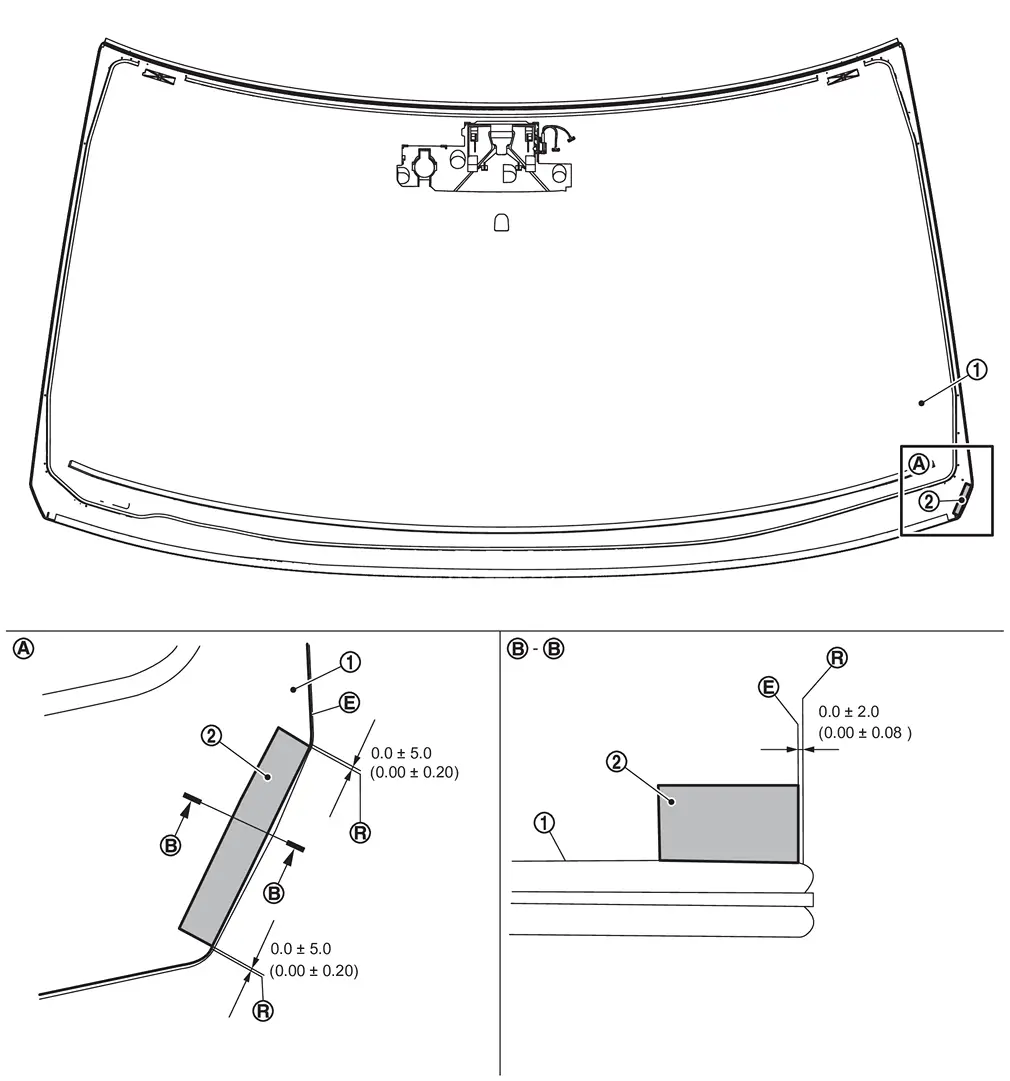
Unit: mm (in)
|
Edge |
|
R-end |
Install windshield molding.Clean windshield glass to install position of windshield molding by using white gasoline or degreasing agent. Apply glass primer on windshield glass as shown in the figure.
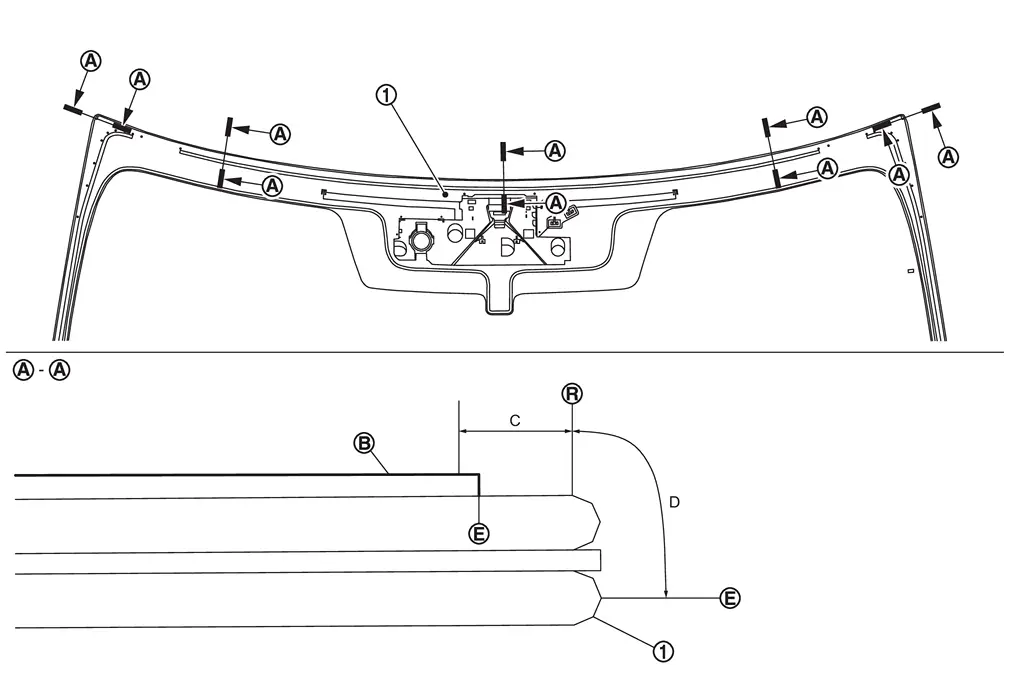
| C | : Glass primer applying range |
| D | : Allowed glass primer applying range |
|
Black print |
|
Edge |
|
R-end |
on windshield glass as shown in the figure.
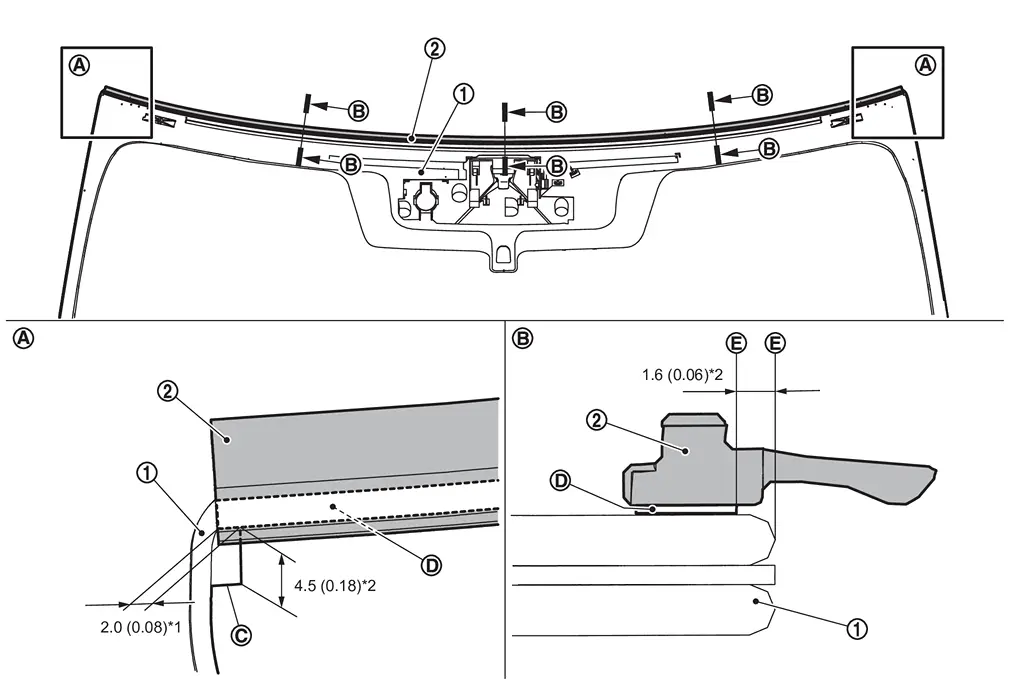
Unit: mm (in)
| *1 | : ± 2.0 mm (0.08 in) |
| *2 | : ± 1.2 mm (0.18 in) |
|
Black print |
|
Double-sided tape on windshield molding |
|
Edge |
Apply glass primer along the entire circumference of windshield glass. For the range of glass primer, refer to Exploded View.
Apply painted surface primer to the body side bonding surface. For the range of painted surface primer, refer to Exploded View.
Apply adhesive to windshield glass by using an adhesive gun. For the volume of adhesive, refer to Exploded View.
CAUTION:
The start/stop positions of adhesive are along with the adhesive marks as shown in the figure.
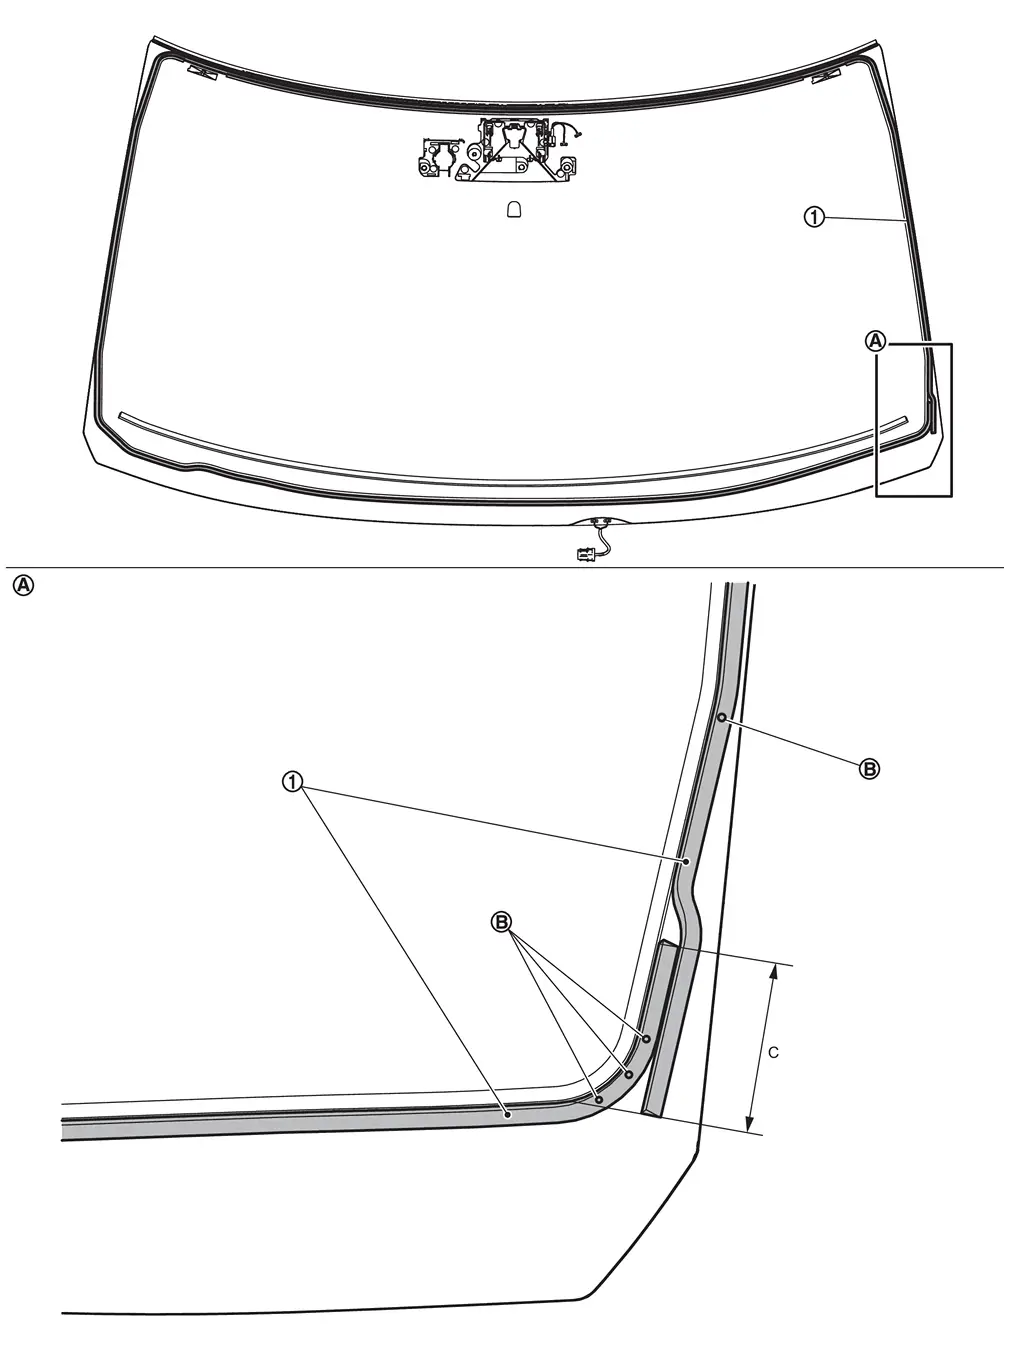
| C | : More than 60.0 mm (2.36 in) |
Use suction lifter (A) that is installed in advance, align clips and roof panel holes and the matching marks of the body side outer panel and windshield glass to install them on the vehicle.
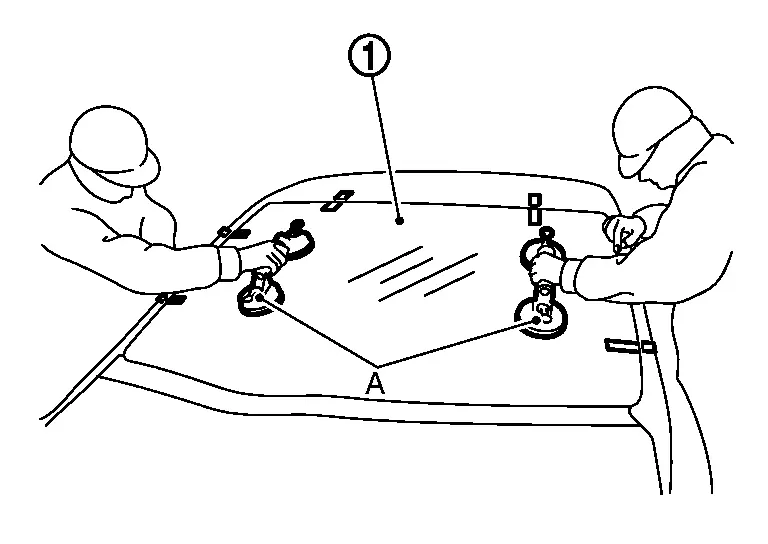
CAUTION:
Due to weight of windshield glass, 2 workers are required.
Press entire surface of windshield glass lightly to fit it completely.
Correct any adhesive overflow or shortage using a spatula to make the surface smooth.
CAUTION:
-
Dry the adhesive according to the specification of adhesive kit.
-
After installing windshield glass, keep the all door glasses open until the adhesive is completely cured.
-
Never drive the vehicle before the adhesive is completely cured.
Remove protective tape.
Install removed parts.
CAUTION:
-
Perform additional service for operating the systems normally after installing windshield glass. Refer to the following.
-
Front camera unit aiming adjustment (with front camera unit): Work Procedure
-
Head up display calibration: Work Procedure
-
-
Adjust the front wiper arms auto stop position. Refer to Adjustment.
-
Check the matching with surrounding parts. Adjust if necessary.
-
After installing, perform the inspection. Refer to Inspection.
Reuse Windshield Glass
CAUTION:
-
Never reuse windshield glass if clip install position has been lost.
-
Never reuse windshield glass if it has damage, scratch, clack, etc.
Use a cutter knife or scraper, and leave the adhesive on each panel and windshield glass thin and smooth as shown in the figure.
Remove remaining adhesive, spacer, windshield molding, dam sealant rubber, dam sealant rubber upper, and clips from windshield glass surface.
Clean the bonded area on windshield glass and body panel side using a white gasoline or degreasing agent.
Install clips.Clean windshield glass to install position of clip by using white gasoline or degreasing agent. Apply glass primer on windshield glass of clip install position. Remove release liner of double-sided tape for installing clip. Install clip on windshield glass along with the matching marks (A) as shown in the figure.
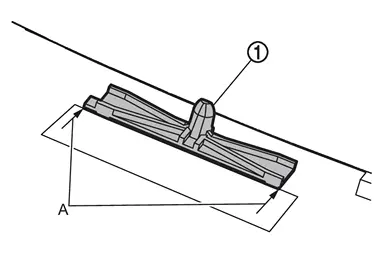
Unit: mm (in)
| * | : ± 1.0 mm (0.04 in) |
|
Edge |
|
R-end |
Install insulator.Clean windshield glass to install position of insulator by using white gasoline or degreasing agent. Remove release liner of double-sided tape for installing insulator. Install insulator on windshield glass as shown in the figure.
Unit: mm (in)
| * | : ± 2.0 mm (0.08 in) |
|
Edge |
|
Center |
|
Vertex |
| H | : Dimensions |
-
Top left and right
Unit: mm (in)
* : ± 1.0 mm (0.04 in) Edge R-end : Upward -
Side left and right
Unit: mm (in)
* : ± 1.0 mm (0.04 in) Edge R-end : Upward -
Lower left
Unit: mm (in)
* : ± 1.0 mm (0.04 in) Edge R-end : Upward -
Bottom left
Unit: mm (in)
* : ± 1.0 mm (0.04 in) Edge R-end : Upward -
Bottom middle left
Unit: mm (in)
* : ± 1.0 mm (0.04 in) Edge : Upward -
Bottom center left
Unit: mm (in)
* : ± 1.0 mm (0.04 in) Center Edge : Upward -
Bottom center right
Unit: mm (in)
* : ± 1.0 mm (0.04 in) Center Edge : Upward -
Bottom right
Unit: mm (in)
* : ± 1.0 mm (0.04 in) Edge R-end : Upward -
Lower right
Unit: mm (in)
* : ± 1.0 mm (0.04 in) R-end : Upward
Install spacer.Clean windshield glass to install position of spacer by using white gasoline or degreasing agent. Remove release liner of double-sided tape for installing spacer. Install spacer on windshield glass as shown in the figures.
Unit: mm (in)
|
Edge |
|
R-end |
Install windshield molding.Clean windshield glass to install position of windshield molding by using white gasoline or degreasing agent. Apply glass primer on windshield glass as shown in the figure.
| C | : Glass primer applying range |
| D | : Allowed glass primer applying range |
|
Black print |
|
Edge |
|
R-end |
on windshield glass as shown in the figure.
Unit: mm (in)
| *1 | : ± 2.0 mm (0.08 in) |
| *2 | : ± 1.2 mm (0.18 in) |
|
Black print |
|
Double-sided tape on windshield molding |
|
Edge |
Apply glass primer along the entire circumference of windshield glass. For the range of glass primer, refer to Exploded View.
Apply painted surface primer to the body side bonding surface. For the range of painted surface primer, refer to Exploded View.
Apply adhesive to windshield glass by using an adhesive gun. For the volume of adhesive, refer to Exploded View.
CAUTION:
The start/stop positions of adhesive are along with the adhesive marks as shown in the figure.
| C | : More than 60.0 mm (2.36 in) |
Use suction lifter (A) that is installed in advance, align clips and roof panel holes and the matching marks of the body side outer panel and windshield glass to install them on the vehicle.
CAUTION:
Due to weight of windshield glass, 2 workers are required by all means.
Press entire surface of windshield glass lightly to fit it completely.
Correct any adhesive overflow or shortage using a spatula to make the surface smooth.
CAUTION:
-
Dry the adhesive according to the specification of adhesive kit.
-
After installing windshield glass, keep the all door glasses open until the adhesive is completely cured.
-
Never drive the vehicle before the adhesive is completely cured.
Remove protective tape.
Install removed parts.
CAUTION:
-
Perform additional service for operating the systems normally after installing windshield glass. Refer to following.
-
Front camera unit aiming adjustment (with front camera unit): Work Procedure
-
Head up display calibration: Work Procedure
-
-
Adjust the front wiper arms auto stop position. Refer to Adjustment.
-
Check the matching with surrounding parts. Adjust if necessary.
-
After installing, perform the inspection. Refer to Inspection.
Inspection
WATER LEAKAGE INSPECTION
CAUTION:
-
Dry adhesive according to the specification of adhesive kit, do the leaking check when adhesive is stiffen.
-
If leakage was found, start over from the beginning as windshield glass removal, install and leaking check.
Other materials
Back Door Finisher Cap
Removal and Installation
CAUTION:
Never damage the back door panel.REMOVALCAUTION:
When removing, always use a remover tool that is made of plastic to prevent damage to the parts.Fully open back door.
Apply protective tape (A) on back door lower finisher to protect it from damage.
Disengage back d ...
4 Way Lumbar Support System
Symptom Table
Symptom Possible causeInspection item
All function does not operate
Fuse
Front seat pneumatic control unit power supply/ground circuit
Check power supply and ground circuit (front seat pneumatic control unit)
Driver seat pneumatic control unit: Refer to Diagnosis Procedure.
Passe ...
Interior Lighting System Service Data and Specifications
Bulb Specifications
Item Type Wattage (W)
Map lamp
LED
—
Vanity mirror lamp
LED
—
Front foot lamp
LED
—
Glove box lamp
LED
—
Center console tray lamp
LED
—
Console box lamp
LED
—
Personal lamp
LED
—
Rear room lamp
LED
—
Luggage ...