Exploded View
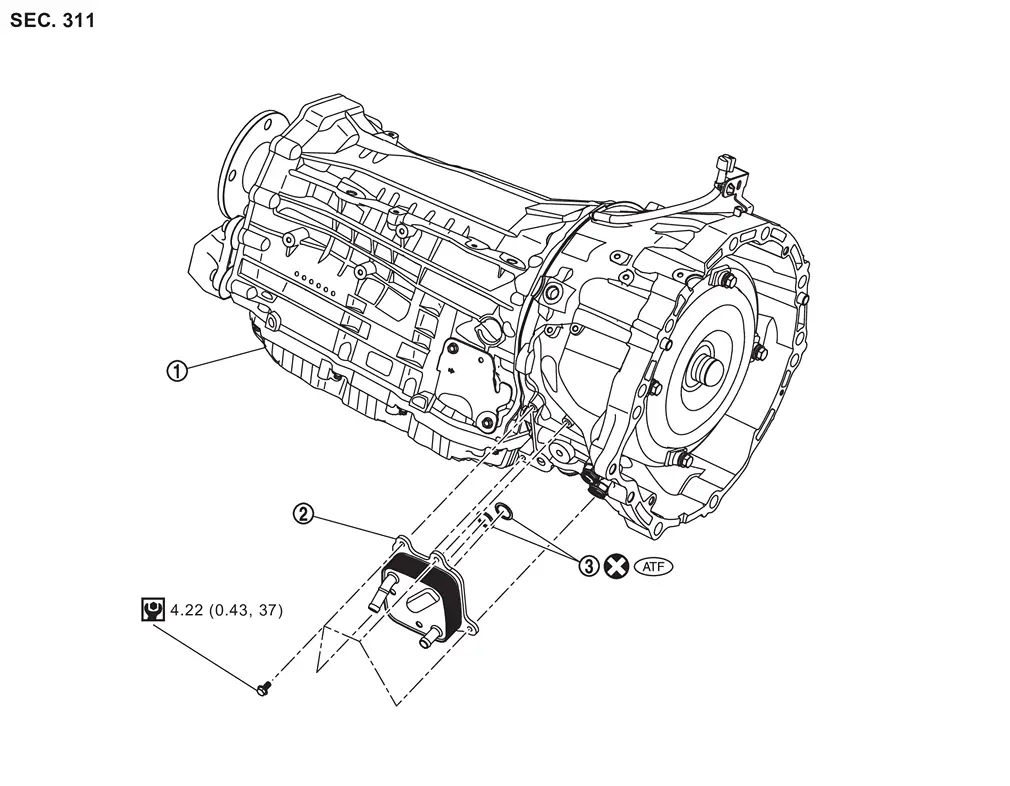
 |
A/T assembly |  |
A/T fluid warmer |  |
O-ring |
 |
: N·m (kg-m, in-lb) | ||||
 |
: Always replace after every disassembly. | ||||
 |
: Apply ATF | ||||
Removal and Installation
WARNING:
-
Jacking up or lift up the vehicle may the vehicle height to go down which cause a personal injury and/or damage to the air suspension component parts. Refer to Precaution for when Jacking and Lifting Up the vehicle with Electronic Air Suspension System.
REMOVAL
WARNING:
Never remove the radiator cap when the engine is hot. Serious burns could occur from high pressure engine coolant escaping from the radiator. Wrap a thick cloth around the cap. Slowly turn it a quarter turn to allow built-up pressure to escape. Carefully remove the cap by turning it all the way.
CAUTION:
Perform this step when the engine is cold.
 NOTE:
NOTE:
When removing components such as hoses, tubes/lines, etc., cap or plug openings to prevent fluid from spilling.
Drain engine coolant. Refer to ENGINE COOLANT : Draining.
Remove water hoses from A/T fluid warmer. Refer to Removal and Installation.
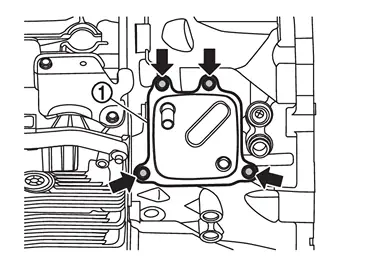
Remove A/T fluid warmer mounting bolts ( ) and then remove A/T fluid warmer .
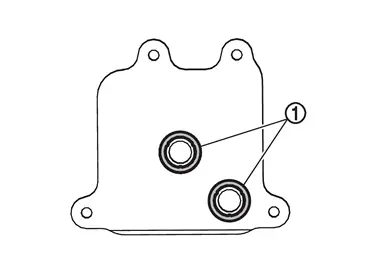
Remove O-rings from A/T fluid warmer.
CAUTION:
Never reuse O-rings.
INSTALLATION
Installation is in the reverse order of removal.
CAUTION:
-
Never reuse O-rings.
-
Apply A/T fluid to the O-rings.
-
Make sure O-rings are securely seated in back of A/T fluid warmer before installing A/T fluid warmer.
Other materials
Cleaning exterior
Basic information
Maintaining the exterior of your Nissan Armada is essential not only for preserving
its visual appeal but also for protecting the paintwork and body components over
time.
To keep the Nissan Armada in optimal condition, wash the vehicle promptly under
the following circumsta ...
Center Pillar Upper Garnish
Removal and Installation
CAUTION:
Never damage the body panel.REMOVALCAUTION:
When removing, always use a remover tool that is made of plastic to prevent damage to the parts.Remove center pillar lower garnish. Refer to Removal and Installation.
Pull out tongue of seat belt pre-tensioner retractor fr ...
Luggage Side Upper Finisher
Removal and Installation
CAUTION:
Never damage the body panel.REMOVALCAUTION:
When removing, always use a remover tool that is made of plastic to prevent damage to the parts.Remove rear pillar finisher. Refer to Removal and Installation.
Remove back pillar garnish. Refer to Removal and Installation. ...