Work Procedure
After repairing the malfunction symptom of ProPILOT Assist 2.1, perform an operation check of ProPILOT Assist 2.1 and check that ProPILOT Assist 2.1 operates normally.
CAUTION:
Always drive safely when performing the action test.
CHECK FOR ProPILOT ASSIST SWITCH
-
Start the engine.
-
Press the ProPILOT Assist switch
 (less than 1.5 seconds).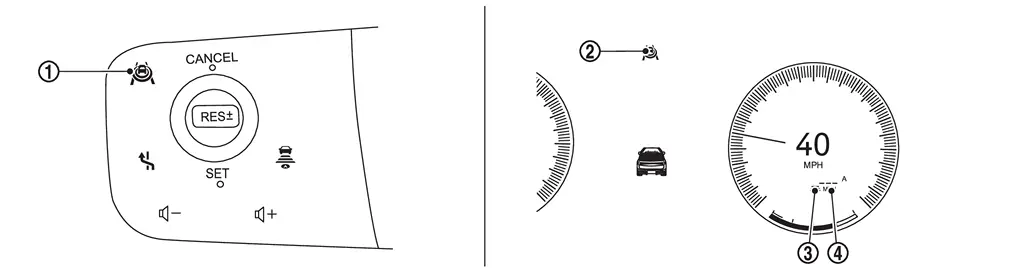
Information display status ProPILOT Assist 2.1 status indicator 
: ON (gray) Set distance indicator 
: Long mode (gray) Set vehicle speed indicator 
: “———”
“MPH” -
Check that the vehicle information display in the combination meter is in the set standby status.
-
Press ProPILOT Assist switch and check that ProPILOT Assist 2.1 operating lamp turns OFF when ProPILOT Assist 2.1 is turned OFF.
-
When the engine starts again, make sure that ProPILOT Assist 2.1 operating lamp is OFF.
>>
GO TO 2.
CHECK FOR DISTANCE SWITCH
-
Start the engine.
-
Press the ProPILOT Assist switch (less than 1.5 seconds).
-
Press the DISTANCE switch.
-
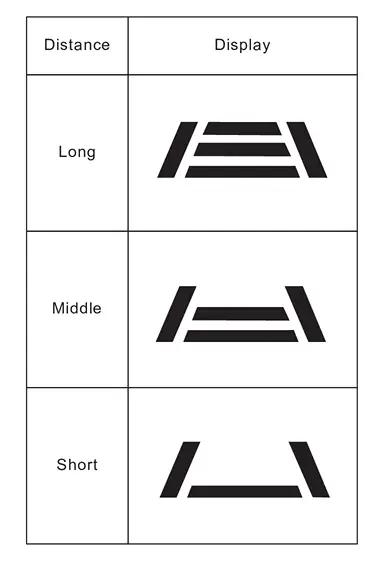
Check that the set distance indicator changes display in order of: (Long)→(Middle)→(Short).
 NOTE:
NOTE:
-
When ProPILOT Assist switch is turned ON, set to (long) as the initial setting.
-
When the vehicle information display is not ProPILOT Assist 2.1 screen or a pop-up appears, distance indicator is displayed on the pop-up screen.
-
>>
GO TO 3.
CHECK FOR RES+, SET-, AND CANCEL SWITCHES
-
Check that RES+, SET-, CANCEL switches are operated smoothly.
-
Check that switches come up as hand is released from the switches.
>>
GO TO 4.
SET CHECKING (1)
-
Start the engine.
-
Press the ProPILOT Assist switch (less than 1.5 seconds) and turn the ProPILOT Assist 2.1 system ON.
-
Drive the vehicle at desired vehicle speed between 30 km/h and 120 km/h (19 MPH and 75 MPH).
-
Push down the SET- switch.
-
Check that the desired speed is set and ProPILOT Assist 2.1 control starts when releasing SET- switch.
NOTE:
The set vehicle speed is indicated on the set vehicle speed indicator on the information display.
>>
GO TO 5.
CHECK FOR INCREASE OF CRUISING SPEED (1)
-
Set desired vehicle speed between 30 km/h and 120 km/h (19 MPH and 75 MPH).
CAUTION:
Never drive vehicle beyond the speed limit.
-
Check that the set vehicle speed increases when RES+ switch is pushed up.
NOTE:
The maximum set speed is 120 km/h (75 MPH).
>>
GO TO 6.
CHECK FOR DECREASE OF CRUISING SPEED (1)
-
Set desired vehicle speed between 30 km/h and 120 km/h (19 MPH and 75 MPH).
CAUTION:
Never drive vehicle beyond the speed limit.
-
Check that the set vehicle speed is reduced when SET- switch is pushed down.
NOTE:
-
The lower limit of the set vehicle speed is 30 km/h (19 MPH) approximately.
-
The control is automatically canceled when the driving vehicle speed drops below 25 km/h (16 MPH) approximately without detecting the vehicle ahead.
>>
GO TO 7.
SET CHECKING (2)
-
Stop the vehicle.
-
Drive the vehicle at less than approximately 30 km/h (19 MPH).
-
Push down the SET- switch when the system detects a vehicle ahead.
-
When releasing finger, check that vehicle-to-vehicle distance is controlled to keep proper distance from vehicle ahead according to the vehicle speed, up to vehicle speed of 30 km/h (19 MPH) approximately.
NOTE:
-
The ProPILOT Assist 2.1 cannot be set when the vehicle speed is less than 30 km/h (19 MPH) and when a vehicle ahead is not detected.
-
The control is automatically canceled when the driving vehicle speed drops below 25 km/h (16 MPH) approximately without detecting the vehicle ahead.
-
The set vehicle speed indicator on the information display is set to 30 km/h (19 MPH).
>>
GO TO 8.
CHECK FOR INCREASE OF CRUISING SPEED (2)
-
Set the ProPILOT Assist 2.1 when the vehicle speed is less than approximately 30 km/h (19 MPH) and when a vehicle ahead is detected.
-
Check that the set vehicle speed increases when RES+ switch is pushed up.
NOTE:
The maximum set speed is 120 km/h (75 MPH).
CAUTION:
Never drive vehicle beyond the speed limit.
>>
GO TO 9.
CHECK FOR DECREASE OF CRUISING SPEED (2)
-
Set the ProPILOT Assist 2.1 when the vehicle speed is less than approximately 30 km/h (19 MPH) and when a vehicle ahead is detected.
-
Set the set vehicle speed to the desired vehicle speed according to “check for increase of cruising speed”.
-
Check that the set vehicle speed is reduced when SET- switch is pushed down.
NOTE:
The lower limit of the set vehicle speed is 30 km/h (19 MPH) approximately.
>>
GO TO 10.
CHECK THE BLUE INDICATOR OF ProPILOT ASSIST 2.1 DISPLAY
Check that the ProPILOT Assist 2.1 indicator is turned blue when driving on highways or motorways with HD maps.
However, in the following cases, the indicator is not turned blue.
-
When driving beyond the speed detected by the sign detection function
-
When approaching to tollhouses, exits, junctions, intersections, or lanes reduction points nearby
-
When no GPS signal is received
-
When driving on a road that is not separated from the oncoming lane
-
When the wiper is operating at low speed or high speed
-
When judging that the driver does not hold or operate the steering wheel
-
When judging that the driver is not facing forward
-
When accelerating by depressing the accelerator pedal
-
When the approach warning is activated
-
When the lane departure warning is activated
>>
GO TO 11.
CHECK FOR CANCELLATION OF ProPILOT ASSIST 2.1
Check that the ProPILOT Assist 2.1 is canceled when performing the following operations.
-
When the brake pedal is depressed after ProPILOT Assist 2.1 is set and the vehicle is driven.
-
When the shift position is in the “N” position after ProPILOT Assist 2.1 is set and the vehicle is driven.
-
When the ProPILOT Assist switch is turned OFF after ProPILOT Assist 2.1 is set and the vehicle is driven.
-
When the CANCEL switch is pressed after ProPILOT Assist 2.1 is set and the vehicle is driven.
>>
GO TO 12.
CHECK THAT THE SET vehicle SPEED RETURN TO THE SAME AS BEFORE CANCELLATION
Check that the vehicle restores the previous speed kept before the system deactivation when performing the following operations.
-
Drive the vehicle when the ProPILOT Assist 2.1 is set and depress the brake pedal to cancel the control. Check that the vehicle restores the previous vehicle speed kept before the system deactivation when pushing up the RES+ switch.
-
Drive the vehicle when the ProPILOT Assist 2.1 is set and shift the shift position to the “N” position to cancel the control. Check that the vehicle restores the previous vehicle speed kept before the system deactivation when shifting the shift position to the “D” position and pushing up the RES+ switch.
-
Drive the vehicle when the ProPILOT Assist 2.1 is set and press the CANCEL switch to cancel the control. Check that the vehicle restores the previous vehicle speed kept before the system deactivation when pushing up the RES+ switch.
>>
INSPECTION END
Other materials
Wiper and washer switch
Basic information
WARNING
In the Nissan Armada, using the washer system in freezing temperatures may
cause the fluid to freeze on the windshield, significantly reducing visibility.
Always warm the glass using the defroster before activating the washer system to
ensure safe driving conditions ...
Engine oil
Checking engine oil level
Vehicle set-up
To ensure accurate engine oil level readings in your Nissan Armada, follow the
proper preparation steps below.
1. Park the Nissan Armada on a flat, level surface and securely apply the parking
brake.
2. Start the engine and allow it to reach no ...
Rear A/c Unit Assembly
Removal and Installation
REMOVALCAUTION:
Perform lubricant return operation before each refrigeration system disassembly. However, if a large amount of refrigerant or lubricant leak is detected, never perform lubricant return operation. Refer to Perform Lubricant Return Operation.
When disconnec ...