
Nissan Armada 2025-2026 Service and Repair Manual: Adjustment
FITTING ADJUSTMENT
Fitting Adjustment Standard Dimension
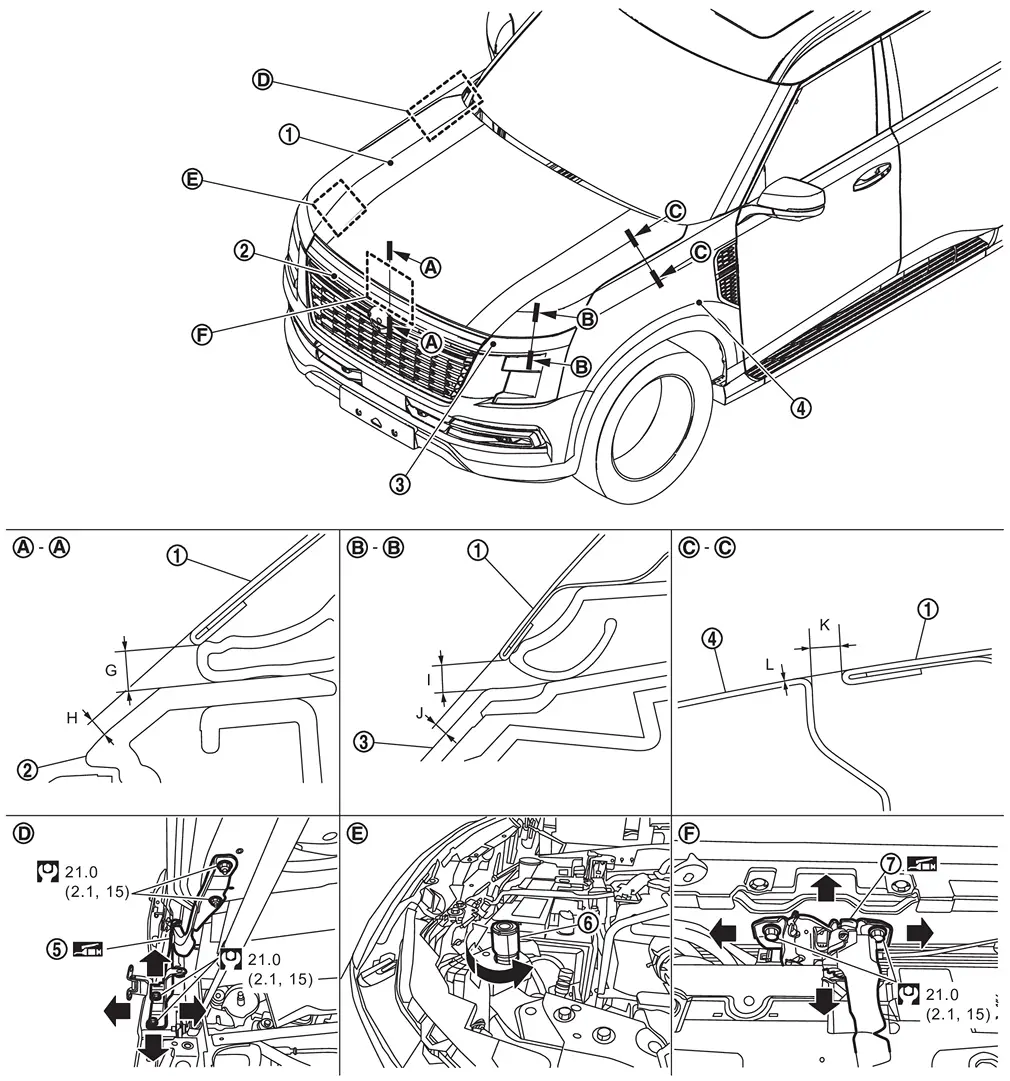
 | Hood assembly |  | Front grille |  | Front combination lamp |
 | Front fender assembly |  | Hood hinge |  | Hood bumper rubber 1 |
 | Hood lock assembly | ||||
 | : N·m (kg-m, ft-lb) | ||||
 | : Body grease | ||||
Unit: mm [in]
| Portion | Standard | Tolerance | Difference (RH/LH, MAX) | |||
|---|---|---|---|---|---|---|
| Hood assembly – Front grille |  – – | G | Clearance | 5.0 [0.197] | ± 2.6 [± 0.102] | — |
| H | Surface height | 2.0 – 2.7 [0.079 – 0.106] | ± 2.4 [± 0.094] | — | ||
| Hood assembly – Front combination lamp |  – – | I | Clearance | 4.7 – 5.1 [0.185 – 0.201] | ± 2.6 [± 0.102] | < 2.0 [0.079] |
| J | Surface height | 1.9 – 2.4 [0.075 – 0.094] | ± 2.3 [± 0.091] | < 2.1 [0.083] | ||
| Hood assembly – Front fender assembly |  – – | K | Clearance | 4.5 [0.177] | ± 1.5 [± 0.059] | < 2.0 [0.079] |
| L | Surface height | 0.0 [0.000] | ± 1.0 [± 0.039] | < 2.0 [0.079] | ||
Check the clearance and the surface height between hood assembly and each part by visually and touching.
If the clearance and the surface height are out of specification, adjust them according to the procedures shown below.
Fitting Adjustment Procedure
Remove hood lock assembly. Refer to Removal and Installation.
Adjust the surface height of hood assembly according to the fitting adjustment standard dimension by rotating hood bumper rubber 1.
Remove front fender assembly. Refer to Removal and Installation.
Loosen hood hinge mounting bolts.
Temporary install front fender assembly, front combination lamp and front grille, and then adjustment clearance of hood assembly according to the specified value by moving hood assembly.
Remove temporary installed parts, and then tighten hood hinge mounting bolts to the specified torque.
CAUTION:
After tightening, apply touch-up paint (the body color) if the paint around hinge and mounting bolts are peeled off during adjustment.
Install front fender assembly. Refer to Removal and Installation.
Install front combination lamp. Refer to Removal and Installation.
Install front grille. Refer to Removal and Installation (OFF ROAD MODELS) or Removal and Installation (CITY MODELS).
Install hood lock assembly and temporary tighten hood lock assembly mounting bolts, and then position hood lock assembly and engage hood striker. Check hood lock assembly and hood striker for looseness. Refer to Removal and Installation.
Move hood lock assembly laterally until the center of hood striker and hood lock assembly are vertical when viewed from the front.
Tighten hood lock assembly mounting bolts to the specified torque.
Install front grille upper. Refer to Removal and Installation (OFF ROAD MODELS) or Removal and Installation (CITY MODELS).
CAUTION:
After adjusting, check the open/close operation. Refer to Inspection.
After installation, perform hood lock control inspection. Refer to Inspection.
 Inspection
Open and close hood. Check that hood hinge rotation portion moves smoothly.
Check hood hinge rotating part for lubrication condition. If necessary, apply grease.
: Body grease ...
 Hood Hinge
...
Other materials:
Inner Sill
WARNING:
Work after lower side dash assembly, center pillar, outer sill, and inner center pillar are removed.
Unit: mm (in) : Vehicle front : Drill φ7 mm (0.28 in) hole for the plug welding hole (ultra high strength steel). : Drill φ8 mm (0.31 in) hole for the plug welding hole (ultra high stren ...
Glue System
Glue systems allow pulling when an area is not easily accessible like roof rail or beneath braces. It is also one of the easiest systems to learn. But it is mainly limited to soft dents.
A couple of things that affect the glue pulling:
Temperature
The diameter and the size of the pull knob
Applica ...
Removal and Installation
REMOVAL
Remove front center console rear finisher assembly. Refer to Removal and Installation.
Remove fixing screws , and then remove rear A/C control assembly.
Remove fixing screws , and then remove rear A/C control from rear A/C control bracket.
INSTALLATION
Install in the reverse order of rem ...

0.0054