Basic information
For detailed specifications regarding brake fluid for your Nissan Armada, refer to the section "Capacities and recommended fluids/lubricants" in the official documentation.
Maintaining the correct brake fluid condition in the Nissan Armada is essential for ensuring consistent braking performance, safety, and long-term system reliability.
WARNING
- Always use fresh brake fluid from a properly sealed container when servicing your Nissan Armada. Contaminated or degraded fluid can compromise braking efficiency and damage system components.
- Before removing the filler cap, ensure that the surrounding area is clean to prevent dirt or debris from entering the brake system.
- Brake fluid is toxic and hazardous. Store it in clearly labeled containers and keep it out of reach of children and pets.
CAUTION
- Never add brake fluid to your Nissan Armada while the ignition is ON or the engine is running, as fluid levels may change once the system stabilizes.
- Avoid spilling brake fluid on painted surfaces of the Nissan Armada. If contact occurs, rinse immediately with clean water to prevent paint damage.
Brake fluid
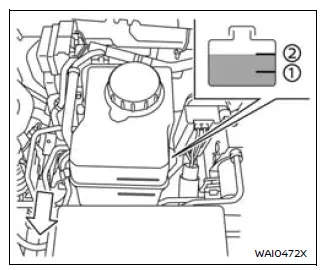
Check the brake fluid level in your Nissan Armada regularly, ensuring it remains between the MIN 1 and MAX 2 markings on the reservoir.
If the brake warning light illuminates or if fluid needs to be added frequently, this may indicate a leak or system issue. In such cases, have the Nissan Armada inspected by a qualified technician or authorized NISSAN dealer as soon as possible.
Other materials
Piston
Piston
DESCRIPTION Selection points Selection parts Selection items Selection methods
Between cylinder block and crankshaft
Main bearing
Main bearing grade
(bearing thickness)
Determined by match of cylinder block bearing housing grade (inner diameter of housing) and crankshaft journal gr ...
Rear Door Striker
Removal and Installation
REMOVALRemove TORX bolts, and then remove rear door striker.INSTALLATIONNote the following items, and then install in the reverse order of removal.CAUTION:
Never reuse TORX bolt. Always replace it with a new one when it is removed.
Before tighten rear door striker mounti ...
Front Power Window Switch (passenger Side)
Removal and Installation
CAUTION:
Never bend the fixing pawl of front armrest RH.REMOVALRemove front door finisher RH. Refer to Removal and Installation.
Disconnect front power window switch (passenger side) harness connector and door lock and unlock switch harness connector.
Remove front door squaw ...