Exploded View
REMOVAL
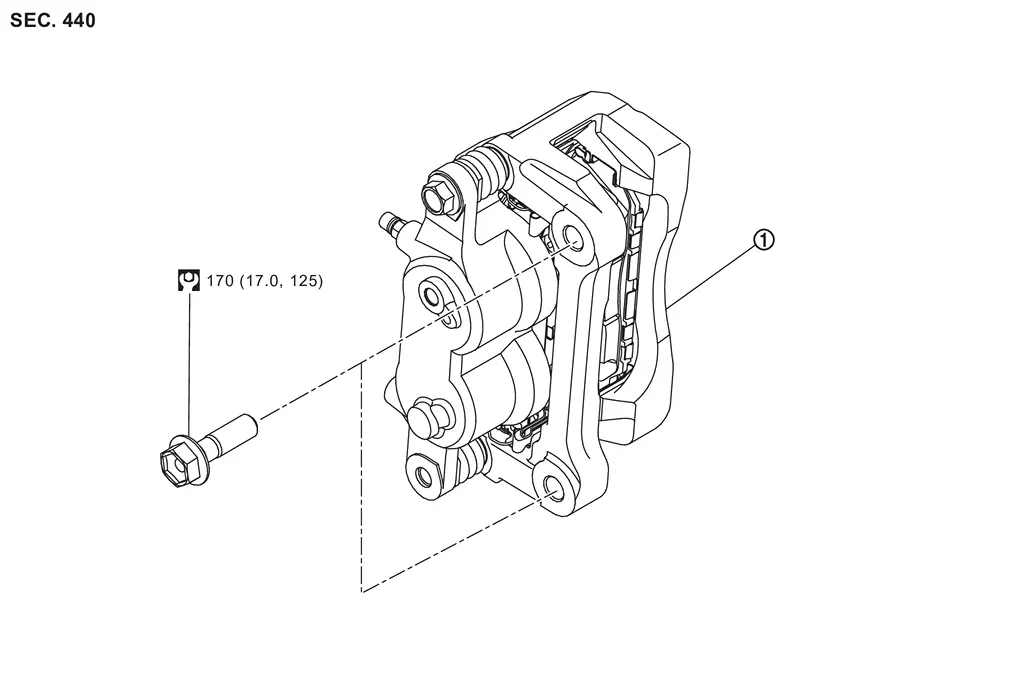
 |
Brake caliper assembly | ||||
 |
: N·m (kg-m, ft-lb) | ||||
DISASSEMBLY
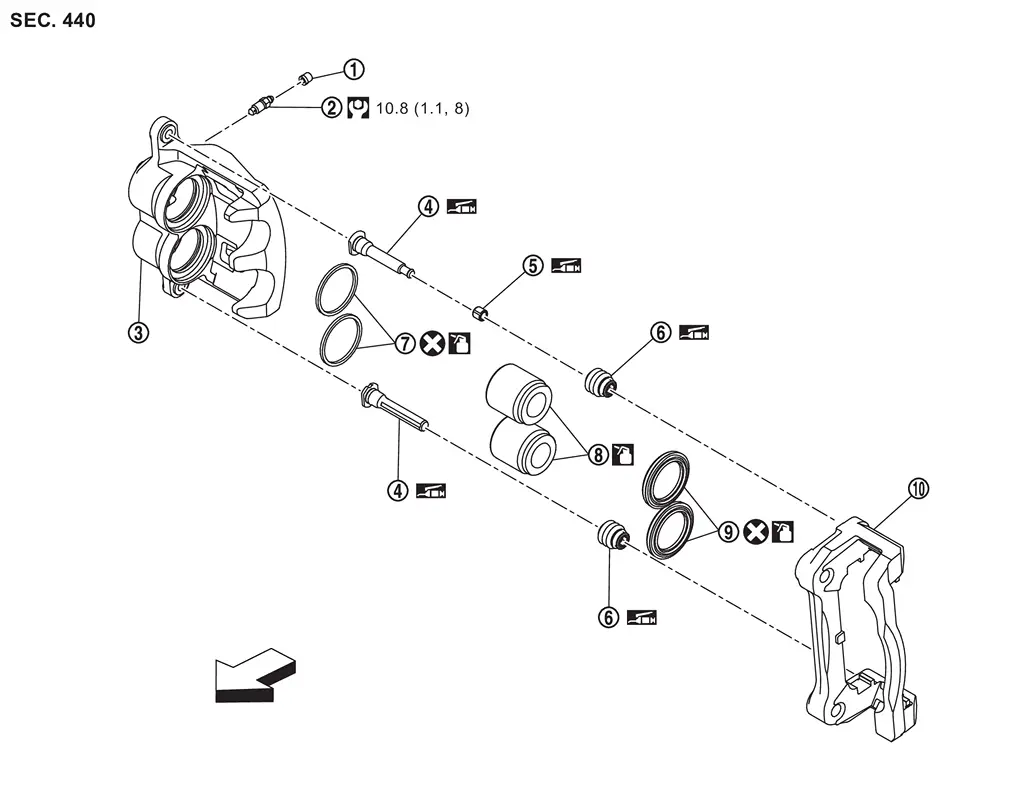
|
Cap |  |
Bleeder valve |  |
Cylinder body |
 |
Sliding pin |  |
Bushing |  |
Sliding pin boot |
 |
Piston seal |  |
Piston |  |
Piston boot |
 |
Torque member | ||||
| : vehicle front | |||||
|
: N·m (kg-m, ft-lb) | ||||
 |
: NISSAN rubber grease. | ||||
 |
: NISSAN brake fluid No.2500 | ||||
 |
: Always replace after every disassembly. | ||||
Removal & Installation
WARNING:
-
Jacking up or lift up the vehicle may the vehicle height to go down which cause a personal injury and/or damage to the air suspension component parts. Refer to Precaution for when Jacking and Lifting Up the vehicle with Electronic Air Suspension System.
REMOVAL
WARNING:
Remove dust covering brake caliper assembly and brake pad with a dust collector. Never splatter the dust with an air blow gun.
CAUTION:
-
Never spill or splash brake fluid on painted surfaces. Brake fluid may seriously damage paint. Wipe it off immediately and wash with water if it gets on a painted surface.
-
Never depress brake pedal during removal and installation of brake hose because brake fluid may scatter.
-
Never depress the brake pedal while removing the brake pads because the piston may pop out.
-
Never drop parts after removal.
-
If the brake fluid or grease adheres to cylinder body and disc rotor, quickly wipe it off.
Remove tires. Refer to ROAD WHEEL TIRE : Removal & Installation.
Perform the advance preparation "(Air release) Accumulator pressure release" using CONSULT. Refer to Work Procedure.
Fix the disc rotor using wheel nuts.
Drain brake fluid. Refer to Draining.
CAUTION:
Never adhere brake fluid to disc rotor.
Remove union bolts and copper washer and then separate brake hose from brake caliper assembly. Refer to Removal and Installation.
CAUTION:
Never depress brake pedal during removal and installation of brake hose because brake fluid may scatter.
Remove torque member mounting bolts  and then remove brake caliper assembly.
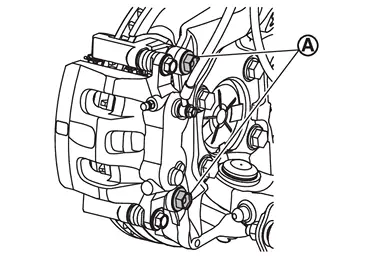
CAUTION:
Never drop brake caliper assembly and brake pad.
INSTALLATION
WARNING:
Remove dust covering brake caliper assembly and brake pad with a dust collector. Never splatter the dust with an air blow gun.
CAUTION:
-
Never spill or splash brake fluid on painted surfaces. Brake fluid may seriously damage paint. Wipe it off immediately and wash with water if it gets on a painted surface.
-
Never depress brake pedal while removing the brake pads because the piston may pop out.
-
If brake fluid or grease adheres to disc rotor and cylinder body, quickly wipe it off.
Install disc rotor.
-
2WD: Refer to Removal and Installation.
-
4WD: Refer to Removal and Installation.
Install brake caliper assembly to steering knuckle and tighten torque member mounting bolts to the specified torque. Refer to FRONT BRAKE CALIPER ASSEMBLY : Exploded View.
CAUTION:
Never spill or splash any grease and moisture on the brake caliper assembly mounting face, threads, mounting bolts and washers. Wipe out any grease and moisture.
Install copper washers and brake hose to brake caliper and tighten union bolt to the specified torque. Refer to Exploded View.
CAUTION:
Never reuse copper washer.
Perform air bleeding. Refer to Work Procedure.
CAUTION:
-
Never refill drained brake fluid.
-
Never adhere brake fluid to disc rotor.
Check front disc brake for dragging. Refer to Inspection and Adjustment.
Install tires. Refer to ROAD WHEEL TIRE : Removal & Installation.
Perform inspection after installation. Refer to FRONT BRAKE CALIPER ASSEMBLY : Inspection.
Disassembly & Assembly
DISASSEMBLY
CAUTION:
Never drop parts.
 NOTE:
NOTE:
When disassembling, torque member, brake pad, and pad retainer are not required to remove. Refer to Removal and Installation.
Remove sliding pin bolts and then remove cylinder body from torque member.
CAUTION:
Never drop brake pad by fixing it with suitable tape.
Remove sliding pin boots from torque member.
Remove bushing from sliding pin .
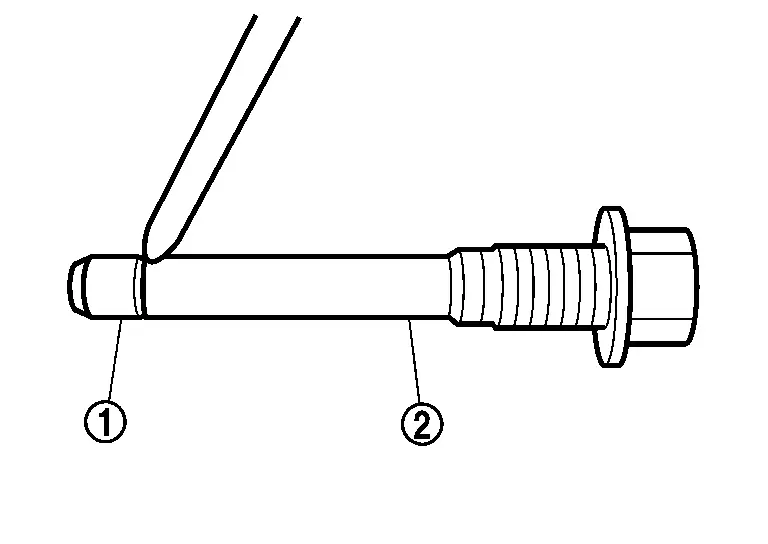
Place a wooden block as shown in the figure, and blow air into union bolt mounting hole to remove pistons and piston boots.
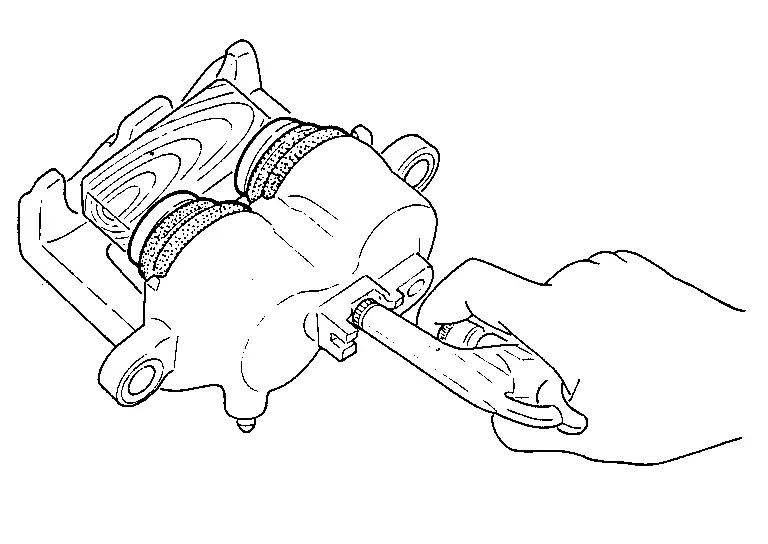
CAUTION:
Never get fingers caught in the pistons.
Remove piston seals from cylinder body using seal pick tool.
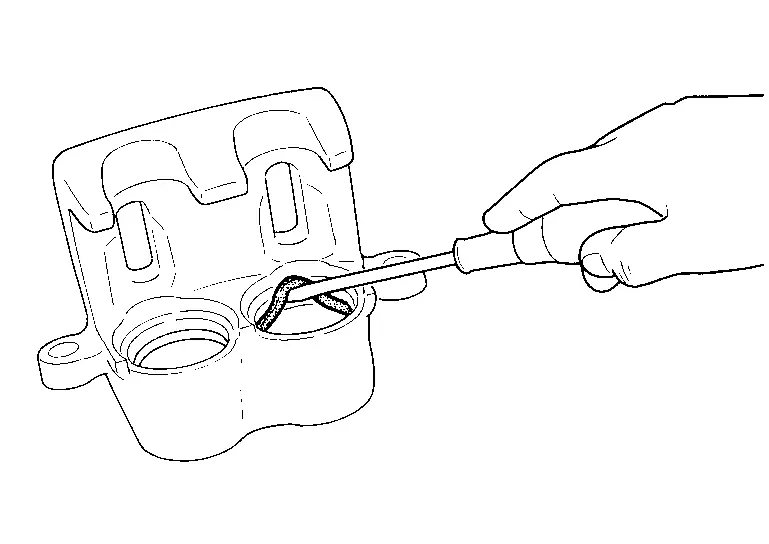
CAUTION:
Be careful not to damage a cylinder inner wall.
Remove bleeder valve and cap.
Perform inspection after disassembly. Refer to FRONT BRAKE CALIPER ASSEMBLY : Inspection.
ASSEMBLY
CAUTION:
Never drop parts.
Install bleeder valve and cap.
Apply new brake fluid to piston seals , and install them to cylinder body.
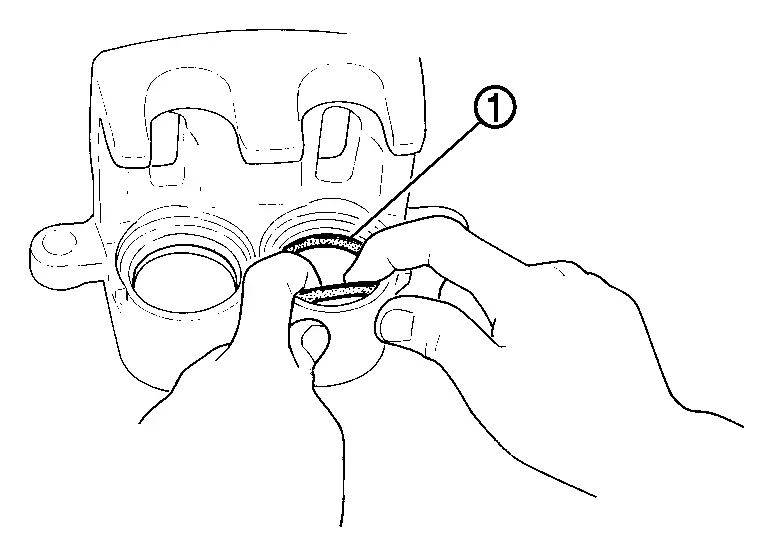
CAUTION:
Never reuse piston seals.
Apply new brake fluid to piston boots . Cover piston end with piston boot, and then install cylinder side lip of piston boot securely into groove on cylinder body.
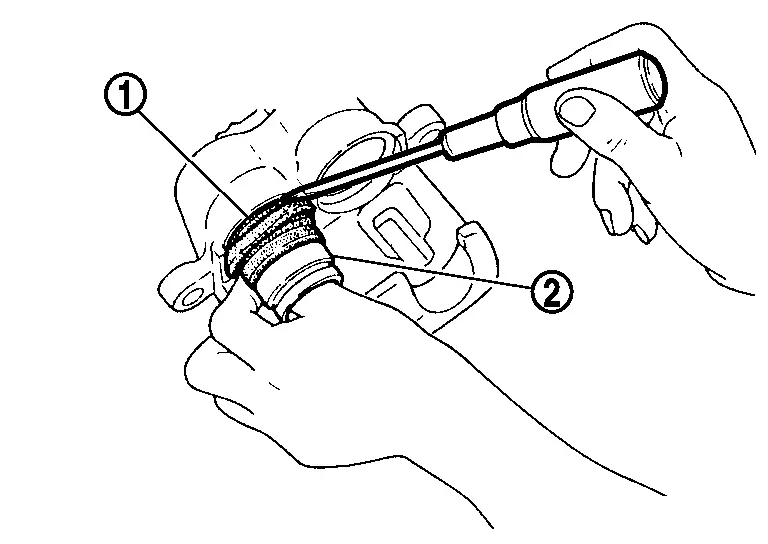
CAUTION:
Never reuse piston boots.
Apply new brake fluid to pistons . Push piston into cylinder body and then install piston-side lip of piston boot into the piston groove.
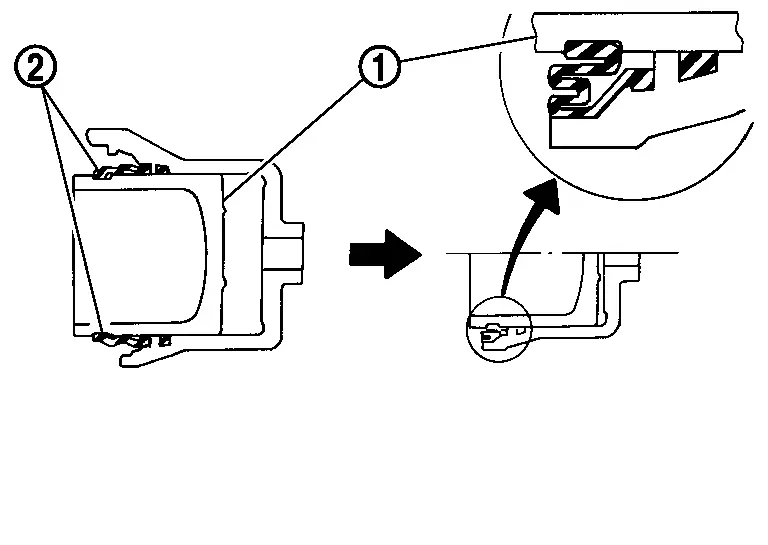
CAUTION:
Press the pistons evenly and vary the pressing point to prevent cylinder inner wall from being rubbed.
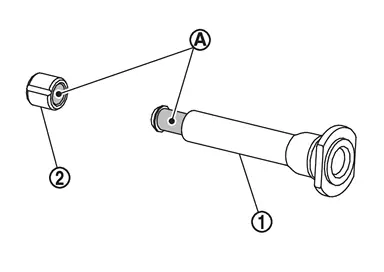
Apply rubber grease to mating faces between sliding pin and bushing , and install bushing to sliding pin.
Apply rubber grease to mating faces between sliding pins and sliding pin boots , and install sliding pins and sliding pin boots to torque member .
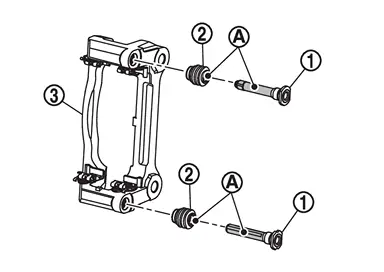
Install cylinder body to torque member and tighten sliding pin bolts to the specified torque. Refer to FRONT BRAKE CALIPER ASSEMBLY : Exploded View.
Inspection
INSPECTION AFTER DISASSEMBLY
Check the following items and replace if necessary.
Cylinder Body
Check cylinder inner wall for rust, wear, cracks or damage.
CAUTION:
Always clean with new brake fluid. Never clean with mineral oil such as gasoline and diesel fuel.
Torque Member
Check the torque member for rust, wear, cracks or damage.
Pistons
Check surface of piston for rust, wear, cracks or damage.
CAUTION:
Piston sliding surface is plated. Never polish with sandpaper.
Sliding Pin, Sliding Pin Boot and Bushing
Check sliding pins, sliding pin boots and bushing for rust, wear, cracks or damage.
INSPECTION AFTER INSTALLATION
Check front disc brake for dragging. If any drag is found, follow the procedure described below.
Remove brake pads. Refer to Removal and Installation.
Return pistons caliper.
Install brake pad. Refer to Removal and Installation.
Depress the brake pedal several times.
Check front disc brake for dragging again. When any drag is found, disassemble the cylinder body and replace if necessary. Refer to FRONT BRAKE CALIPER ASSEMBLY : Disassembly & Assembly.
If brake pads are replaced or ground, or if braking force is felt strange, perform break-in work. Refer to Inspection and Adjustment.
Other materials
How to enable/disable the I-DA system
Vehicle information display
Steering-wheel-mounted control (right side)
To enable or disable the Intelligent Driver Alertness system in the Nissan Armada,
follow these steps:
1. Press the
button until "Settings" appears in the vehicle information display, then confirm
...
Front Oil Seal
Exploded View
Front output shaft
Front oil seal
Front case
Snap ring
Sprockets with chain
Snap ring
Rear case
Rear companion flange
O-ring
: Always replace after every disassembly.
: N·m (kg-m, ft-lb)
: Apply transfer fluid.
: Apply Genuine Liquid Gas ...
Wheel Sensor
Front Wheel Sensor
Exploded View
Front LH wheel sensor
Bracket
Steering knuckle
: vehicle front
: N·m (kg-m, in-lb)
NOTE:
Front RH wheel sensor is symmetrically opposite of LH.
Removal and Installation
WARNING:
Jacking up or lift up the vehicle may the vehicle he ...