Checking engine oil level
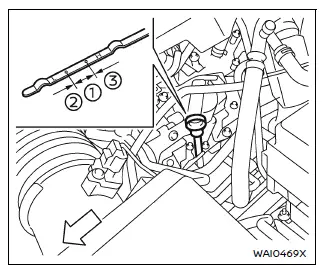
Vehicle set-up
To ensure accurate engine oil level readings in your Nissan Armada, follow the proper preparation steps below.
1. Park the Nissan Armada on a flat, level surface and securely apply the parking brake.
2. Start the engine and allow it to reach normal operating temperature to ensure proper oil circulation.
3. Turn the engine off and wait at least 15 minutes to allow the oil to drain back into the oil pan.
4. Carefully raise the Nissan Armada using a suitable floor jack and support it with properly positioned safety jack stands.
- Ensure the jack stands are placed at the designated lifting points of the Nissan Armada.
- Use a proper adapter on the jack stand saddle to prevent damage to the vehicle frame.
5. Remove the engine undercover.
- Unscrew and remove the fasteners securing the undercover in place.
CAUTION
Always use the correct lifting and support points when raising your Nissan Armada to prevent structural damage or personal injury.
Changing engine oil and filter
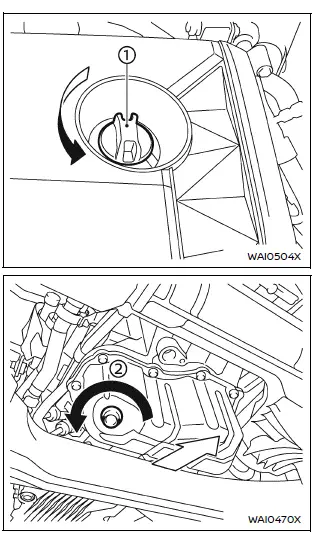
Example
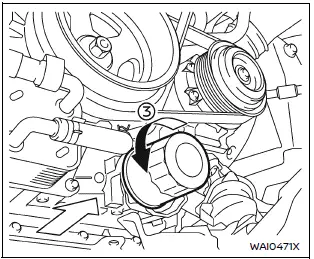
Example
Engine oil and filter
1. Position a suitable drain pan beneath the oil drain plug of your Nissan Armada.
2. Remove the engine oil filler cap 1 to allow proper drainage.
3. Using a wrench, loosen and remove the drain plug 2, allowing the engine oil to completely drain.
CAUTION
Engine oil in the Nissan Armada may be extremely hot. Use caution to avoid burns.
- Dispose of used engine oil in accordance with local environmental regulations.
- Always follow proper disposal procedures.
4. (Steps 4–7 apply when replacing the oil filter.) Loosen the oil filter 3 using an oil filter wrench, then remove it by hand.
5. Clean the oil filter mounting surface thoroughly using a clean cloth.
CAUTION
- Ensure all old gasket material is removed from the mounting surface to prevent leaks and possible engine damage in your Nissan Armada.
- Keep the dipstick properly inserted during oil refilling to avoid oil spillage.
6. Lightly coat the gasket of the new oil filter with clean engine oil.
7. Install the new oil filter by turning it clockwise until resistance is felt, then tighten it an additional 2/3 turn.
Oil filter tightening torque:
11 to 15 ft-lb
(15 to 21 N·m)
8. Clean the drain plug and install it with a new washer. Tighten securely using a wrench.
Drain plug tightening torque:
22 to 29 ft-lb
(29.4 to 39.2 N·m)
Do not overtighten, as this may damage threads or components.
9. Refill the Nissan Armada engine with the recommended grade and quantity of engine oil, then securely reinstall the oil filler cap.
The exact oil capacity depends on factors such as oil temperature and drain time. Always verify the oil level using the dipstick to ensure correct filling.
10. Start the engine and inspect the area around the drain plug and oil filter for any signs of leakage.
If leaks are detected, correct them immediately.
11. Turn the engine off and wait at least 15 minutes, then recheck the oil level using the dipstick. Add oil if necessary to reach the proper level.
After the operation
1. Reinstall the engine undercover in the reverse order of removal.
2. Carefully lower the Nissan Armada back to the ground.
3. Dispose of the used oil and filter responsibly according to local regulations.
WARNING
- Repeated or prolonged contact with used engine oil may pose health risks, including skin irritation or more serious conditions.
- Avoid direct contact with used oil. If contact occurs, wash thoroughly with soap or an appropriate cleaner.
- Keep used engine oil safely stored and out of reach of children.
Other materials
Cockpit
Example
The cockpit of the Nissan Armada is engineered to provide maximum control, comfort,
and advanced driver assistance integration. Every switch and control element is
strategically positioned to ensure intuitive access, allowing the driver of the
Nissan Armada to stay focused on the ...
Unit Parameter Writing
Description
After working the following, transfer unit parameter must be written to transfer control unit.
Transfer control unit replacing
Transfer assembly replacing
Transfer control actuator replacing
Transfer range position sensor replacing
Transfer cam position sensor replacing
Transf ...
Front Center Console Assembly
Exploded View
REMOVAL
Front center console switch finisher assembly
Front center console bracket
Front center console side finisher upper LH
Front center console side finisher lower LH
Instrument lower cover LH
Front center console mask LH
Front center console rear finisher assemb ...