
Nissan Armada 2025-2026 Service and Repair Manual: Exploded View
WITHOUT DYNAMIC DIGITAL SUSPENSION AND ELECTRONIC AIR SUSPENSION
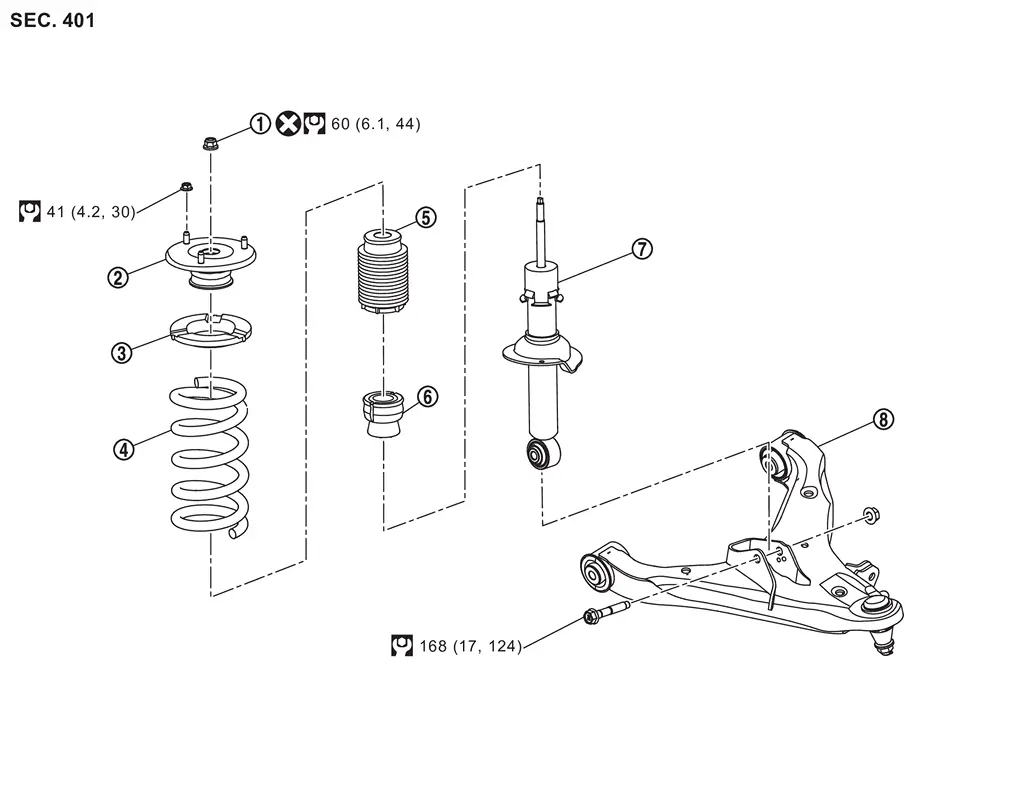
 | Piston rod lock nut |  | Mounting insulator |  | Rubber seat |
 | Coil spring |  | Dust cover |  | Bound bumper |
 | Shock absorber |  | Lower link | ||
 | : Always replace after every disassembly. | ||||
 | : N·m (kg-m, ft-lb) | ||||
WITH DYNAMIC DIGITAL SUSPENSION AND ELECTRONIC AIR SUSPENSION
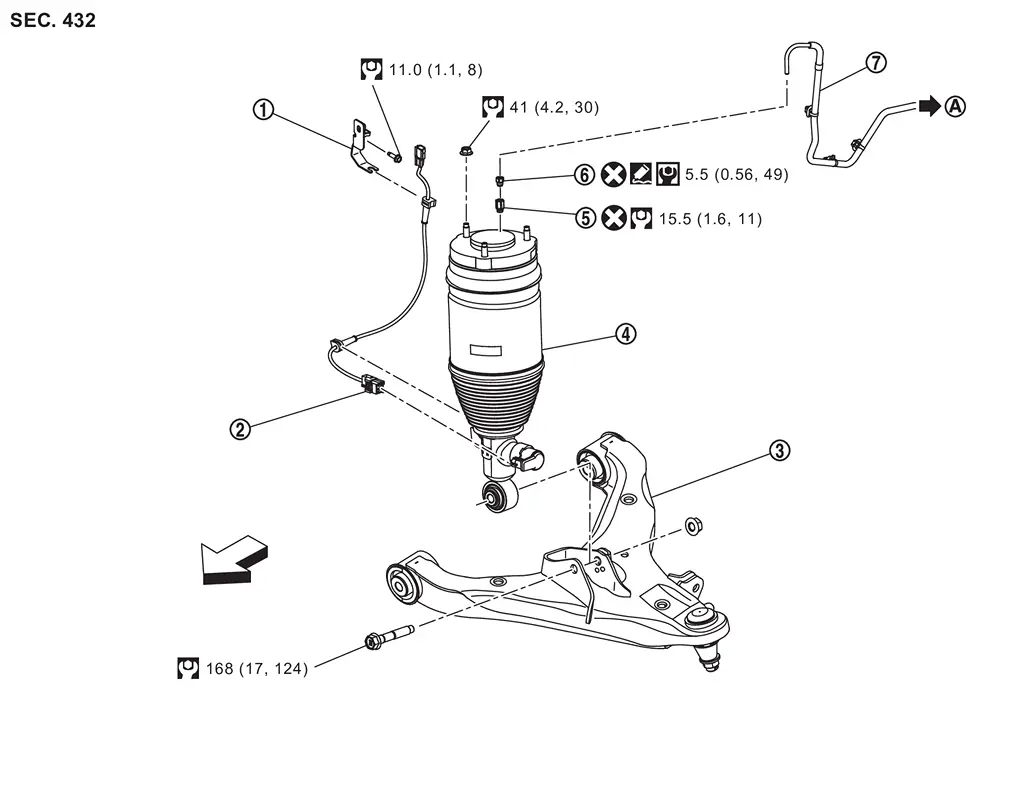
| Bracket | | Shock absorber harness | | Lower link |
| Shock absorber (With Built In Air Spring) | | Air adapter | | Air connector |
| Air tube | ||||
 | To air suspension control module | ||||
| : Always replace after every disassembly. | ||||
 | : Apply silicone sealant. | ||||
 | : Vehicle front | ||||
| : N·m (kg-m, ft-lb) | ||||
 | : N·m (kg-m, in-lb) |
CAUTION:
The shock absorber assembly cannot be disassembled.

 Removal and Installation
REMOVAL
Without Dynamic Digital Suspension and Electronic Air Suspension
Remove tires. Refer to ROAD WHEEL TIRE : Removal & Installation.
Set suitable jack under lower link.
CAUTION:
Never damage ...
Other materials:
How to Use Hammer and Dolly
(1) HAMMER-ON-DOLLY
This is also known as dinging on the dolly. The dolly is held directly under the area being struck with the hammer. Hammering smoothes the dented metal between the dolly and hammer. This method causes the sheet metal to stretch.
Hammering on a dolly is most effective for repairi ...
Removal and Installation
REMOVAL
CAUTION:
Never damage body side outer panel.
Remove rear side spoiler. Refer to Removal and Installation.
Remove luggage side upper finisher. Refer toRemoval and Installation .
Disconnect window antenna connectors .
Cut the adhesive using a piano wire.Apply protective tapes (A) on body sid ...
Diagnosis Procedure
CHECK AUTOMATIC BACK DOOR WARNING BUZZER
Check automatic back door warning buzzer.
Refer to DTC Diagnosis Procedure.
Is the inspection result normal?
YES>>
GO TO 2.
NO>>
Repair or replace the malfunctioning parts.
REPLACE AUTOMATIC BACK DOOR CONTROL UNIT
Replace automatic back door con ...

0.0056