
Nissan Armada 2025-2026 Service and Repair Manual: Removal and Installation
REMOVAL
Without Dynamic Digital Suspension and Electronic Air Suspension
Remove tires. Refer to ROAD WHEEL TIRE : Removal & Installation.
Set suitable jack under lower link.
CAUTION:
Never damage lower link.
Remove brake hose bracket from steering knuckle. Refer to Removal and Installation.
Separate upper link from steering knuckle.
2WD models: Refer to Removal and Installation.
4WD models: Refer to Removal and Installation.
Remove shock absorber mounting nuts (upper side).
Remove shock absorber mounting bolt (lower side), and remove shock absorber from vehicle.
Perform inspection after removal. Refer to Inspection.
With Dynamic Digital Suspension and Electronic Air Suspension
WARNING:
When checking under the vehicle or inside wheel house, always turn OFF the electronic air suspension function with the vehicle unladen and normal height, since the suspension may accidentally move and it can lead to personal injury. Refer to the operation procedures on the reference to set normal height and turn off the system functions. Refer to Precaution for Electronic Air Suspension System.
CAUTION:
Never grab and deform the boots
 of the air spring when remove and installing. If deformed, return it without stretching.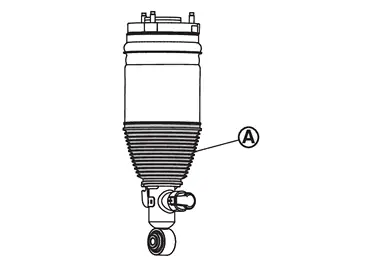
Start engine.
Turn OFF the electronic air suspension function. Refer to Operation.
Stop engine.
Lift up the vehicle.
Remove tires. Refer to ROAD WHEEL TIRE : Removal & Installation.
Set suitable jack (A) under lower link.
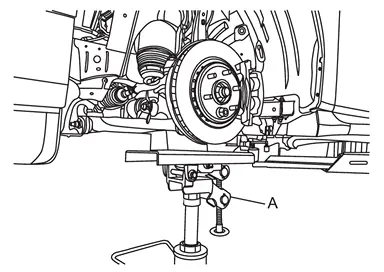
CAUTION:
Never damage lower link.
Disconnect shock absorber harness connector , and remove shock absorber harness and bracket from vehicle.
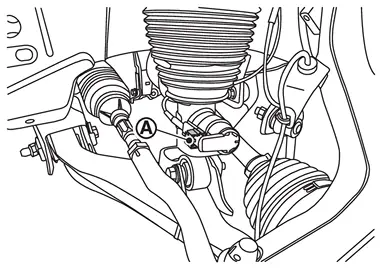
Remove silicone sealant between the air connector  and air adapter
  .
.
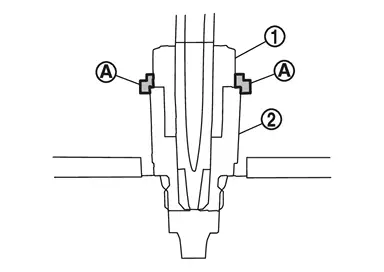
CAUTION:
Never damage air connector and air adapter.
Apply the matching marks to the air tube when replacing air connector  .
.
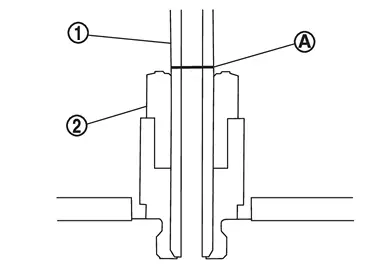
Loosen the air connector and perform air bleeding.
CAUTION:
Be careful since air flows swiftly from air tube.
Loosen the air connector slowly.
Never disconnect the air connector until the air completely bleeds.
Never damage air connector.
When reusing the air connector, remove air tube together with air connector from air adapter  .
.
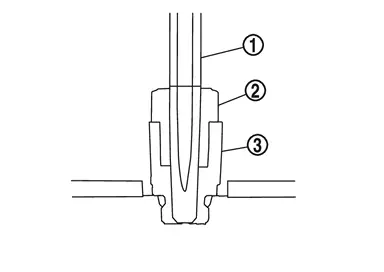
CAUTION:
Never damage air connector, air adapter, and air tube.
When reusing air connector, never remove air tube from air connector.
 NOTE:
NOTE:
When replacing the air connector, follow the procedure below.Slide the air connector part to direction  , and remove the part
  from the air tube .
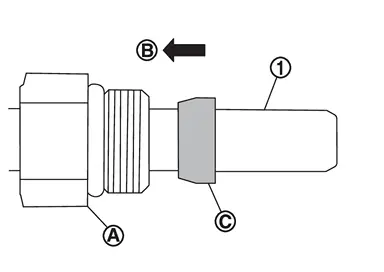
CAUTION:
Never damage air connector and air tube.
Remove the air connector part from the air tube .
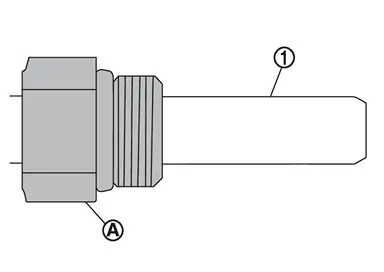
CAUTION:
Never damage air connector and air tube.
Remove air adapter from shock absorber if necessary.
CAUTION:
Separate upper link from steering knuckle.
2WD: Refer to Removal and Installation.
4WD: Refer to Removal and Installation.
Remove shock absorber mounting nuts (upper side).
Remove shock absorber mounting bolt (lower side), and remove shock absorber from vehicle.
Perform inspection after removal. Refer to Inspection.
INSTALLATION
Without Dynamic Digital Suspension and Electronic Air Suspension
Note the following, and install in the reverse order of removal.
Perform final tighting of shock absorber (lower side) by the following procedures.
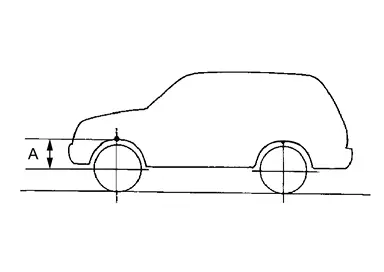
Measure between wheel center and fender arch (A).
 NOTE:
NOTE:Note the measurements.
Set the wheel chocks on the rear tires.
Jack up front of the vehicle and set the rigid rack.
Remove the front tires.
Set suitable jack (A) on the left and right steering knuckles
(lower link ball joint fastening part). 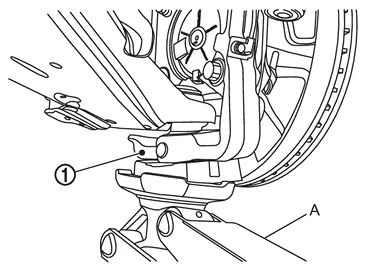
CAUTION:
Never damage threaded part of ball joint.
Jack up the left and right steering knuckles until the vehicle no longer floats off the rigid rack (A).
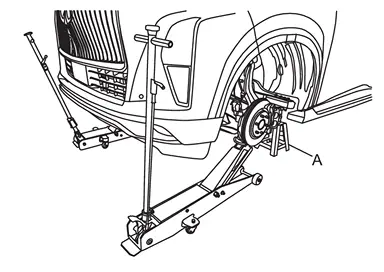
CAUTION:
Never damage steering knuckles.
Check the stable condition when using a suitable jack.
Never float the vehicle.
NOTE:Jack up left and right at the same time.
Measure between wheel center and fender arch (A).
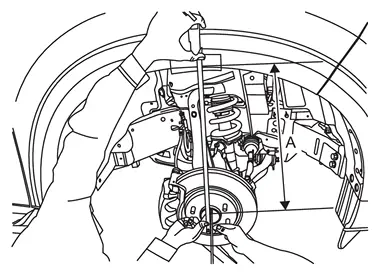
CAUTION:
Check the measurements are within +20 mm (0.79 in) from step 1.
If the measurements are +20 mm (0.79 in) or more, perform step 6 again.
Tight the mounting bolt of shock absorber (lower side) to the specified torque. Refer to Exploded View.
Perform inspection after installation. Refer to Inspection.
Perform adjustment after installation. Refer to Adjustment.
After replacing the shock absorber, always follow the disposal procedure to discard the shock absorber. Refer to Disposal.
With Dynamic Digital Suspension and Electronic Air Suspension
Install shock absorber to vehicle.
Install shock absorber harness connector, shock absorber harness, and bracket.
CAUTION:
Never twist or pull shock absorber harness, when installing.
Install upper link to steering knuckle.
2WD: Refer to Removal and Installation.
4WD: Refer to Removal and Installation.
Install brake hose bracket to steering knuckle. Refer to Removal and Installation.
Install air adapter to shock absorber if necessary.
CAUTION:
Never let foreign materials entered into parts.
When reusing the air connector, install air tube and air connector together to air adapter .
CAUTION:
Never damage air connector, air adapter, and air tube.
Never let foreign materials entered into parts.
When replacing the air connector, follow the procedure below.Install air connector to air adapter .
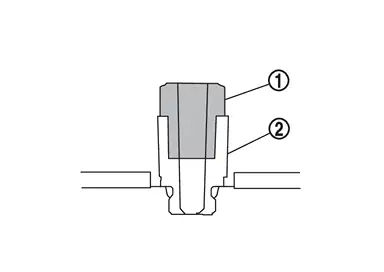
CAUTION:
Never damage air connector and air adapter.
Never reuse air connector.
Never remove the air connector cover until air tube is installed.
Never let foreign materials entered into parts.
straight into the air connector to the marked point which is applied when removing.
CAUTION:
Securely insert the air tube with no damage and twist.
Never remove the air connector cover until air tube is installed.
Never let foreign materials entered into parts.
Apply silicone sealant to faces air connector  and air adapter .
CAUTION:
Before applying the silicone sealant, make sure that there are no clearance between air adapter and air connector.
Apply the silicone sealant to the air adapter and air connector jointed parts without any clearance.
Start engine.
Use CONSULT and fill the inner pressure of shock absorber to 5.7 bar. Refer to Work Support.
Stop engine.
Install tire. Refer to ROAD WHEEL TIRE : Exploded View.
Lift down the vehicle.
Start engine.
Perform pressure measurements using CONSULT. Refer to Work Support.
NOTE:
Confirm that "Air suspension internal pressure judgement" is OK.
Use CONSULT and vehicle to the normal height. Refer to Work Support.
Turn ON the electronic air suspension function. Refer to Operation.
Stop engine.
Perform final tighting of shock absorber (lower side) by the following procedures.Measure between wheel center and fender arch (A).
NOTE:
Note the measurements.
Set the wheel chocks on the rear tires. Jack up front of the vehicle and set the rigid rack. Remove the front tires. Set suitable jack (A) on the left and right steering knuckles (lower link ball joint fastening part).
CAUTION:
Never damage threaded part of ball joint.
Jack up the left and right steering knuckles until the vehicle no longer floats off the rigid rack (A).
CAUTION:
Never damage steering knuckles.
Check the stable condition when using a suitable jack.
Never float the vehicle.
NOTE:
Jack up left and right at the same time.
Measure between wheel center and fender arch (A).
CAUTION:
Check the measurements are within +20 mm (0.79 in) from step a.
If the measurements are +20 mm (0.79 in) or more, perform step f again.
Perform inspection after installation. Refer to Inspection.
Perform adjustment after installation. Refer to Adjustment.
 Exploded View
WITHOUT DYNAMIC DIGITAL SUSPENSION AND ELECTRONIC AIR SUSPENSION
Piston rod lock nut Mounting insulator Rubber seat Coil spring Dust cover Bound bumper Shock absorber Lower link : Always rep ...
 Disassembly & Assembly
DISASSEMBLY
Without Dynamic Digital Suspension and Electronic Air Suspension
CAUTION:
Never damage shock absorber piston rod when removing components from shock absorber.
Install shock absorber attach ...
Other materials:
Work Flow
OVERALL SEQUENCE
DETAILED FLOW
GET INFORMATION FOR SYMPTOM
Get the detailed information about symptom from customer.
Check the drive mode indicator on the meter appeared.
Check the drive mode indicator on the meter changed when operates the drive mode selector switch.
>>
GO TO 2.
CHECK THE ...
Removal and Installation
REMOVAL
Front
Remove headlining. Refer to Removal and Installation.
Remove instrument panel assembly. Refer to Removal and Installation.
Remove front drain hose from fixing clips.
Disconnect front drain hose from moonroof unit assembly and front drain connector.
Rear
Remove headlining. Refer to Remo ...
Removal and Installation
REMOVAL
Remove hood assembly. Refer to Removal and Installation.
Remove front fender assembly. Refer to Removal and Installation.
Remove hood hinge mounting bolts, and then remove hood hinge.
INSTALLATION
Note the following items, and then install in the reverse order of removal.
CAUTION:
Before ins ...

0.0061