
Nissan Armada 2025-2026 Service and Repair Manual: Exploded View
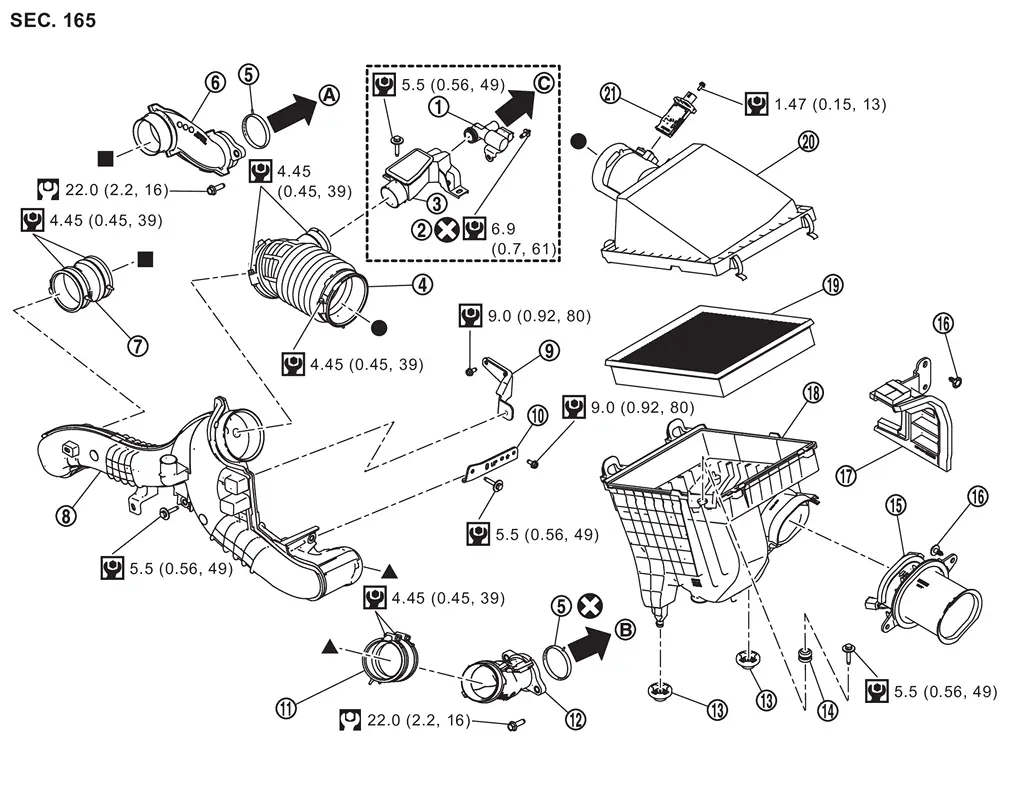
 | Crankcase ventilation valve* |  | Crankcase ventilation valve bolt* |  | Resonator* |
 | Air duct 1 |  | Gasket |  | Air duct 3 (bank 1) |
 | Air duct 2 (bank 1) |  | Inlet air duct 2 |  | Bracket 1 |
 | Bracket 2 |  | Air duct 2 (bank 2) |  | Air duct 3 (bank 2) |
 | Grommet |  | Mounting rubber |  | Inlet air duct 1 |
 | Clip |  | Air guide |  | Air cleaner body |
 | Air cleaner filter |  | Air cleaner cover |  | Mass air flow sensor |
 | To turbocharger assembly (bank 1). Refer to Exploded View. |  | To turbocharger assembly (bank 2). Refer to Exploded View. |  | To rocker cover (bank 2). Refer to Exploded View. |
 | : Always replace after every disassembly. | ||||
 | : N·m (kg-m, ft-lb) | ||||
 | : N·m (kg-m, in-lb) | ||||
 , ,  , ,  : Indicates that the parts is connected at points with same symbols in actual vehicle. : Indicates that the parts is connected at points with same symbols in actual vehicle. | |||||
* When removing the crankcase ventilation valve* exchange as a set.

 Removal & Installation
REMOVAL
NOTE:
The mass airflow sensor can be removed while still installed on the air cleaner cover.
Pinch the clip on the air cleaner cover to release the lock, and remove the air cleaner cover.
...
Other materials:
Work Flow
CUSTOMER INTERVIEW
Interview the customer if possible, to determine the conditions that exist when the noise occurs. Use the Diagnostic Worksheet during the interview to document the facts and conditions when the noise occurs and any of customer's comments; Refer to Diagnostic Worksheet. This infor ...
Removal and Installation
WORK STEP
When removing instrument panel assembly and display unit take steps in the order shown by the numbers below.
PARTS INSTRUMENT PANEL ASSEMBLY DISPLAY UNIT Dash side finisher RH [1] Instrument lower cover RH [2] Glove box assembly [3] Passenger knee air bag module [4] Instrument ...
Exploded View
Timing chain (bank 1) Timing chain slack guide (bank 1) Timing chain tension guide (bank 1) Timing chain tensioner (bank 1) Timing chain tensioner (bank 2) Timing chain slack guide (bank 2) Timing chain tension guide (bank 2) Timing chain (bank 2) Crankshaft sprocket Crankshaft key Timing ...

0.0053