
Nissan Armada 2025-2026 Service and Repair Manual: Work Flow
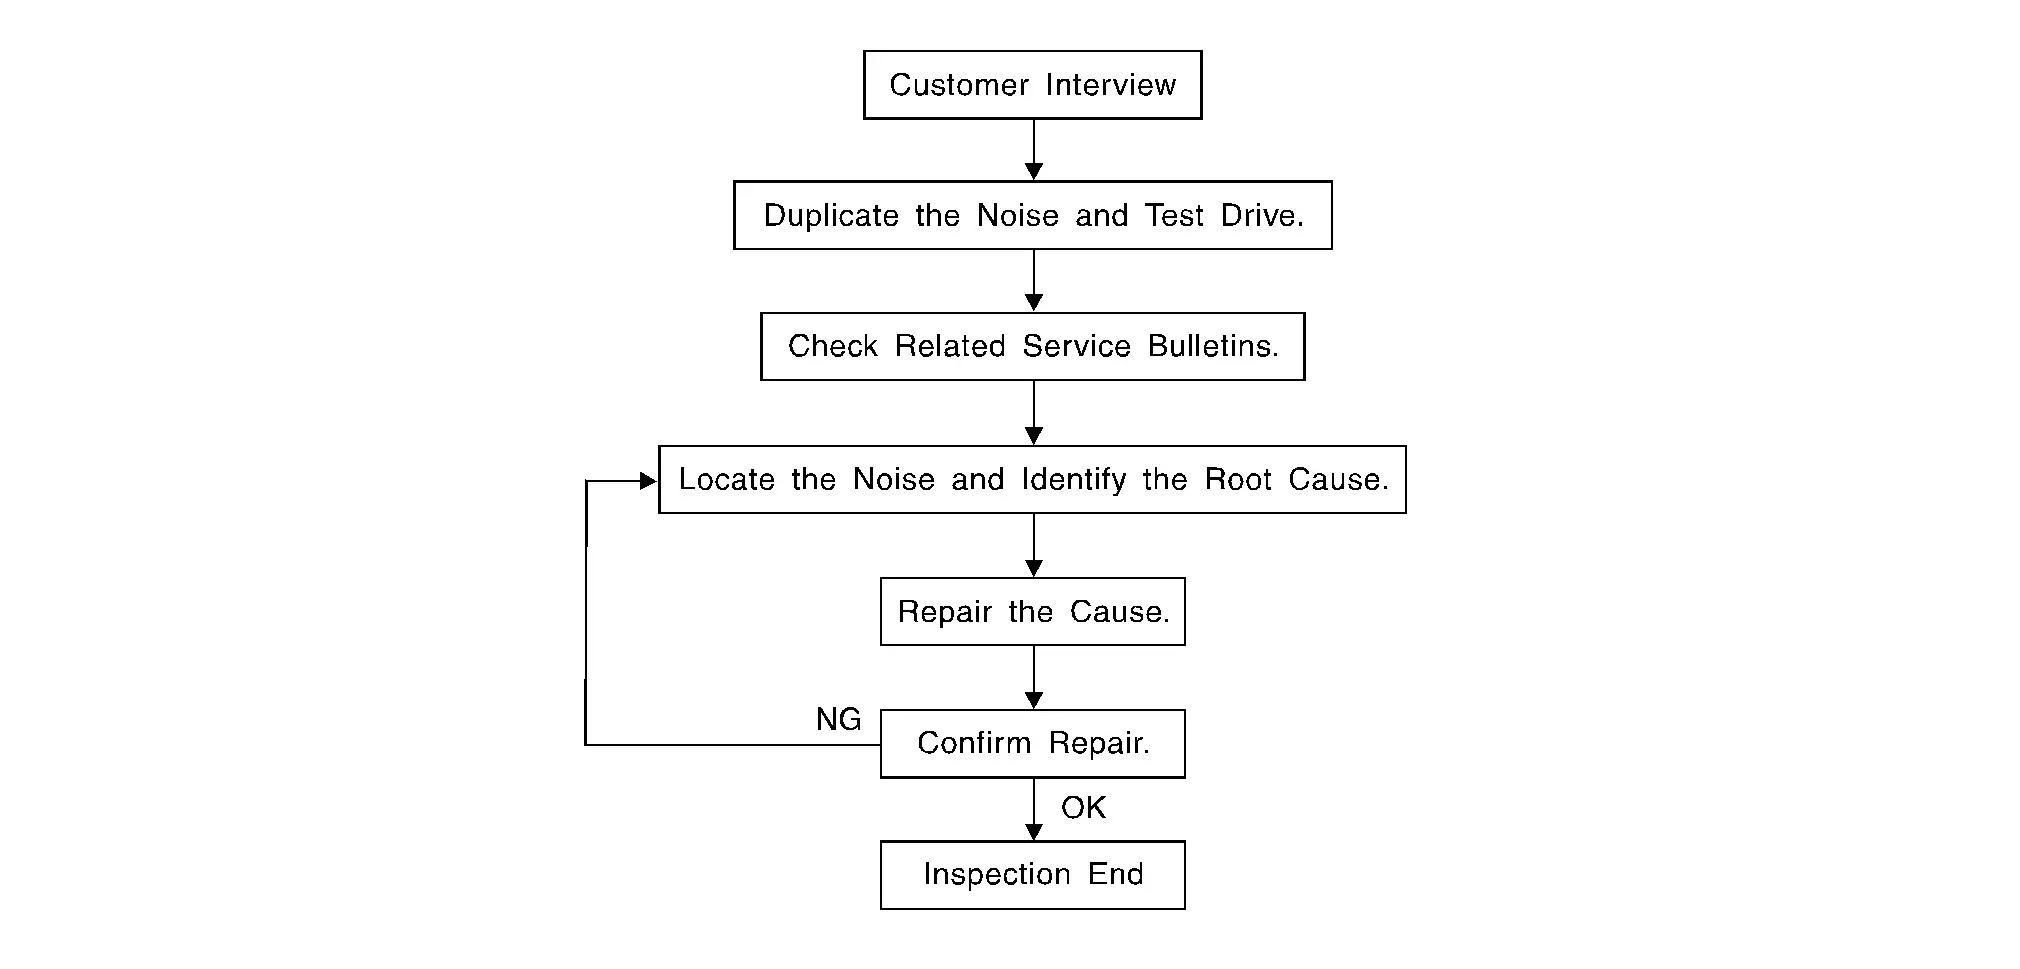
CUSTOMER INTERVIEW
Interview the customer if possible, to determine the conditions that exist when the noise occurs. Use the Diagnostic Worksheet during the interview to document the facts and conditions when the noise occurs and any of customer's comments; Refer to Diagnostic Worksheet. This information is necessary to duplicate the conditions that exist when the noise occurs.
If there is more than one noise in the vehicle, perform a diagnosis and repair the noise that the customer is concerned about. This can be accomplished by performing a cruise test on the vehicle with the customer.
After identifying the type of noise, isolate the noise in terms of its characteristics. The noise characteristics are provided so the customer, service adviser and technician are all speaking the same language when defining the noise.
Squeak – (Like tennis shoes on a clean floor)
Squeak characteristics include the light contact/fast movement/brought on by road conditions/hard surfaces = higher pitch noise/softer surfaces = lower pitch noises/edge to surface = chirping
Creak – (Like walking on an old wooden floor)
Rattle – (Like shaking a baby rattle)
Rattle characteristics include the fast repeated contact/vibration or similar movement/loose parts/missing clip or fastener/incorrect clearance.
Knock – (Like a knock on a door)
Knock characteristics include hollow sounding/sometimes repeating/often brought on by driver action.
Tick – (Like a clock second hand)
Tick characteristics include gentle contacting of light materials/loose components/can be caused by driver
action or road conditions.
Thump – (Heavy, muffled knock noise)
Thump characteristics include softer knock/dead sound often brought on by activity.
Buzz – (Like a bumblebee)
Buzz characteristics include high frequency rattle/firm contact.
Often the degree of acceptable noise level will vary depending up on the person. A noise that a technician may judge as acceptable may be very irritating to the customer.
DUPLICATE THE NOISE AND TEST DRIVE
If the noise can be duplicated easily during the test drive, to help identify the source of the noise, try to duplicate the noise with the vehicle stopped by doing one or all of the following:
1) Close a door.
2) Tap or push/pull around the area where the noise appears to be coming from.
3) Rev the engine.
4) Use a floor jack to recreate vehicle “twist”.
6) Raise the vehicle on a hoist and hit a tire with a rubber hammer.
CHECK RELATED SERVICE BULLETINS
After verifying the customer concern or symptom, check ASIST for Technical Service Bulletins (TSBs) related to that concern or symptom.
If a TSB relates to the symptom, follow the procedure to repair the noise.
LOCATE THE NOISE AND IDENTIFY THE ROOT CAUSE
Narrow down the noise to a general area. To help pinpoint the source of the noise, use a listening tool (Chassis ear: NI-39570, Engine ear and mechanics stethoscope).
Removing the components in the area that you suspect to be the cause of the noise.
Do not use too much force when removing clips and fasteners, otherwise clips and fastener can be broken or lost during the repair, resulting in the creation of new noise.
Tapping or pushing/pulling the component that you suspect to be the cause of the noise.
Do not tap or push/pull the component with excessive force, otherwise the noise will be eliminated only temporarily.
Looking for loose components and contact marks.
Refer to Inspection Procedure.
REPAIR THE CAUSE
If the cause is a loose component, tighten the component securely.
If the cause is insufficient clearance between components:
Separate components by repositioning or loosening and retightening the component, if possible.
Insulate components with a suitable insulator such as urethane pads, foam blocks, felt cloth tape or urethane tape. A Nissan Squeak and Rattle Kit (NI-50397) is available through the authorized Nissan Parts Department.
CAUTION:
 NOTE:
NOTE:
Always check with the Parts Department for the latest parts information.
URETHANE PADS [1.5 mm (0.059 in) thick]
Insulates connectors, harness, etc.
76268-9E005: 100 × 135 mm (3.94 × 5.31 in)/76884-71L01: 60 × 85 mm (2.36 × 3.35 in)/76884-71L02:15 × 25 mm (0.59 × 0.98 in)
INSULATOR (Foam blocks)
Insulates components from contact. Can be used to fill space behind a panel.
73982-9E000: 45 mm (1.77 in) thick, 50 × 50 mm (1.97 × 1.97 in)/73982-50Y00: 10 mm (0.39 in) thick, 50 × 50 mm (1.97 × 1.97 in)
INSULATOR (Light foam block)
80845-71L00: 30 mm (1.18 in) thick, 30 × 50 mm (1.18 × 1.97in)
FELT CLOTHTAPE
68370-4B000: 15 × 25 mm (0.59 × 0.98 in) pad/68239-13E00: 5 mm (0.20 in) wide tape roll
UHMW (TEFLON) TAPE
SILICONE GREASE
Used in place of UHMW tape that is be visible or does not fit. Will only last a few months.
SILICONE SPRAY
Used when grease cannot be applied.
DUCT TAPE
Used to eliminate movement.
CONFIRM THE REPAIR
Confirm that the cause of a noise is repaired by test driving the vehicle. Operate the vehicle under the same conditions as when the noise originally occurred. Refer to the notes on the Diagnostic Worksheet.

 Inspection Procedure
INSTRUMENT PANEL
Most incidents are caused by contact and movement between:
Cluster lid A and instrument panel
Acrylic lens and combination meter housing
Instrument panel to front pillar garnish
Instr ...
Other materials:
Removal and Installation
CAUTION:
REMOVAL
Remove back door finisher. Refer to Removal and Installation.
Remove rear emblem and rear emblem bracket. Refer to Removal and Installation.
Disconnect tail lamp harness connectors .
Remove tail lamp mounting nuts .
Apply protective tapes (A) on the part to protect it from damag ...
Removal and Installation
WARNING:
Always observe the following items for preventing accidental activation.
Before servicing, ignition switch OFF, disconnect battery negative terminal and wait for 3 minutes or more (discharges electricity held in the additional power supply circuit of the air bag diagnosis sensor unit). Refe ...
Special Service Tools
Tool number
(TechMate No.)
Tool name Description KV10122000
(NI-53383)
Side oil seal puller
Removing side oil seal KV10123000
(NI-53384)
Side oil seal installer
Installing side oil seal ...

0.0071