Before installing a forward-facing child restraint in the Nissan Armada, carefully review all Warnings and Cautions provided in the "Child safety" and "Child restraints" sections. Proper installation is essential to ensure maximum protection for your child while traveling in the Nissan Armada.
Do not use the LATCH lower anchors in the Nissan Armada if the combined weight of the child and the child restraint exceeds 65 lbs (29.5 kg). In such cases, the child restraint must be secured using the vehicle’s seat belt system instead. Always follow the child restraint manufacturer’s installation instructions precisely.
Follow these steps to properly install a forward-facing child restraint using the LATCH system in the Nissan Armada:
1. Place the child restraint on the selected seat in the Nissan Armada.
Ensure correct positioning and always follow the manufacturer’s recommendations for proper placement and orientation.
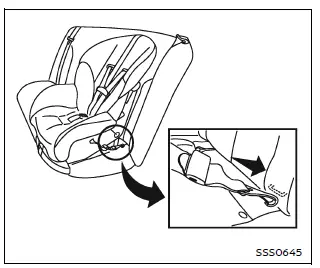
Forward-facing web-mounted - step 2
2. Attach the child restraint connectors securely to the LATCH lower anchors. Confirm that each attachment is fully engaged and properly locked into place.
If the child restraint includes a top tether strap, route the strap correctly and secure it to the designated tether anchor point in the Nissan Armada. Never install a child restraint requiring a top tether strap in a seating position that does not have a tether anchor.
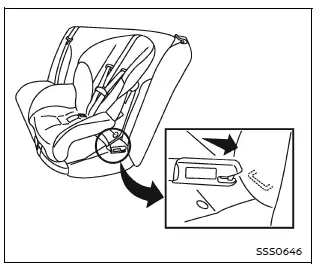
Forward-facing rigid-mounted - step 2
3. Ensure that the back of the child restraint is firmly positioned against the vehicle seatback in the Nissan Armada.
If necessary, adjust or temporarily remove the head restraint to achieve a proper fit. When removed, store the head restraint securely and reinstall it once the child restraint is no longer in use.
If the seating position does not allow proper installation due to head restraint interference, consider selecting a different seating position or using an alternative child restraint compatible with the Nissan Armada.
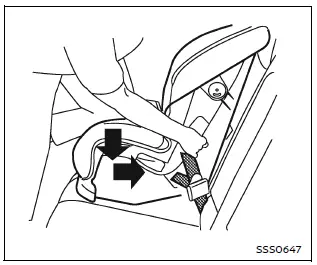
Forward-facing - step 4
4. For child restraints equipped with webbing-mounted attachments, remove all slack from the anchor straps. Apply firm downward and rearward pressure on the child restraint (using your knee if necessary) to compress the seat cushion and seatback while tightening the straps securely.
5. Tighten the top tether strap according to the manufacturer’s instructions until all slack is removed, ensuring additional stability and safety in the Nissan Armada.
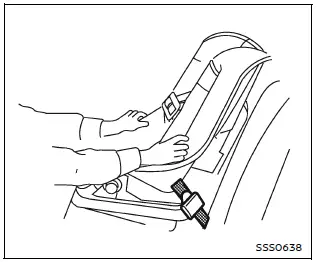
Forward-facing - step 6
6. After installation, test the child restraint thoroughly before placing the child inside. Hold the restraint near the LATCH attachment path and attempt to move it side to side.
The child restraint should not move more than 1 inch (25 mm). Also pull it forward to ensure that the anchors are holding the restraint securely in place.
If the restraint is not stable, tighten the attachments further or reposition the seat within the Nissan Armada. You may need to try a different child restraint, as compatibility can vary between models.
7. Before every trip in the Nissan Armada, check that the child restraint is securely installed. If any looseness is detected, repeat the installation steps to ensure proper safety.
Correct installation of forward-facing child restraints in the Nissan Armada ensures enhanced protection, providing a safer and more secure travel environment for young passengers.
Other materials
Seat belts with pretensioners (front and second row outboard seats)
WARNING
In the Nissan Armada, seat belt pretensioners are single-use safety devices.
Once activated, they must be replaced as a complete unit together with the seat
belt retractor and buckle to ensure continued protection.
If your Nissan Armada is involved in a collision and the pretensi ...
Starting System Tools and Preparation
Special Service Tools
Tool number
(TechMate No.)
Tool name Description
—
(—) Model GR8-1200 NI
Multitasking battery and electrical diagnostic station
Tests batteries, starting and charging systems and charges batteries.
For operating instructions, refer to diagnostic station instruction ...
Side Oil Seal
Exploded View
Side oil seal
Front final drive assembly
: Always replace after every disassembly.
Removal and Installation
WARNING:
Jacking up or lift up the vehicle may the vehicle height to go down which cause a personal injury and/or damage to the air suspension component ...