Exploded View
REMOVAL
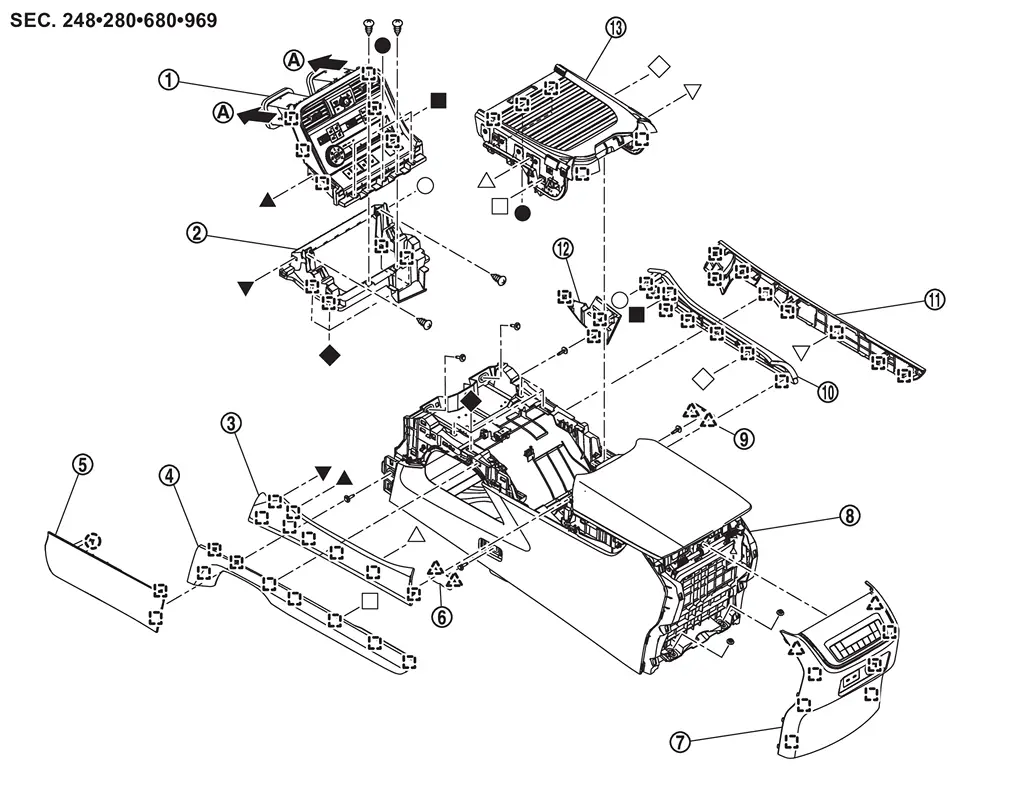
 |
Front center console switch finisher assembly |  |
Front center console bracket |  |
Front center console side finisher upper LH |
 |
Front center console side finisher lower LH |  |
Instrument lower cover LH |  |
Front center console mask LH |
 |
Front center console rear finisher assembly |  |
Front center console body assembly |  |
Front center console mask RH |
 |
Front center console side finisher lower RH |  |
Front center console side finisher upper RH |  |
Instrument lower cover RH |
 |
Front center console cup holder assembly | ||||
 |
To instrument pad B | ||||
 |
: Clip | ||||
 |
: Pawl | ||||
 |
: Metal clip | ||||
 , , , ,  , ,  , ,  , ,  , ,  , ,  , ,  , ,  : Indicates that the part is connected at points with same symbol in actual vehicle. : Indicates that the part is connected at points with same symbol in actual vehicle. |
|||||
DISASSEMBLY
Front center console switch finisher assembly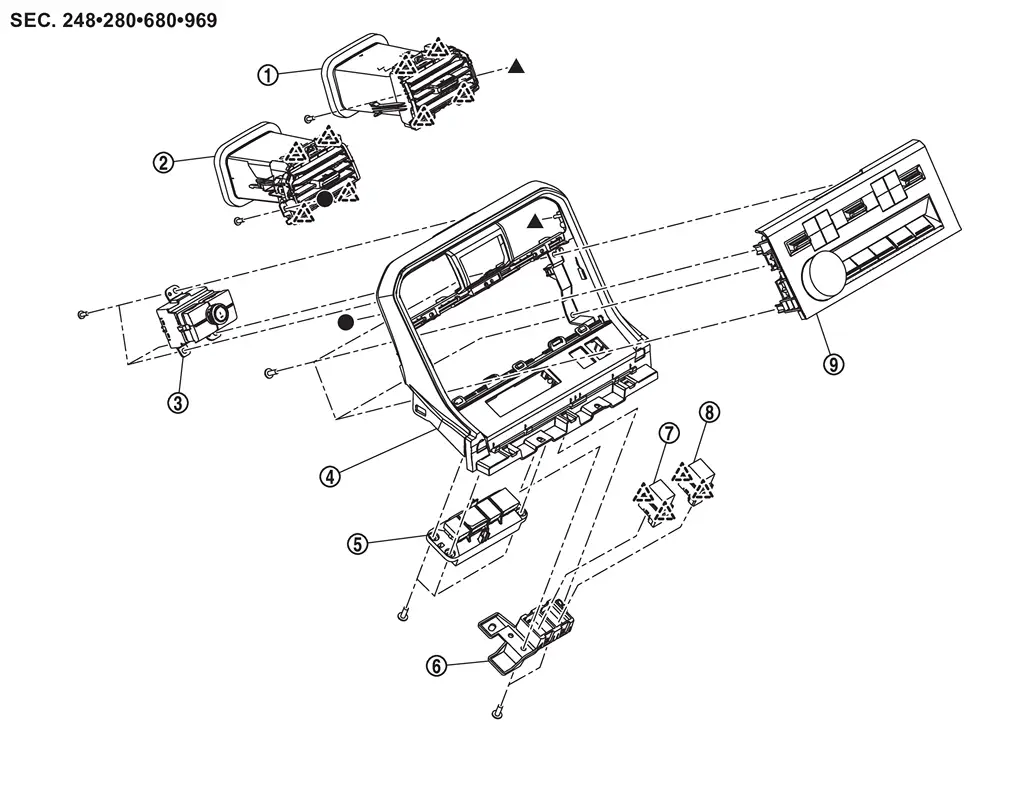
|
Center ventilator grille RH | |
Center ventilator grille LH | |
Preset switch |
|
Front center console switch finisher assembly | |
Electric shift selector | |
Switch bracket |
|
Auto height mode control switch* | |
Idle start/stop OFF switch | |
Multi function switch |
|
: Pawl | ||||
| , : Indicates that the part is connected at points with same symbol in actual vehicle. |
|||||
*: With air suspension models
Front Center Console Cup Holder Assembly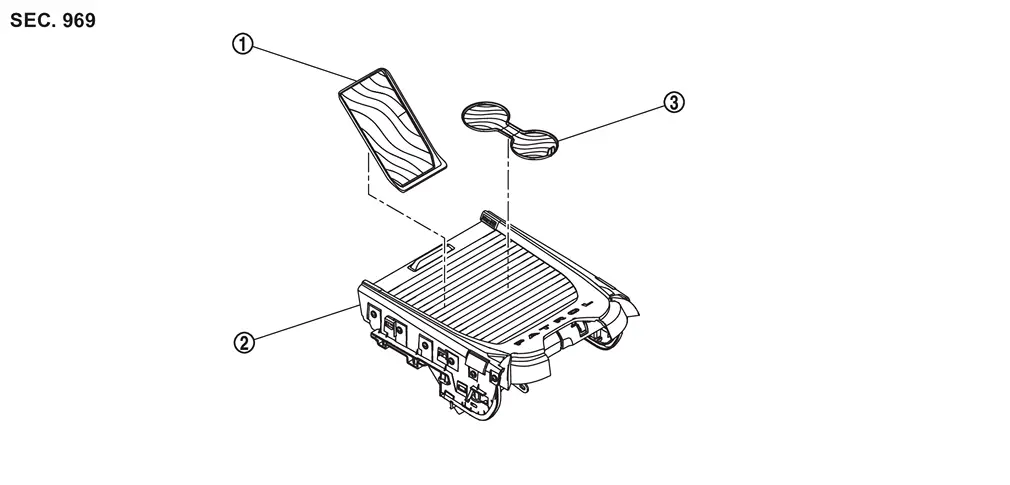
|
Front center console pocket mat | |
Front center console cup holder assembly | |
Front center console cup holder mat |
Front Center Console Body Assembly and Front Center Console Rear Finisher Assembly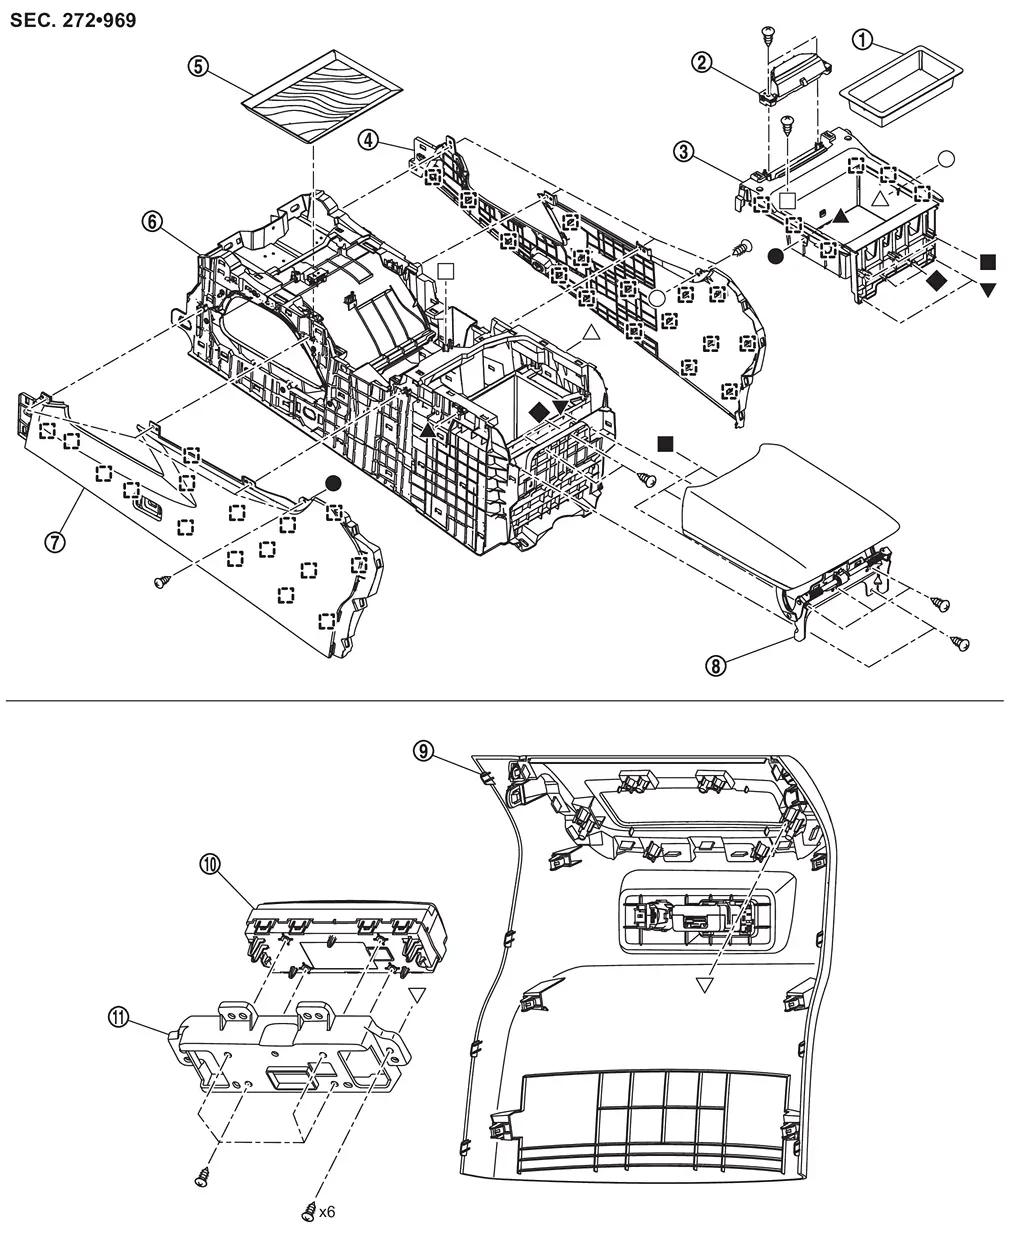
|
Front center console box tray | |
Front center console lid opener switch | |
Front center console box |
|
Front center console body panel RH | |
Front center console mat | |
Front center console body |
|
Front center console body panel LH | |
Front center console lid | |
Front center console rear finisher |
|
Rear A/C control | |
Rear A/C control bracket | ||
|
: Metal clip | ||||
| , , , , , , , , : Indicates that the part is connected at points with same symbol in actual vehicle. |
|||||
Removal and Installation
WARNING:
Before servicing, disconnect battery negative terminal. Refer to Precautions for Removing Battery Terminal.
CAUTION:
Always apply the parking brake before performing removal and installation.
REMOVAL
CAUTION:
When removing, always use a remover tool that is made of plastic.
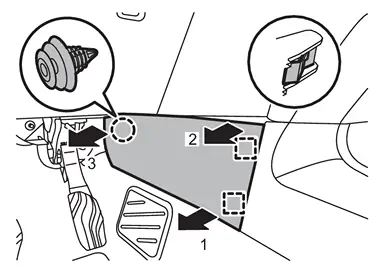
Disengage fixing clip and metal clips according to numerical order 1→3 indicated by arrows as shown in the figure, and then remove instrument lower cover LH.
|
: Clip |
|
: Metal clip |
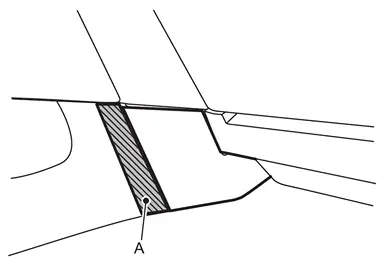
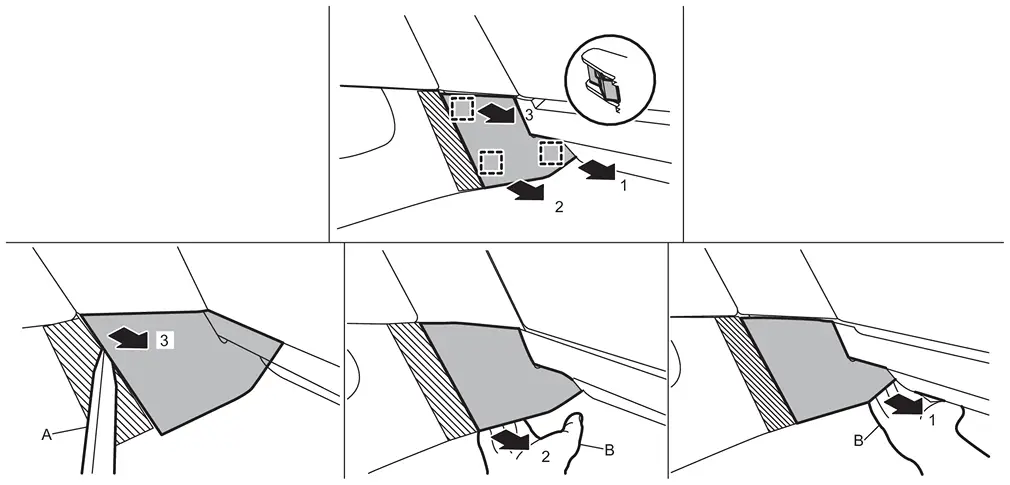
Remove instrument lower cover RH.Apply protective tape (A) on the part to protect it from damage.
|
: Metal clip |
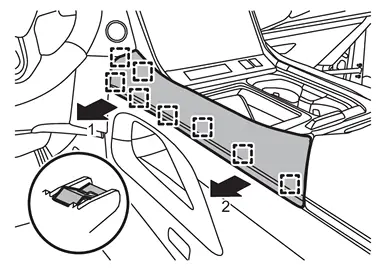
Disengage fixing metal clips according to numerical order 1→2 indicated by arrows as shown in the figure, and then remove front center console side finisher upper LH.
|
: Metal clip |
Disengage fixing metal clips according to numerical order 1→2 indicated by arrows as shown in the figure, and then remove front center console side finisher upper RH.
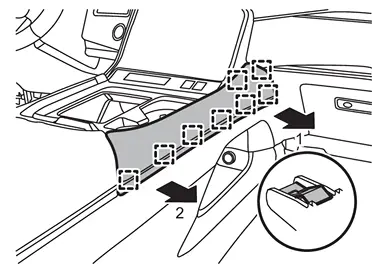
|
: Metal clip |
Disengage fixing metal clips according to numerical order 1→2 indicated by arrows as shown in the figure, and then remove front center console side finisher lower LH.
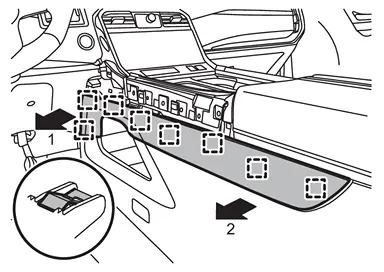
|
: Metal clip |
Disengage fixing metal clips according to numerical order 1→2 indicated by arrows as shown in the figure, and then remove front center console side finisher lower RH.
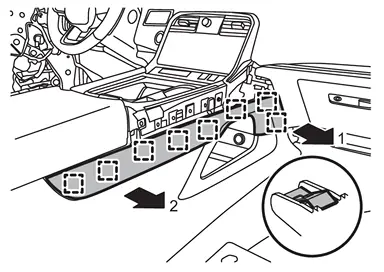
|
: Metal clip |
Remove front center console cup holder assembly.Disengage fixing metal clips according to numerical order 1→2 indicated by arrows as shown in the figure.
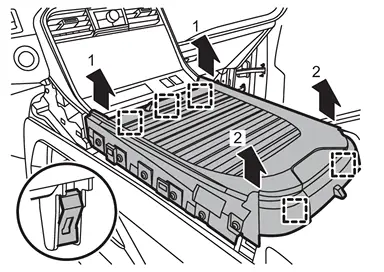
|
: Metal clip |
Remove front center console switch finisher assembly.Remove fixing screws .
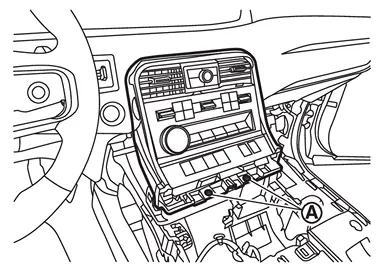
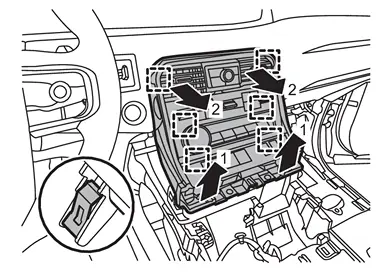
|
: Metal clip |
Remove front center console bracket.Remove fixing screws .
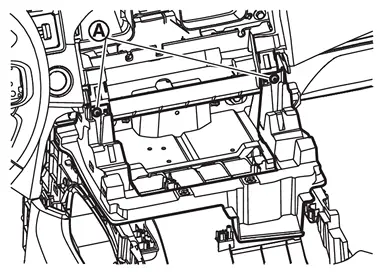
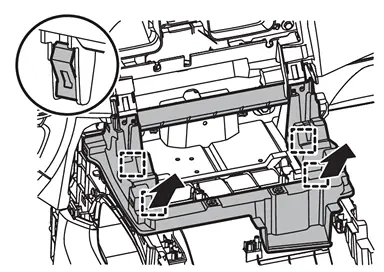
|
: Metal clip |
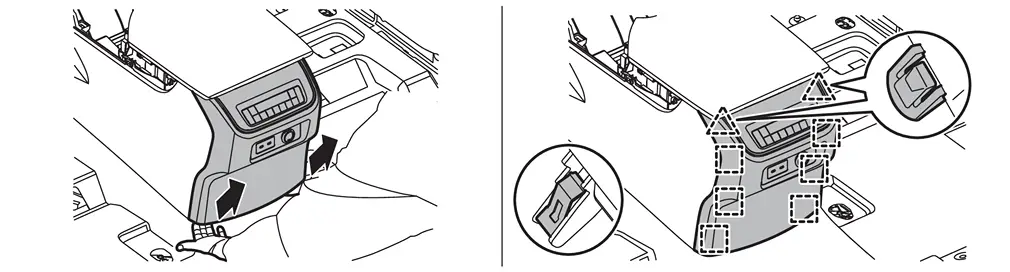
Remove front center console rear finisher assembly.Disengage front center console rear finisher assembly fixing pawls and metal clips by hands according to arrows direction as shown in the figure.
|
: Pawl |
|
: Metal clip |
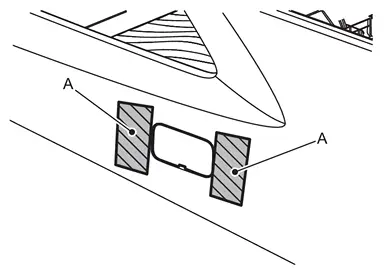
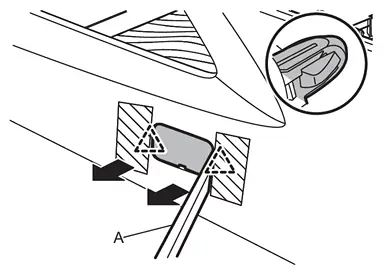
Remove front center console mask (LH and RH).Apply protective tapes (A) on the part to protect it from damage.
|
: Pawl |
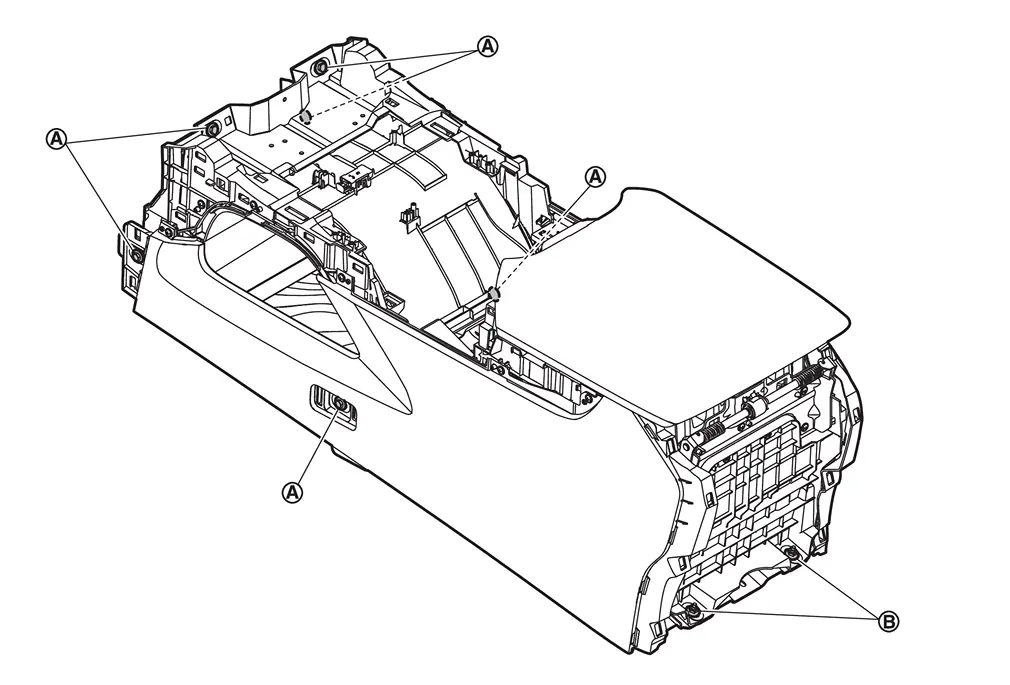
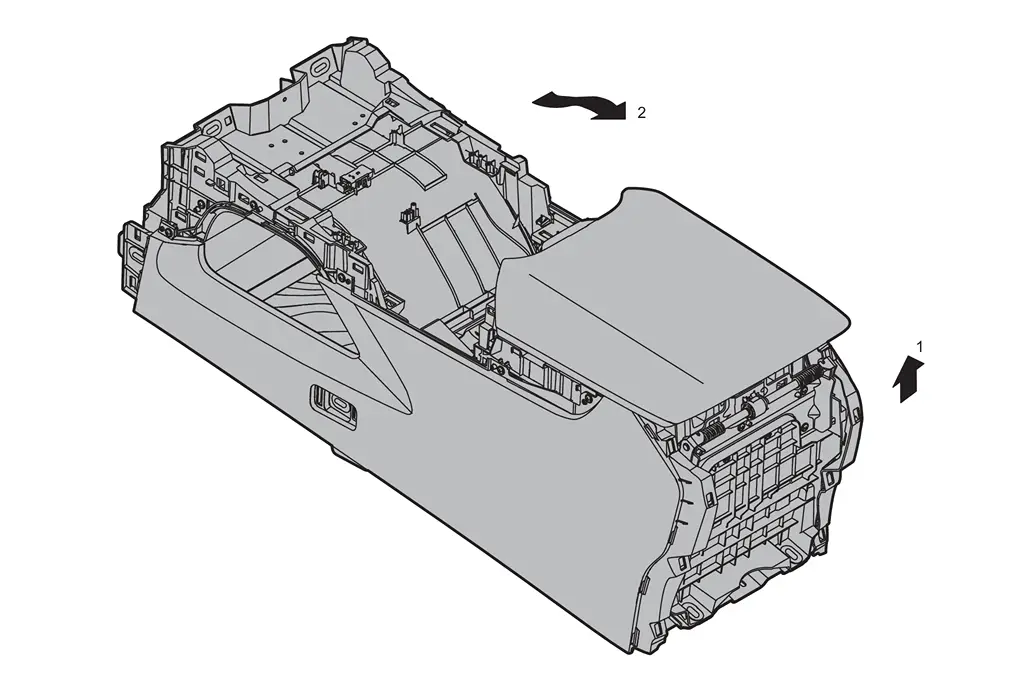
Remove front center console body assembly.Disconnect harness connector and disengage harness fixing clips on front center console body assembly. Remove front center console body mounting bolts and nuts  .
.
INSTALLATION
Install in the reverse order of removal.
Disassembly and Assembly
DISASSEMBLY
CAUTION:
When disassemble, always use a remover tool that is made of plastic.
Front Center Console Switch Finisher Assembly
Remove preset switch. Refer to Removal & Installation.
Remove electric shift selector. Refer to Removal and Installation.
Remove switch bracket.Remove fixing screws, and then remove switch bracket from front center console switch finisher assembly. Remove auto height mode control switch from switch bracket (with air suspension models). Refer to Removal and Installation Disengage fixing pawls, and then remove idle start/stop OFF switch from switch bracket.
Remove center ventilator grille (LH and RH). Refer to Removal and Installation.
Remove fixing screws, and then remove multi function switch.
Front Center Console Cup Holder Assembly
Remove front center console pocket mat.
Remove front center console cup holder mat.
Front Center Console Body Assembly
Remove front center console mat.
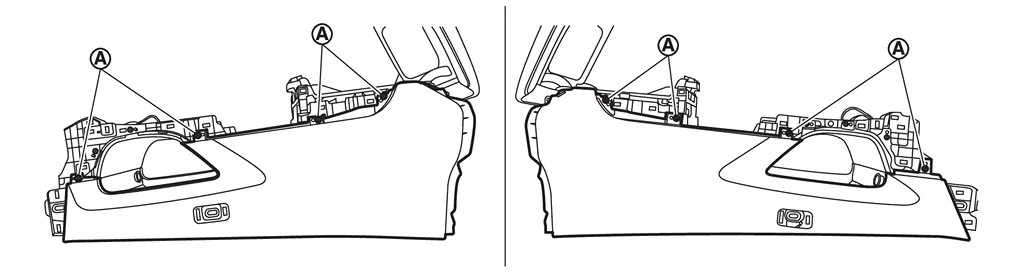
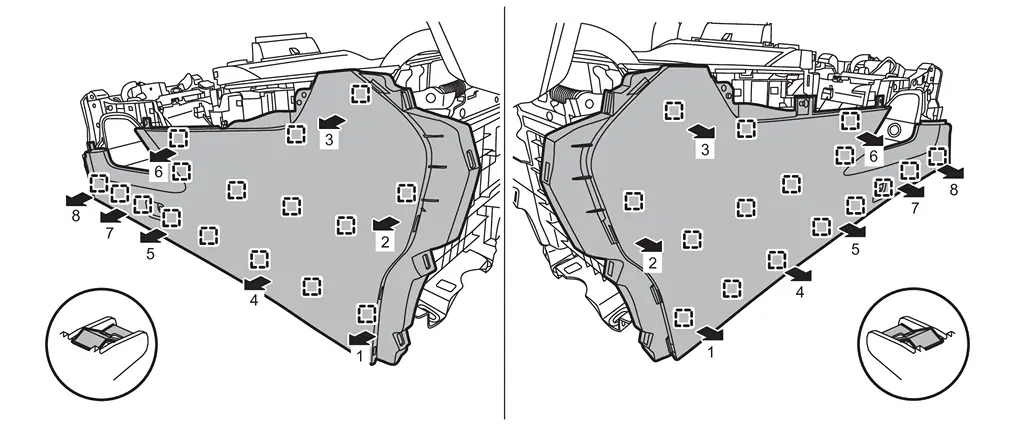
Remove front center console body panel (LH and RH).Remove front center console body panel (LH and RH) fixing screws .
|
: Metal clip |
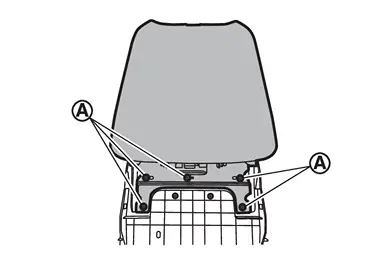
Remove fixing screws , and then remove front center console lid.
Remove front center console box tray.
Remove fixing screws , and then remove front center console lid opener switch.
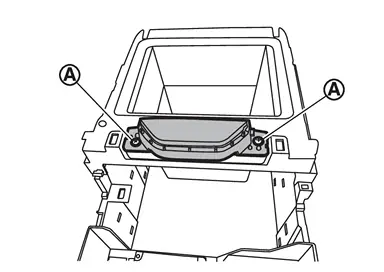
Remove front center console cover.Remove front center console box fixing screws .
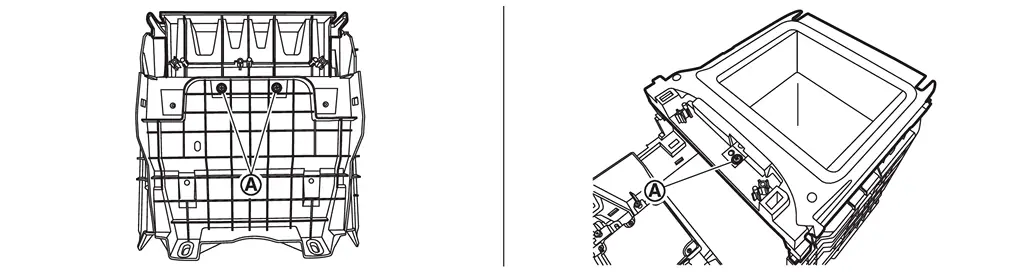
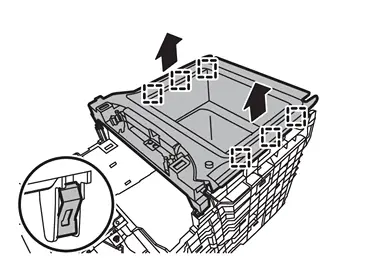
|
: Metal clip |
Front Center Console Rear Finisher Assembly
Remove fixing screws , and then remove rear A/C control and rear A/C control bracket as a set.
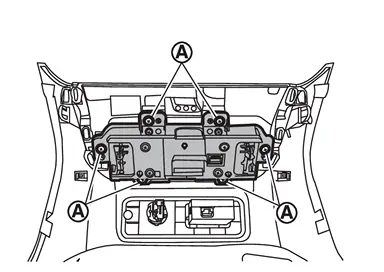
Remove rear A/C control and rear A/C control bracket. Refer to Removal and Installation.
ASSEMBLY
Assemble in the reverse order of disassembly.
Other materials
Intelligent Key operation
Example
Example
The Nissan Armada Intelligent Key system allows seamless locking and unlocking
of doors without removing the key from your pocket or bag, enhancing both convenience
and everyday usability.
When carrying the Nissan Armada Intelligent Key within the operating range, you ...
Differential Lock Position Switch
Exploded View
Rear final drive assembly
Differential lock position switch
O-ring
: N·m (kg-m, in-lb)
: Apply gear oil.
Removal and Installation
REMOVALIgnition switch OFF.
Disconnect negative battery terminal.
Disconnect the differential lo ...
Additional Service When Replacing Automatic Back Door Control Unit
Description
When replacing automatic back door control unit necessary to perform initial setting to operate automatic back door system normally. Refer to Work Procedure.
Work Procedure
STEP 1
Fully close the back door manually.
>>
GO TO 2.
STEP 2
Operate back door opener switch and perform a ...