WARNING
- Serious hazard: Swallowing a button cell battery can result in severe injury or death.
- If a coin-type battery is swallowed, it can cause internal burns within as little as two hours.
- Always keep both new and used batteries away from children when handling your Nissan Armada Intelligent Key.
- Ensure that removed battery components are not accessible to children.
- If ingestion or insertion into the body is suspected, seek immediate medical assistance.
- Contact emergency services or the battery ingestion hotline immediately if needed.
- Improper battery replacement may cause explosion or serious injury.
Always use the correct battery type (CR2032 or equivalent) specified for your Nissan Armada Intelligent Key.
- Do not crush, cut, or damage the battery.
- Avoid exposing the battery to extreme temperatures, pressure changes, or direct heat sources such as sunlight or fire.
CAUTION
- Improper disposal of batteries may harm the environment.
Follow all local regulations for safe battery disposal when servicing your Nissan Armada.
- Prevent contamination of internal components by avoiding contact with dust, oil, or moisture during replacement.
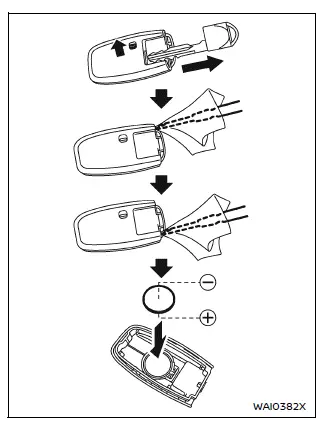
To replace the battery in your Nissan Armada Intelligent Key, follow these steps carefully:
1. Remove the mechanical key from the Intelligent Key housing.
2. Insert a small flat-head screwdriver into the designated slots on both sides of the key and gently twist to separate the upper and lower halves. Use a soft cloth to protect the casing of your Nissan Armada key from scratches.
3. Install a new battery.
Recommended battery type: CR2032 or equivalent.
- Avoid touching the internal circuitry or electrical contacts, as this may cause malfunction of the Nissan Armada key system.
- Hold the battery only by its edges.
Touching both terminals simultaneously may reduce battery life.
- Ensure correct orientation when installing the battery.
The positive (+) side should be positioned facing the correct direction as illustrated.

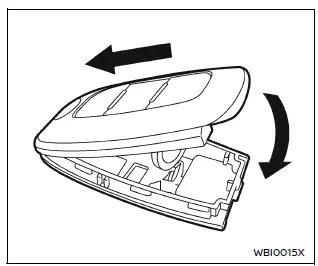
4. Align the upper and lower halves of the Nissan Armada Intelligent Key and press them together until securely closed.
5. Test all buttons to confirm proper operation of the Intelligent Key.
If you are unsure about replacing the battery yourself, it is recommended to have the procedure performed by a NISSAN dealer to ensure proper handling and functionality.
NOTE:
FCC Notice (USA): This device complies with Part 15 of FCC Rules. Operation is subject to two conditions: (1) This device may not cause harmful interference, and (2) it must accept any interference received, including interference that may cause undesired operation.
NOTE:
Unauthorized modifications to your Nissan Armada Intelligent Key may void the user’s authority to operate the device.
For Canada: This device complies with applicable licence-exempt RSS standards. Operation is subject to standard interference conditions.
Other materials
Front Wheel Hub and Knuckle
Inspection
WARNING:
Jacking up or lift up the vehicle may the vehicle height to go down which cause a personal injury and/or damage to the air suspension component parts. Refer to Precaution for when Jacking and Lifting Up the vehicle with Electronic Air Suspension System.
COMPONENT PARTMake s ...
Diagnosis and Repair Work Flow
Work Flow
OVERALL SEQUENCEDETAILED FLOWGET INFORMATION FOR SYMPTOM
Get detailed information from the customer about the symptom (the condition and the environment when the incident/malfunction occurs).
Check operation condition of the function that is malfunctioning.
>>
GO TO 2.
CHECK ...
Advanced Ambient Light (front Door Upper)
Exploded View
Advanced ambient light (front door upper) is integrated structure with front door finisher. For exploded view of front door finisher, refer to Exploded View.
Replacement
CAUTION:
Disconnect the battery negative terminal or remove power circuit fuse when performing the operation for p ...