Removal and Installation
CAUTION:
Never damage the body panel.
REMOVAL
Front Kicking Plate
Disengage front kicking plate fixing pawls according to numerical order 1→3 indicated by arrows as shown in the figure, and then remove front kicking plate.
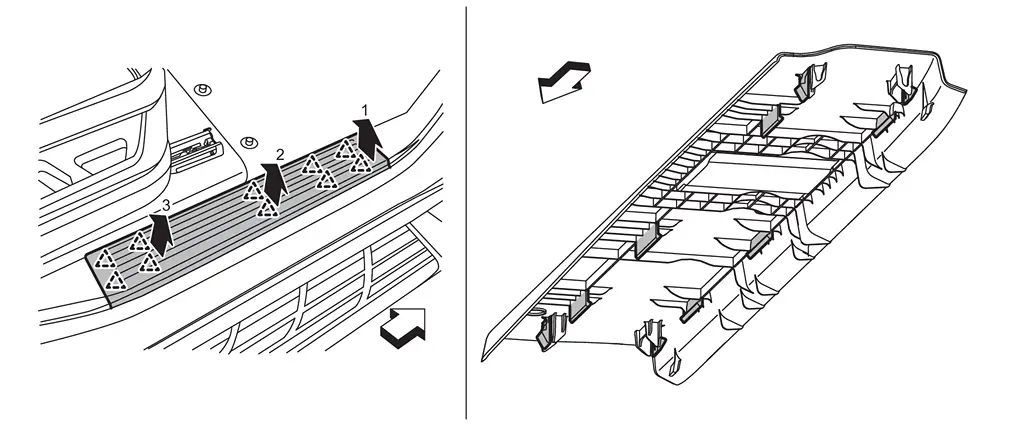
 |
: Pawl |
| : vehicle front |
Rear Kicking Plate
Disengage rear kicking plate fixing pawls according to numerical order 1→3 indicated by arrows as shown in the figure.
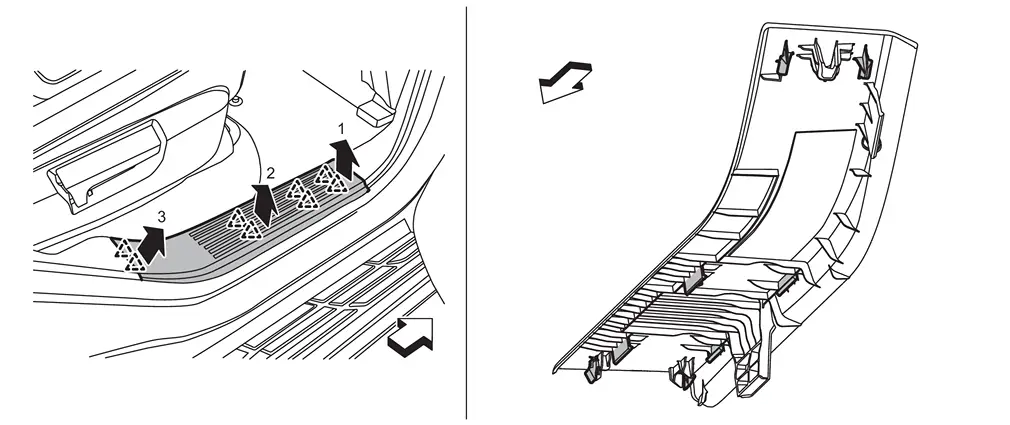
|
: Pawl |
| : vehicle front |
Disengage rear kicking plate from fixing part of trim metal clip, and then remove rear kicking plate.
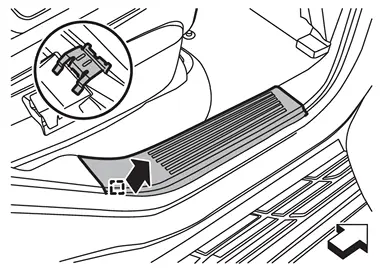
 |
: Metal clip |
| : vehicle front |
INSTALLATION
Note the following items, and then install in the reverse order of removal.
CAUTION:
-
Visually check metal clip for deformation and damage during installation. Replace with new ones if necessary.
-
Check in advance that pawls are accurately aligned with the portions on each finishers, and then install by pressing in.
-
After installation, check that the lip of body side welt covers. Refer to Inspection.
Other materials
Air Breather Hose
Exploded View
Bracket
A/T assembly
Air breather hose
Clip
: N·m (kg-m, ft-lb)
Always replace after every disassembly.
Removal and Installation
WARNING:
Jacking up or lift up the vehicle may the vehicle height to go dow ...
Front Pillar Garnish
Removal and Installation
CAUTION:
Never damage the body panel.REMOVALApply protective tapes (A) on assist grip to protect it from damage.
Disengage assist grip cap fixing pawls of assist grip using a remover tool (A), and then remove assist grip cap of assist grip.
: Pawl
Remove assist grip ...
Reservoir Tank Cap
Inspection
Check valve seat of reservoir tank cap.
: Metal plunger
Check if valve seat is swollen to the extent that the edge of the metal plunger cannot be seen when watching it vertically from the top.
Check if valve seat has no soil and damage.
Pull negative-pressure valve to ...