
Nissan Armada 2025-2026 Service and Repair Manual: Leak Test
CHECK REFRIGERANT LEAKAGE USING ELECTRICAL LEAK DETECTOR
WARNING:
Never check refrigerant leakage while the engine is running.
CAUTION:
Be careful of the following items so that inaccurate checks or misidentifications are avoided.
Never allow refrigerant vapor, shop chemical vapors, cigarette smoke, or others around the vehicle.
Always check refrigerant leakage in a low air flow environment so that refrigerant may not disperse when leakage occurs.
Stop the engine.
Connect recovery/recycling/recharging equipment or manifold gauge set to A/C service valve.
Check that A/C refrigerant pressure is 345 kPa (3.52 kg/cm2, 50 psi) or more when temperature is 16°C (61°F) or more. When pressure is lower than the specified value, recycle refrigerant completely and fill refrigerant to the specified level.
 NOTE:
NOTE:
Leakages may not be detected if A/C refrigerant pressure is 345 kPa (3.52 kg/cm2, 50 psi) or less when temperature is less than 16°C (61°F).
Clean area where refrigerant leakage check is performed, and check refrigerant leakage along all surfaces of pipe connections and A/C system components using electrical leak detector probe.
CAUTION:
Continue checking when a leakage is found. Always continue and complete checking along all pipe connections and A/C system components for additional leakage.
When a leakage is detected, clean leakage area using compressed air and check again.
When checking leakage of cooling unit inside, always clean inside of drain hose so that the probe surface may not be exposed to water or dirt.
NOTE:
Always check leakage starting from high-pressure side and continue to low-pressure side.
When checking leakage of cooling unit inside, operate blower fan motor for 15 minutes or more at the maximum fan speed while the engine is stopped, and then insert electrical leak detector probe into drain hose and hold for 10 minutes or more.
When disconnecting shut-off valve that is connected to A/C service valve, always evacuate remaining refrigerant so that misidentification can be avoided.
Repair or replace parts where refrigerant leakage is detected. (Leakage is detected but leakage area is unknown. GO TO 6.)
Start the engine and set A/C control in the following conditions.
A/C switch ON
Air flow: VENT (ventilation)
Intake door position: Recirculation
Temperature setting: Full cold
Fan (blower) speed: Maximum speed set
Run the engine at approximately 1,500 rpm for 2 minutes or more.
Stop the engine. Check again for refrigerant leakage. GO TO 4.
WARNING:
Be careful not to get burned when the engine is hot.
NOTE:
Start refrigerant leakage check immediately after the engine is stopped.
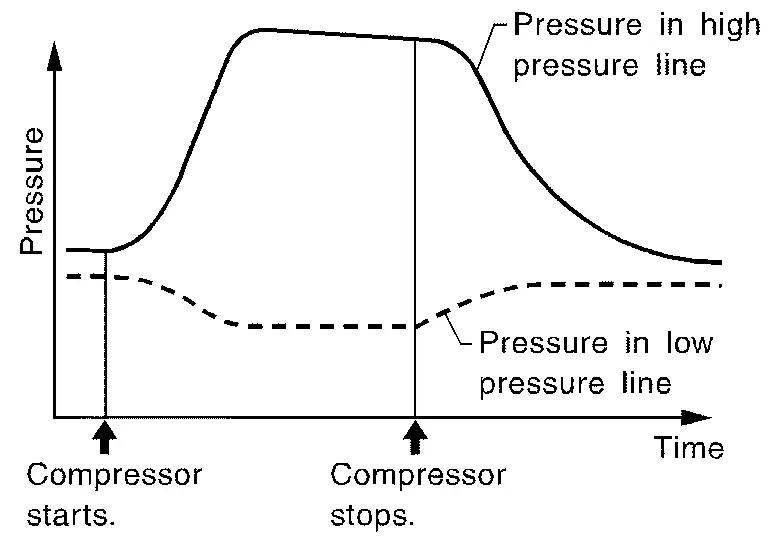
When refrigerant circulation is stopped, pressure on the low-pressure side rises gradually, and after this, pressure on the high-pressure side falls gradually.
The higher the pressure is, the easier it is to find the refrigerant leakage.
 Refrigerant
CONNECTION OF SERVICE TOOLS AND EQUIPMENT
Be certain to follow the manufacturer’s instructions for connecting to the machine. ...
 Recycle Refrigerant
WARNING:
Always use HFO-1234yf for A/C refrigerant. If CFC-12 or HFC-134a is accidentally charged, A/C compressor is damaged due to insufficient lubrication.
Always observe and follow precautions desc ...
Other materials:
STEERING ASSIST SWITCH : Removal & Installation
REMOVAL
Remove instrument pad A. Refer to Removal and Installation.
Remove mounting screws , and remove switch panel from instrument pad A .
Unhook the pawls to remove the switch from the switch panel . 
INSTALLATION
Installation is in the reverse order of removal. ...
Engine Can Not Start
Engine does not start when push-button ignition switch is pressed.
SYMPTOM TABLE (BOTH INTELLIGENT KEYS HAVE THE SAME SYMPTOMS)
Door lock operation (remote keyless entry) Door lock operation (request switch of front/rear door) or trunk/back door open operation (opener switch of trunk/back door pan ...
HomeLink Universal Transceiver
Basic information
The HomeLink Universal Transceiver in the Nissan Armada offers a practical and
streamlined solution by combining the functions of up to three separate handheld
remote controls into one integrated system.
With the Nissan Armada HomeLink system, you can conveniently operate a w ...

0.0053