Removal and Installation
REMOVAL
CAUTION:
-
Perform lubricant return operation before each refrigeration system disassembly. However, if a large amount of refrigerant or lubricant leak is detected, never perform lubricant return operation. Refer to Perform Lubricant Return Operation.
-
When disconnect the A/C piping related parts, cap or wrap the joint of those parts with suitable material such as vinyl tape to avoid the entry of air.
Use a refrigerant collecting equipment (for HFO-1234yf) to discharge the refrigerant. Refer to Recycle Refrigerant.
Remove air cleaner body. Refer to Removal and Installation.
Remove mounting bolt  , and then disconnect low-pressure flexible hose from low-pressure pipe.
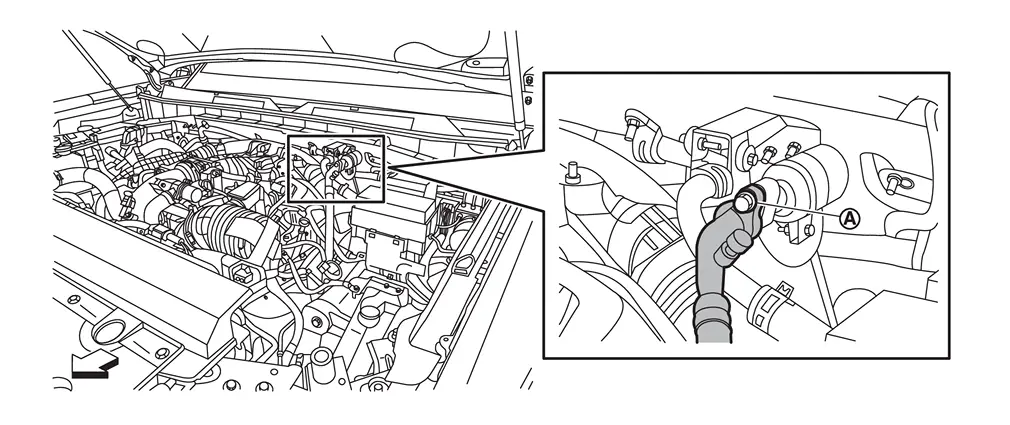
| : vehicle front |
Remove mounting bolt , and then remove low-pressure flexible hose from A/C compressor.
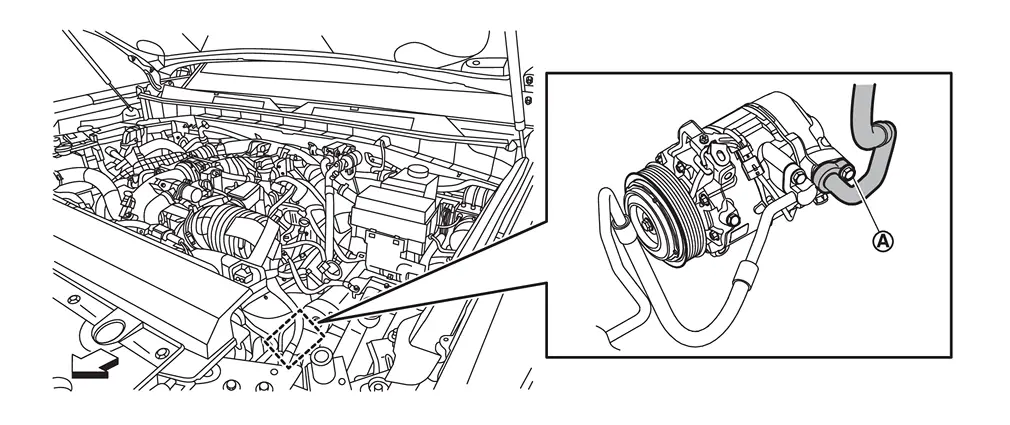
| : vehicle front |
Remove low-pressure flexible hose from vehicle.
INSTALLATION
Note the following items, and then install in the reverse order of removal.
CAUTION:
-
To prevent leakage of refrigerant, replace the O-ring and washer seal with a new one. Apply a coat of compressor oil to the O-ring prior to installation.
-
Use a refrigerant collecting equipment (for HFO-1234yf) to charge the refrigerant. Refer to Charge Refrigerant.
-
Perform a check for refrigerant leakage when charging with refrigerant. Refer to Leak Test.
Other materials
Passenger Knee Air Bag Module
Exploded View
Steering member
Passenger knee air bag module
: Always replace after every disassembly.
: N·m (kg-m, in-lb)
Removal and Installation
WARNING:
Always observe the following items for preventing accidental activation.
Before servicing, ignition switch OFF, ...
Configuration (a/c Auto Amp.)
Description
Vehicle specification needs to be written with CONSULT because it is not written after replacing the A/C auto amp.The configuration requires network connection. CONSULT connects to network and then it downloads the configuration data from the server. Then CONSULT writes the vehicle speci ...
Front Passenger Side Power Window Does Not Operate
When Both Power Window Main Switch and Front Power Window Switch Are Operated
Diagnosis Procedure
CHECK FRONT POWER WINDOW MOTOR (PASSENGER SIDE) POWER SUPPLY AND GROUND CIRCUIT
Check front power window motor (passenger side) power supply and ground circuit. Refer to Diagnosis Procedure.
Is the ...