Exploded View
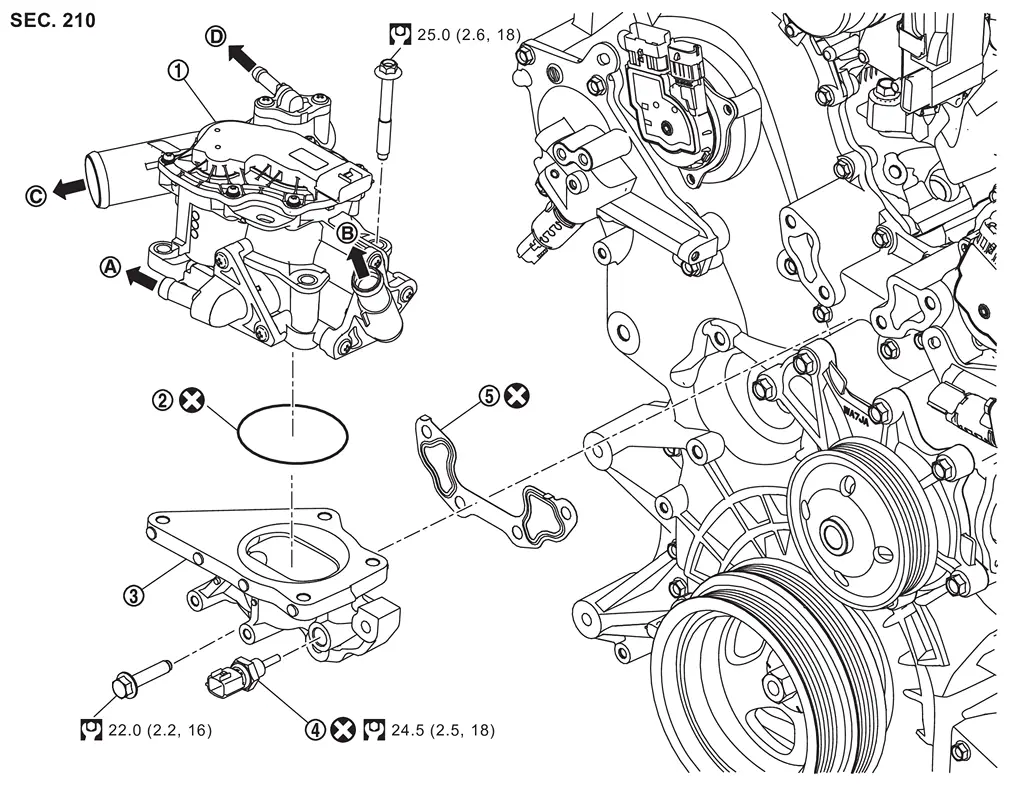
 |
Multi-way control valve |  |
O-ring |  |
Water outlet |
 |
Engine coolant temperature sensor 1 |  |
Gasket | ||
 |
To oil cooler hose 1. Refer to Exploded View. |  |
To electric water pump. Refer to Exploded View. |  |
To radiator. Refer to RADIATOR : Exploded View. |
 |
To electric throttle control actuator. Refer to Exploded View. | ||||
 |
: N·m (kg-m, ft-lb) | ||||
 |
: Always replace after every disassembly. |
Removal & Installation
WARNING:
Jacking up or lift up the vehicle may the vehicle height to go down which cause a personal injury and/or damage to the air suspension component parts. Refer to Precaution for when Jacking and Lifting Up the vehicle with Electronic Air Suspension System.
REMOVAL
Remove engine cover. Refer to Removal and Installation.
Remove front under cover using a power tool. Refer to Removal and Installation.
Drain engine coolant. Refer to ENGINE COOLANT : Draining.
CAUTION:
Perform this step when the engine is cold.
Remove air inlet tube 2. Refer to Removal & Installation.
Remove inlet air duct 2. Refer to Removal and Installation.
Remove electric throttle control actuator. Refer to Removal and Installation.
Remove radiator hose (upper) from multi-way control valve side.
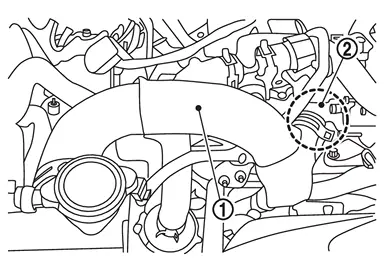
Remove each remaining hose connected to the multi-way control valve.
Remove multi-way control valve.
INSTALLATION
Note the following, and install in the reverse order of removal.
CAUTION:
-
Do not reuse O-ring.
-
Care should be taken not to apply scratches, dents and foreign bodies to the respective surfaces for mounting gasket and engine coolant temperature sensor 1.
-
Be careful to install the O-ring in the correct position.
-
Make sure the O-ring is free from separation and contamination with oil.
-
O-ring should be installed to engine coolant temperature sensor 1 without being twisted. After that, apply Genuine NISSAN Long LifeAntifreeze/Coolant (blue) to outer peripheral surface of O-ring and install engine coolant temperature sensor 1 to multi-way controlvalve.
Inspection
INSPECTION AFTER INSTALLATION
-
Check that the reservoir tank cap is tightened.
-
Check for leakage of engine coolant using the radiator cap tester adapter (commercial service tool) and the radiator cap tester (commercial service tool). Refer to ENGINE COOLANT : Inspection.
-
Start and warm up the engine. Visually check that there is no leakage of engine coolant.
Other materials
Active sound enhancement
NOTE:
To ensure the active sound enhancement system in the Nissan Armada operates
at its best performance, follow these important guidelines:
Do not block or cover the speakers, as this may distort or reduce sound
quality.
Avoid modifying or replacing the original speaker components inst ...
Noise, Vibration and Harshness (nvh) Troubleshooting
NVH Troubleshooting Chart
Use chart below to find the cause of the symptom. If necessary, repair or replace these parts. Possible cause and suspected parts SYMPTOM Reference
Noise Shake Vibration Shimmy Judder Poor quality ride or handling
Improper installation, looseness
×
×
×
...
Exhaust System
Inspection
WARNING:
Jacking up or lift up the vehicle may the vehicle height to go down which cause a personal injury and/or damage to the air suspension component parts. Refer to Precaution for when Jacking and Lifting Up the vehicle with Electronic Air Suspension System.
Check exhaust pipes, ...