Exploded View
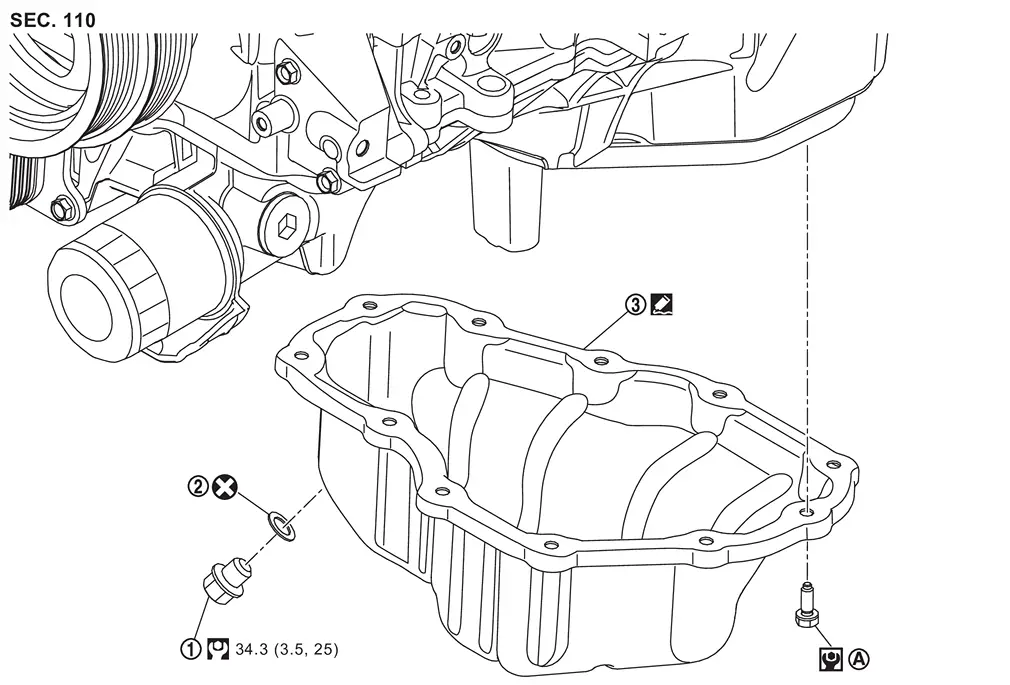
 |
Drain plug |  |
Drain plug washer |  |
Oil pan (lower) |
 |
Comply with the installation procedure when tightening. Refer to Removal and Installation. | ||||
 |
: N·m (kg-m, ft-lb) | ||||
 |
: N·m (kg-m, in-lb) | ||||
 |
: Always replace after every disassembly. | ||||
 |
: Sealing point | ||||
Removal and Installation
WARNING:
-
Jacking up or lift up the vehicle may the vehicle height to go down which cause a personal injury and/or damage to the air suspension component parts. Refer to Precaution for when Jacking and Lifting Up the vehicle with Electronic Air Suspension System.
REMOVAL
CAUTION:
Never drain engine oil when the engine is hot to avoid the danger of being scalded.
Remove front under cover using a power tool (commercial service tool). Refer to Removal and Installation.
Remove front cross member assembly.
Drain engine oil. Refer to Draining.
Remove engine oil level sensor. Refer to Disassembly and Assembly.
Loosen mounting bolts in the order from 11 to 1 as shown in the figure.
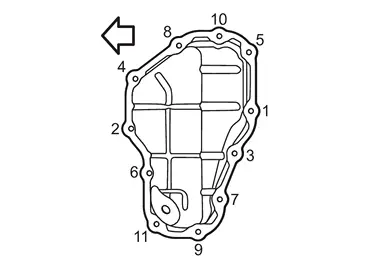
| : Engine front |
Insert seal cutter [SST: KV10111100 (NI-37228)] (A) between oil pan (upper) and oil pan (lower).
CAUTION:
Be careful not to damage the mating surface.
Since factory default liquid gasket has better adhesion than conventional one, never pick the area forcibly with a screw driver.
INSTALLATION
Follow the procedure below to install the oil pan (lower). Apply gasket fluid (Genuine Silicone RTV Sealant or equivalent) to the position shown in the figure, making sure that there are no breaks or overlaps.
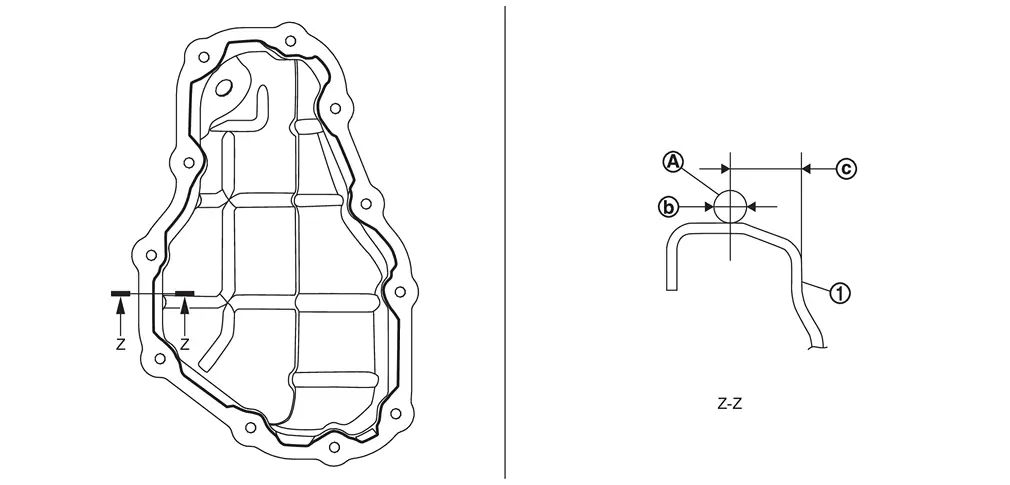
|
:Oil pan (lower) |
 |
:φ3.4 - 4.4 mm (0.134 - 0.173 in) |
 |
:7.5 - 9.5 mm (0.295 - 0.374 in) |
CAUTION:
-
The components must be installed within 5 minutes of the liquid gasket application.
-
Do not re-tighten bolts after the 5 minutes have elapsed.
-
Then allow 30 minutes for the liquid gasket to set before adding oil to the engine.
Install oil pan (lower).
-
Tighten mounting bolts in two steps in the order from 1 to 11 as shown in the figure.
: Engine front : 6.9 N·m (0.7 kg-m, 61 in-lb)
Install oil pan drain plug.
CAUTION:
Do not reuse drain plug washer.
Install in the reverse order of removal after this step.
Inspection
INSPECTION AFTER REMOVAL
Clean oil strainer if any object is attached.
INSPECTION AFTER INSTALLATION
Check the engine oil level and adjust engine oil. Refer to Inspection.
Start engine, and check there is no leakage of engine oil.
Stop engine and wait for 10 minutes.
Check the engine oil level again. Refer to Inspection.
Other materials
File menu
The file menu in the Nissan Armada driving recorder system allows users to conveniently
manage all recorded content, including photos and video files. Through this interface,
you can view, organize, and delete stored media directly from the touchscreen display,
making it easy to maintain stora ...
Front Blower Motor
Exploded View
Refer to Exploded View.
Removal and Installation
REMOVALRemove glove box assembly. Refer to Removal and Installation.
Remove passenger knee air bag module. Refer to Removal and Installation.
Disconnect front blower unit harness connector.
Remove fixing screws , and then remove front bl ...
Front Fender Protector Tape
Removal and Installation
REMOVALRemove front fender protector tape from front fender assembly. INSTALLATIONNote the following items, and then install in the reverse order of removal.CAUTION:
Never reuse front fender protector tape. Always replace it with a new one when it is removed.
Degrease fr ...