When seated properly in the Nissan Armada, with your seat belt correctly adjusted, your back positioned firmly against the seat and both feet placed on the floor, the risk of serious injury or fatal consequences in an accident can be significantly reduced. The Nissan Armada is equipped with advanced safety systems, but seat belts remain one of the most critical elements of occupant protection. For this reason, NISSAN strongly recommends that all occupants in the Nissan Armada fasten their seat belts at all times, even when supplemental air bags are present.
Most U.S. states and Canadian provinces or territories require that seat belts be worn at all times when a vehicle is in operation.
WARNING
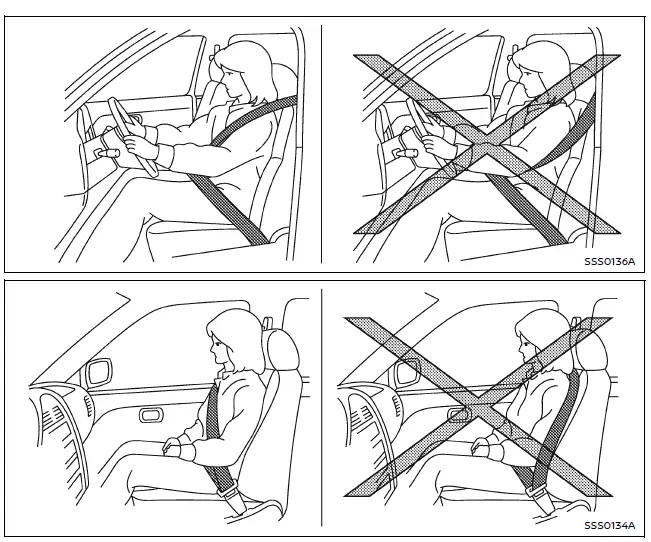
- Every driver and passenger in the Nissan Armada must wear a seat belt at all times. Children should always be seated in the rear seats and secured with an appropriate child restraint system when required.
- The seat belt must be properly adjusted to fit snugly. Improper use may
reduce the effectiveness of the restraint system and increase the likelihood
or severity of injury in an accident.
Failure to wear a seat belt correctly may result in serious injury or death.
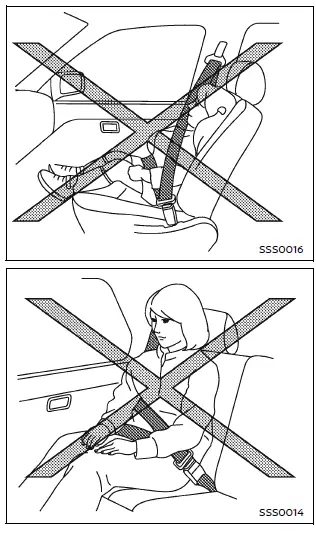
- Always position the shoulder belt over your shoulder and across your chest. Never place it behind your back, under your arm, or across your neck. The belt should stay away from your face and neck but remain securely on your shoulder.
- Position the lap belt low and snug across your hips, not your waist. A belt positioned too high may increase the risk of internal injuries during a collision.
- Ensure that the seat belt tongue is securely inserted into the correct buckle.
- Do not twist the seat belt or wear it inside out, as this can reduce its protective capability.
- Never allow more than one person to share a single seat belt in the Nissan Armada.
- Do not exceed the number of available seating positions equipped with seat belts.
- If the seat belt warning light remains illuminated while the ignition
is ON and all seat belts are fastened, this may indicate a system malfunction.
Have the Nissan Armada inspected by an authorized NISSAN dealer as soon as possible.
- Do not modify or alter the seat belt system in any way. Adding accessories or making changes that affect belt routing or tension may impair system performance and result in serious injury.
- If a seat belt pretensioner has been activated, it must be replaced along with the retractor. Service should be performed by a qualified NISSAN dealer.
- All seat belt components, including retractors and mounting hardware, should be inspected after any collision. NISSAN recommends replacing all seat belts that were in use during an accident unless the impact was minor and no damage is visible.
- Child restraint systems and their mounting hardware must also be inspected after a collision. Follow the manufacturer’s recommendations and replace any damaged components.
Pregnant women
NISSAN strongly recommends that pregnant women wear seat belts while traveling in the Nissan Armada. The lap belt should be positioned as low as possible across the hips, never across the abdomen, while the shoulder belt should pass over the shoulder and across the chest. Always consult a medical professional for personalized advice.
Injured persons
Injured occupants traveling in the Nissan Armada should continue to use seat belts when possible, depending on the nature of the injury. It is advisable to consult a healthcare provider for specific recommendations regarding safe seat belt use.
Proper seat belt usage in the Nissan Armada is essential for ensuring maximum safety and reducing injury risk, making it one of the most important habits for every driver and passenger.
Other materials
Engine Mechanical Tools and Preparation
Special Service Tool
The actual shapes of TechMate tools may differ from those of special service tools illustrated here.
Tool number
(TechMate No.)
Tool name Description
KV10116200
(NI-26336-A)
Valve spring compressor
1. KV10115900
(NI-26336-20)
Attachment
2.KV10109220
( — )
Adapter
D ...
Vehicle Security System Cannot Be Set
Description
Armed phase is not activated.
Diagnosis Procedure
CHECK INTELLIGENT KEY SYSTEM
Check Intelligent Key system. Refer to System Description.
Are all doors LOCKED?
YES>>
GO TO 2.
NO>>
Check Intelligent Key system. Refer to Diagnosis Procedure.
CHECK HOOD SWITCH
Check hood switc ...
Front Camera
Removal and Installation
REMOVALRemove the front grille. Refer to Removal and Installation.
Remove the front camera mounting screws , then remove the front camera .
INSTALLATIONInstall in the reverse order of removal.
Perform parameter writing. (With ProPILOT Assist 2.1) Refer to Work Procedure.
Pe ...