Exploded View
For exploded view of rear door regulator, refer to Exploded View.
Removal and Installation
REMOVAL
CAUTION:
Never damage rear door glass and rear door panel.
Remove rear door glass. Refer to Removal and Installation.
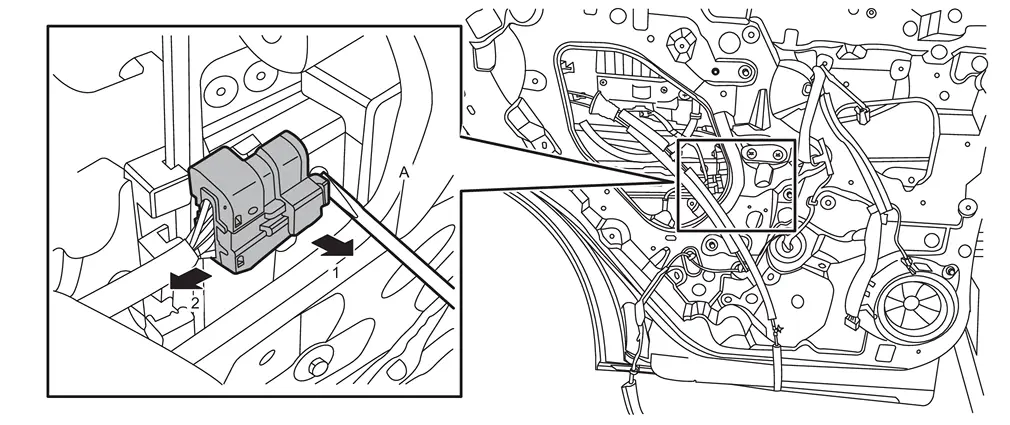
Disengage fixing portion using a remover tool (A) according to numerical order 1→2 as shown in the figure, and then disconnect rear door power window motor harness connector.
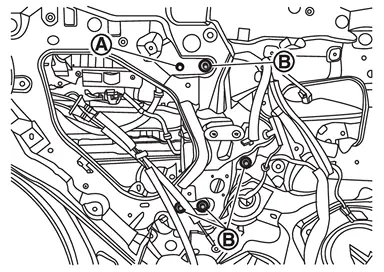
Remove mounting nut  and bolts
  , and then remove rear door regulator assembly.
INSTALLATION
Note the following items, and then install in the reverse order of removal.
CAUTION:
-
Check rear door regulator parts for lubrication. If necessary, apply body grease.
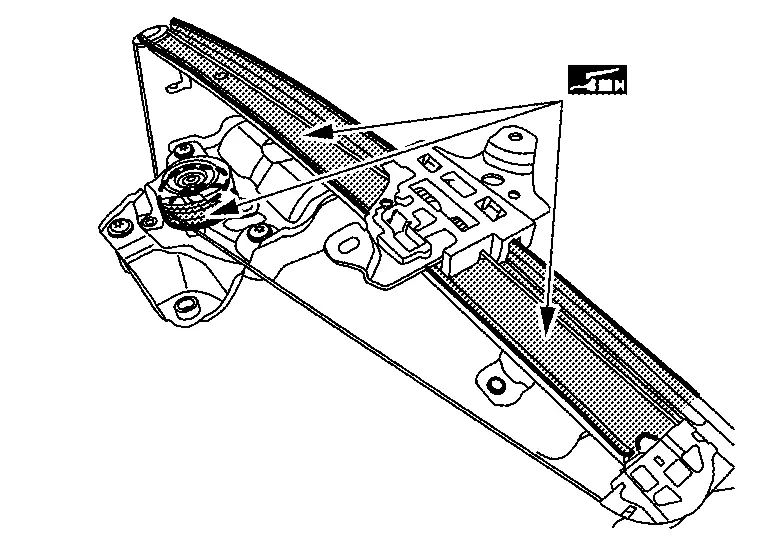

: Body grease -
Tighten rear door regulator assembly mounting bolts to the specified torque. Refer to Exploded View.
-
After installing rear door regulator, perform inspection and adjustment. Refer to Inspection and Adjustment.
Disassembly and Assembly
DISASSEMBLY
Remove rear door regulator assembly. Refer to Removal and Installation.
Remove rear door power window motor mounting bolts, and then remove rear door power window motor.
ASSEMBLY
Note the following item, and then assemble in the reverse order of disassembly.
CAUTION:
After assembly, perform the inspection and adjustment. Refer to Inspection and Adjustment.
Inspection and Adjustment
SYSTEM INITIALIZATION
Perform additional service for operating the power window control system normally after installing rear door regulator assembly. Refer to Work Procedure.
FITTING INSPECTION
-
Check that the glass is fitted securely into the sash groove.
-
Lower the glass slightly [approximately 10 to 20 mm (0.39 to 0.79 in)], and check that the clearance to the sash is parallel. Loosen each mounting bolt to correct the glass position if the clearance between the glass and sash are not parallel.
Other materials
Hill descent control system
Basic information
WARNING
Do not rely solely on the Hill Descent Control system in the Nissan Armada
to regulate speed on steep downhill slopes. Always maintain full control of
the vehicle and use the brake pedal when necessary. Extra caution is required
on slippery, muddy, icy, or ext ...
Rear Door Parting Seal
Removal and Installation
REMOVALRear Door Parting Seal FrontFully open rear door.
Remove rear door parting seal front clip.Apply protective tape (A) to rear door panel around rear door parting seal front clip for preventing damage.
Disengage fixing pawls using a remover tool (A), and then remove re ...
Charging System Tools and Preparation
Special Service Tools
Tool number
(TechMate No.)
Tool name Description
—
(—) Model GR8-1200 NI
Multitasking battery and electrical diagnostic station
Tests batteries, starting and charging systems and charges batteries.
For operating instructions, refer to diagnostic station instruction ...