
Nissan Armada 2025-2026 Service and Repair Manual: Removal and Installation
WARNING:
REMOVAL
Disconnect the battery cable from negative terminal. Refer to Removal and Installation
Drain brake fluid. Refer to Draining.
Disconnect ABS actuator and electric unit (control unit) harness connector  , follow the procedure below.
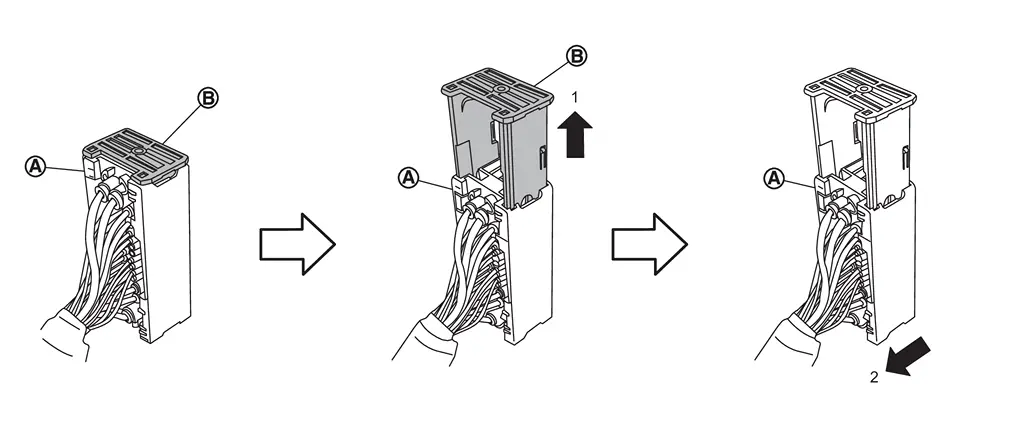
 of the connector toward the direction (1). Disconnect ABS actuator and electric unit (control unit) harness connector toward the direction (2).
Loosen flare nut of brake tube using a flare nut wrench.
Remove brake tube between electrical brake control unit to ABS actuator and electric unit (control unit).
Remove ABS actuator and electric unit (control unit) mounting bolt, then remove ABS actuator and electric unit (control unit).
CAUTION:
Never remove and never install ABS actuator and electric unit (control unit) by holding harness connector.
Be careful not to drop ABS actuator and electric unit (control unit) and apply excessive impact to it.
Remove bracket from ABS actuator and electric unit (control unit).
INSTALLATION
Note the following, and install in the reverse order of removal.
When replacing ABS actuator and electric unit (control unit), remove the inlet hole protector for brake tube just before performing.
When installing brake tube, tighten to the specified torque using a flare nut torque wrench so that flare nut and brake tube are not damaged. Refer to Exploded View.
Never remove and install actuator by holding actuator harness.
Bleed air from brake piping after installation. Refer to Work Procedure.
Never apply excessive impact to actuator, such as by dropping it.
Install ABS actuator and electric unit (control unit) harness connector
, follow the procedure below.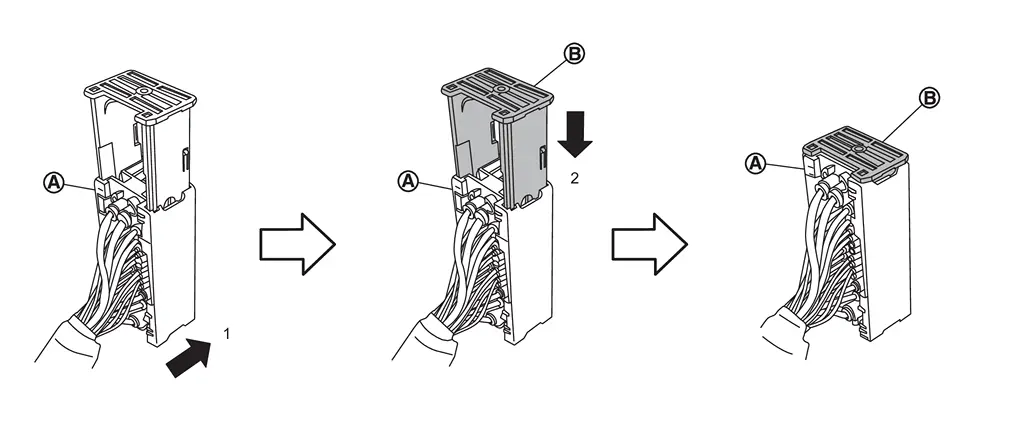
Install ABS actuator and electric unit (control unit) harness connector toward the direction (1).
Push the lock
of the connector toward the direction (2).
When replacing the ABS actuator and electric unit (control unit), perform "ADDITIONAL SERVICE WHEN REPLACING ABS ACTUATOR AND ELECTRIC UNIT (CONTROL UNIT)". Refer to Work Procedure.
 Exploded View
ABS actuator and electric unit (control unit) Bracket ABS actuator and electric unit (control unit) harness connector To electrical brake control unit primary side To electrical brake control u ...
 Wheel Sensor
...
Other materials:
Inspection
INSPECTION AFTER REMOVAL
Check the following items, and replace the part if necessary.
Ball Joint Inspection
Check boots of upper link, lower link and steering outer socket ball joint for breakage, axial play, and swing torque:
Upper link: Refer to Inspection.
Lower link: Refer to Inspection.
Steeri ...
Exploded View
Crankcase ventilation valve* Crankcase ventilation valve bolt* Resonator* Air duct 1 Gasket Air duct 3 (bank 1) Air duct 2 (bank 1) Inlet air duct 2 Bracket 1 Bracket 2 Air duct 2 (bank 2) Air duct 3 (bank 2) Grommet Mounting rubber Inlet air duct 1 Clip Air guide Air cleaner body ...
Forward-facing child restraint installation using LATCH
Before installing a forward-facing child restraint in the Nissan Armada, carefully
review all Warnings and Cautions provided in the "Child safety" and "Child restraints"
sections. Proper installation is essential to ensure maximum protection for your
child while traveling i ...

0.0064