
Nissan Armada 2025-2026 Service and Repair Manual: Removal and Installation
CAUTION:
Never damage the body panel.
REMOVAL
Front Kicking Plate
Disengage front kicking plate fixing pawls according to numerical order 1→3 indicated by arrows as shown in the figure, and then remove front kicking plate.
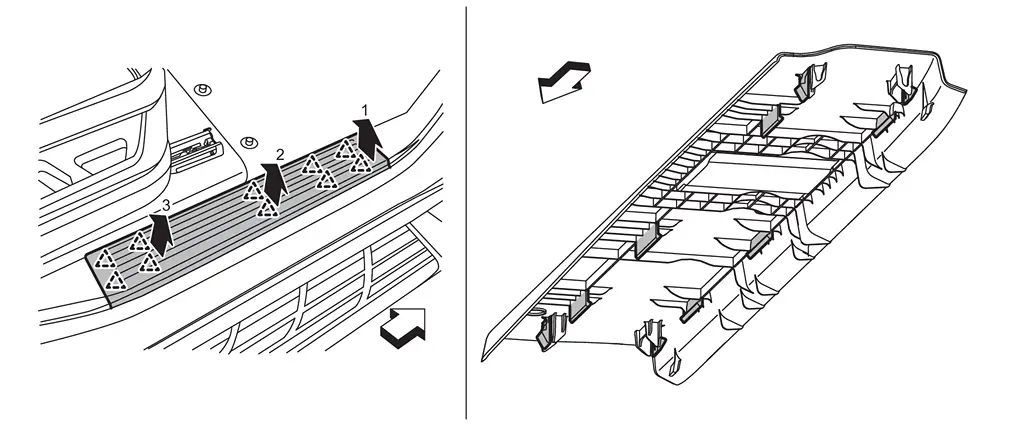
 | : Pawl |
 | : Vehicle front |
Rear Kicking Plate
Disengage rear kicking plate fixing pawls according to numerical order 1→3 indicated by arrows as shown in the figure.
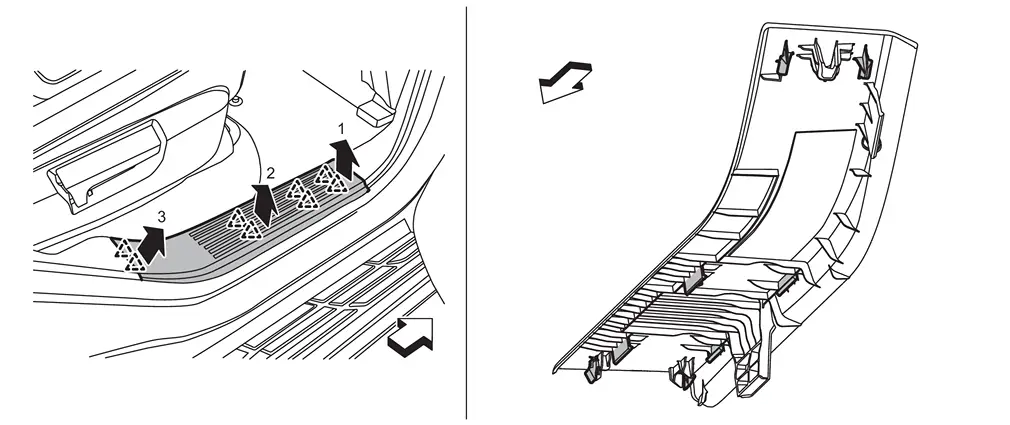
| : Pawl |
| : Vehicle front |
Disengage rear kicking plate from fixing part of trim metal clip, and then remove rear kicking plate.
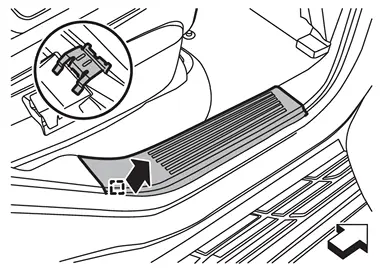
 | : Metal clip |
| : Vehicle front |
INSTALLATION
Note the following items, and then install in the reverse order of removal.
CAUTION:
Visually check metal clip for deformation and damage during installation. Replace with new ones if necessary.
Check in advance that pawls are accurately aligned with the portions on each finishers, and then install by pressing in.
 Kicking Plate
...
 Body Side Welt
...
Other materials:
Refilling
WARNING:
The ignition switch OFF.
Recommended fluid and capacity: Refer to Fluids and Lubricants.
CAUTION:
Carefully fill the fluid. (Fill up for approximately 3 minutes.)
Leave the vehicle for 3 minutes, and check the fluid level again.
Install filler plug on transfer and tighten to the specif ...
Removal and Installation
CAUTION:
Clean back door window glass and rear wiper refill so that back door window glass may not be damaged by dust, etc.
REMOVAL
Operate rear wiper to the auto stop position. Refer to System Description.
Remove rear spoiler. Refer to Removal and Installation.
Remove rear wiper arm mounting nut.
R ...
Exploded View
Air inlet tube 1 Bracket 1 Mounting rubber (upper) Bracket 2 Charge air cooler cover Clip Mounting rubber (lower) Bracket 3 Bracket 4 Air inlet tube 2 Air inlet hose Clamp Recirculation valve Turbocharger boost sensor Charge air cooler To electric throttle control actuator. Refer to ...

0.0054