
Nissan Armada 2025-2026 Service and Repair Manual: Removal and Installation
WARNING:
CAUTION:
Rear bumper fascia assembly is made of resin. Never apply excessive force to it, and be careful to prevent contact with oil.
REMOVAL
Remove rear combination lamp. Refer to Removal and Installation.
Remove fixing clips  and screws
  .
.
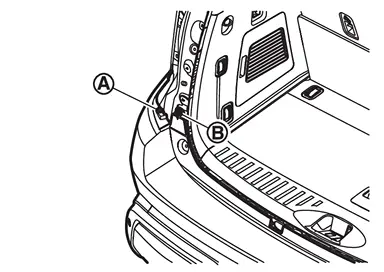
Remove mounting bolts .
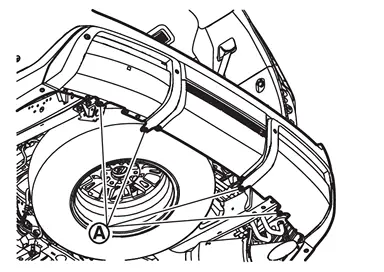
Remove fixing screws and mounting bolts .
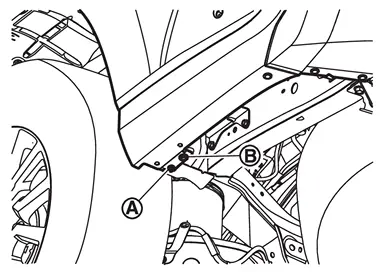
Remove fixing screws .
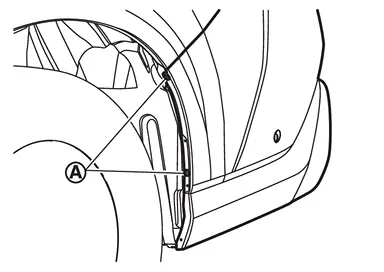
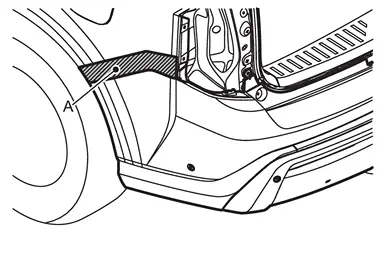
Apply protective tapes (A) on the part to protect it from damage.
Pull rear bumper fascia side toward the vehicle side to disengage the fitting of rear bumper side bracket and rear bumper fascia side according to the numerical order 1→2 as shown by the arrows in the figure.
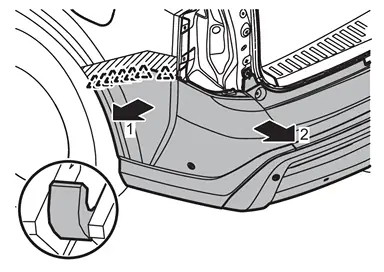
 | : Pawl |
CAUTION:
When disenagage rear bumper fascia assembly, 2 workers are required so as to prevent it from dropping.
Disconnect rear sonar sensor harness connector.
Disconnect rear side radar harness connector.
Remove rear bumper fascia assembly.
CAUTION:
When removing rear bumper fascia assembly, 2 workers are required so as to prevent it from dropping.
Remove the following parts after removing rear bumper fascia assembly.
Rear sonar sensor. Refer to SONAR SENSOR (REAR) : Removal & Installation.
Rear side radar. Refer to Removal and Installation.
Rear reflex reflector. Refer to Removal and Installation.
Hands free control unit and hands free sensors. Refer to Removal and Installation.
Bumper clips
Hands free sensor bracket
Rear bumper molding (LH and RH)
U nuts
Rear bumper bracket (LH and RH)
Grommets
Rear bumper finisher upper
Rear bumper finisher lower
Remove rear bumper energy absorber.
Remove mounting bolts, and then remove rear bumper stay A (LH and RH).
Remove mounting bolts, and then remove rear bumper stay B (LH and RH).
Remove mounting nuts, and then remove rear bumper side stay (LH and RH).
Remove rear bumper side bracket (LH and RH) fixing screws.
Disengage fixing pawls, and then remove rear bumper side bracket (LH and RH).
INSTALLATION
Note the following items, and then install in the reverse order of removal.
CAUTION:
Perform side radar alignment. Refer to Work Procedure.
Always replace double-sided tape with a new one when installing hands free sensor bracket.
Degrease a double-sided tape mounting surface.
Never wash the vehicle within 24 hours after installing so as to keep adhesive.
 NOTE:
NOTE:
After installing rear bumper finisher to rear bumper fascia, install rear bumper fascia assembly to the vehicle body.
If it is difficult to install the clips when assembling rear bumper finisher, install them in the following order.
Disassembly clips into pin and grommet.
Install grommet to rear bumper finisher.
Install pin into grommet.
Fitting adjustment cannot be performed.
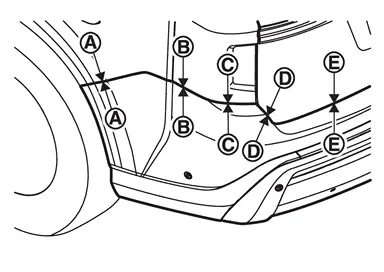
Portion Clearance Surface height difference Rear bumper fascia assembly – Body side outer panel – 0.1 - 1.0 mm
(0.004 - 0.039 in)(-1.5) - (+1.5) mm
[(-0.059) - (+0.059) mm]Rear bumper fascia assembly – Rear combination lamp – 0.1 - 2.9 mm
(0.004 - 0.114 in)(-1.2) - (+1.6) mm
[(-0.047) - (+0.063) mm] –
– 0.1 - 2.9 mm
(0.004 - 0.115 in)(-1.0) - (+1.4) mm
[(-0.039) - (+0.055) mm]Rear bumper fascia assembly – Back door assembly  –
– 3.0 - 7.0 mm
(0.118 - 0.276 in)(-1.0) - (+3.0) mm
[(-0.039) - (+0.118) mm] –
– 4.0 - 8.0 mm
(0.157 - 0.315 in)(-1.3) - (+2.7) mm
[(-0.051) - (+0.106) mm]
 Exploded View
Rear bumper side bracket LH Rear bumper bracket RH Rear bumper bracket LH Hands free sensor bracket
(with hands free sensor models) Double-sided tape
[t: 1.2 mm (0.047 in)]
(with hands free sensor ...
 Inspection
SIDE RADAR IRRADIATION AREA
For side radar irradiation area, refer to the figure below.
Rear bumper fascia Side radar irradiation area Reference point (R end) C 115 mm
(4.53 in) (vertical line) ...
Other materials:
Work Procedure
Description
When TCU is replaced, TCU configuration is required.
Preparation before configuration operation
Subscribe to telematics service.
Preregister user ID and password (can be performed from owner homepage).
Since VIN data is not included in the TCU after replacement, it is required to write ...
Stone Guard Coat
WARNING:
To prevent damage caused by stones, the lower outer body panel (fender, door, etc.) have an additional layer of Stone Guard Coating over the ED primer coating. When replacing or repairing these panels, apply Stone Guard coating to the same portions as before. Use a coating which is rust pre ...
Removal and Installation
REMOVAL
Remove front grille upper. Refer to the following.
Off road models: Removal and Installation
City models: Removal and Installation
Disconnect exhaust gas/outside odor detecting sensor harness connector .
Disengage fixing clip, and then remove exhaust gas/outside odor detecting sensor har ...

0.0071