
Nissan Armada 2025-2026 Service and Repair Manual: Removal and Installation
REMOVAL
Remove front seat LH. Refer to Removal and Installation.
Remove front kicking plate inner LH and rear kicking plate inner LH. Refer to Removal and Installation.
Remove dash side finisher LH. Refer to Removal and Installation.
Remove center pillar lower garnish LH. Refer to Removal and Installation.
Flip the carpet to allow the work space.
Remove the around view monitor control unit mounting bolt  and nuts
  , and then remove the around view monitor control unit
  .
.
 | : Vehicle front |
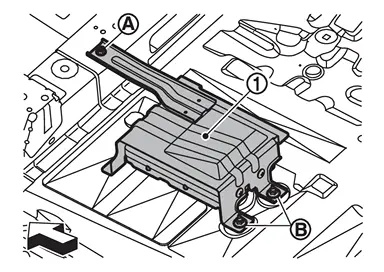
Disconnect the around view monitor control unit harness connectors.
INSTALLATION
Installation is the reverse order of removal.
CAUTION:
Perform the “ADDITIONAL SERVICE WHEN REPLACING AROUND VIEW MONITOR CONTROL UNIT� when after replacing around view monitor control unit. Refer to Description.

 Front Camera
...
Other materials:
Refilling
WARNING:
The ignition switch OFF.
Recommended fluid and capacity: Refer to Fluids and Lubricants.
CAUTION:
Carefully fill the fluid. (Fill up for approximately 3 minutes.)
Leave the vehicle for 3 minutes, and check the fluid level again.
Install filler plug on transfer and tighten to the specif ...
Diagnosis Procedure
CHECK AUTO OPEN/CLOSE FUNCTION
Check auto open/close function using automatic back door switch.
Is the inspection result normal?
YES>>
GO TO 2.
NO>>
Refer to Diagnosis Procedure.
CHECK BACK DOOR OPENER SWITCH
Check back door opener switch.
Refer to Component Function Check.
Is the insp ...
Work Flow
OVERALL SEQUENCE
DETAILED FLOW
GET INFORMATION FOR SYMPTOM
Check operation condition of the function that is malfunctioning.
>>
GO TO 2.
CHECK DTC
Check DTC.
Perform the following procedure if DTC is detected.
Record DTC and freeze frame data (Print them out using CONSULT.)
Erase DTC.
Ar ...

0.0084